Why Do I Have Two Panopto Accounts and How Can I See Videos in the Other Account?

The Problem

When we added Brightspace to our digital learning environment this fall, we added an integration to Panopto. One of the complexities of getting systems to work well together is that sometimes they don’t play well together due to unique system requirements. We found one of these requirements in setting up Brightspace. When selecting what username to use with Brightspace we discovered that we could not use the Wentworth email address as we had used in Blackboard. Using an email address as the username would have interfered with the email functionality that instructors use heavily and required that we disable that functionality. So instead, we used the username part of the email address and were able to set up Single Sign-On.

When we added the integration to Panopto, however, we discovered a problem. For Panopto to recognize users as the same person and unify the accounts, the username had to be the same. So, Panopto created new accounts when users entered the system from Brightspace.

For users who have never used Panopto, this won’t be a problem. For users with extensive content in their “unified” accounts, this presents a challenge. However, this challenge is not insurmountable. With a few tweaks to permissions, you can see the content of the “unified” account in the “Brightspace” account. You can even move the content from one account to the other if you ensure the permissions are correct. So, how do you accomplish these tasks?

Adding Permissions to Panopto Folders

Unfortunately, you can’t add permissions to your “My Folder” in Panopto. But you can add permissions to subfolders. Since most users with a lot of content have this content in folders by course, you can simply add your “Brightspace” Panopto user account to the folder with the same permissions as your “unified” user account. To see the permissions set on a folder, click on it to display the content, and then when in the folder, click on the gear icon at the top right corner of the page to see the folder location and sharing information:

Subfolder file list showing settings, gear, icon

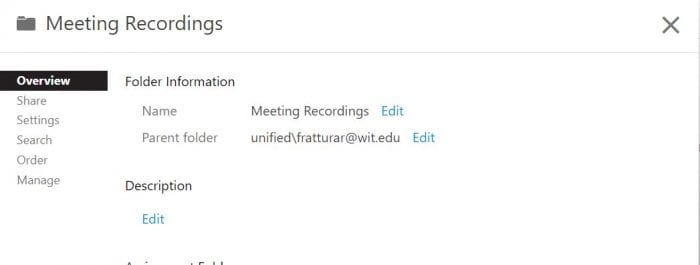
In the settings window, on the overview tab, you will see the parent folder location. This is the account that the folder is associated with. In the example below, the folder is in the unified account of Ron Frattura (fratturar@wit.edu). “Unified” accounts were created when users logged in from Blackboard.

Parent Folder Location Screenshot

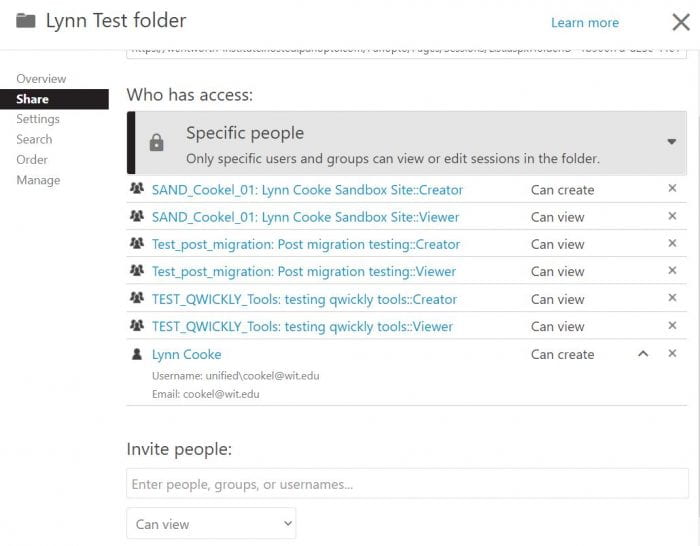
In the Share tab, you can see which users (accounts) can access this content. In the example below, in addition to course access, only my unified account can create content. Using the invite people section, I can add my “Brightspace” account to this folder.

Panopto sharing information showing course level access and account level access

To add another account to share a folder, start typing the user’s name or username in the Invite People text box. If you are in your “unified” account, you will be looking for a “Brightspace” user, if you are in your “Brightspace” account, you will be looking for a “unified” user.

Sharing screen showing selection of Brightspace account

Note: You’ll want to add usernames with the following patterns:

  • \Brightspace\WIT-username
  • \unified\WIT-email-address

These will give access to your accounts and not to your account associated with a course or specific video.

After selecting the account, select the permissions for the share, you’ll want to have the creator value selected to be able to edit or move any content. In the example below, I’ve left the notify box checked so that I receive an email when the change occurs. You can leave this unchecked if you prefer not to have the extra email. Click the Send and Save changes to add the sharing to your second account to the folder.
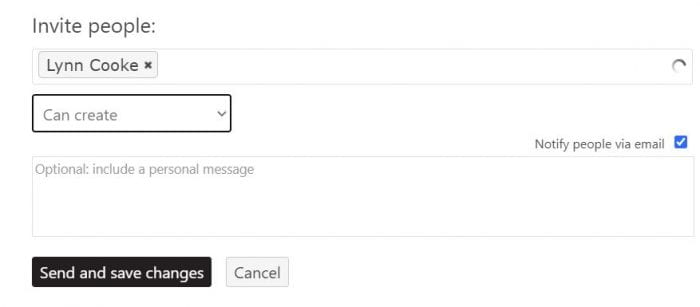
Invite people screen with "can create" selected as the permission level.Once you have shared with your second account, you will see both listed under the sharing access-list along with the associated permissions – they should be the same:
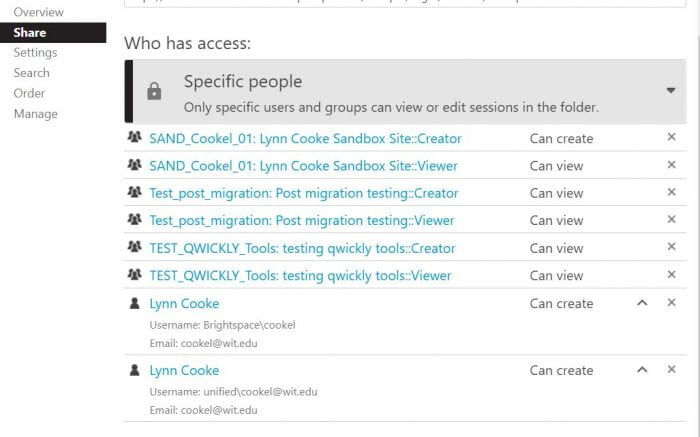
Sharing window, listing two accounts and permissionsOnce you’ve done this on your “unified” account, you should set up folders to receive content on your “Brightspace” account and share with your “unified” account. Sharing all folders with both accounts will make it easier to move content from one account to another.

Moving Content

Once you have permissions set on your folders, you can move content by the folder from one account to another. Enter a folder to see your videos. Click the checkbox to the left of the video – if you see a preview the checkbox will be in top left of the preview image. A series of buttons will appear at the top toolbar, one of them will be move, click the Move button:
Panopto file list showing move button

In the Move Sessions window, start typing the name of the folder the new location for the videos, and a list of options available to you will appear:

Move Sessions window in Panopto showing folder name entry and popup of available optionsSelect the location you want for these videos and a move button will appear. Click the move button to move the recordings to their new locations.

Move sessions window showing move buttonBy selecting multiple videos, you can move many videos at once. Repeat this process for additional folders.

We will be modifying accounts in Panopto, hopefully before summer 2021, to unify all the accounts. Our Blackboard contract ends on June 30, 2021. Access to Panopto will end before that date when we end access to Blackboard. You will not lose any content- it will remain in the Panopto accounts that you have. We will either manually move the content or, working with Panopto, unify the existing accounts.

More information to come as we plan this part of our journey.

Spring 2021 LMS Course Locations

Spring 2021 Courses are open in both Blackboard and Brightspace

To provide faculty with the flexibility and agency they’ve asked for, all Spring courses are now open and available in both Blackboard and Brightspace.

To provide students with direction, we ask faculty to :

    • Check the  LMS Course Locations – Spring 2021.xlsx spreadsheet to make sure it accurately reflects where they will teach each of their course and send an email to lit@wit.edu with updates.
    • Post a welcome announcement in each of your courses to notify students where you’re teaching the course, in the Brightspace or Blackboard.

Communication and Resources for Students:

Please change course availability in the LMS you’re not using

All Spring 2021 courses are active in both Brightspace and Blackboard. to make your course unavailable in the LMS you’re not using, follow these instructions.

If you can’t find your course in either system, please open a TechSpot ticket and provide the CRN number for the course so that we can troubleshoot your issue.

Qwickly Module has gone missing!

If you are a regular user of Qwickly Course Tools to quickly add content, make announcements, or send email to multiple classes, you may have noticed that the large Qwickly module has disappeared from the My Wentworth tab in Blackboard. During our migration to the SaaS environment, we shifted from the building block implementation to the LTI integration for this tool. This change means that the large module is no longer available.

Can you still use these popular and useful tools? Not to fear, check the tools module on the My Wentworth tab for a new link:
Blackboard My Wentworth tab tools module with last item, Qwickly tools, highlighted

Click on the Qwickly Tools link, and a new window will open with the familiar tools you have always used.

Changing Course Availability and Available Dates in Brightspace and Blackboard

Standardize Automatic Opening of Courses

With a new LMS comes change. Not just a new system to learn but some new standards as well. With all the changes involved in the university’s move from colleges to schools, we need to standardize ways of doing things across all academic programs. One of these changes is to standardize the automatic opening of courses. In the past, CPCE courses opened a week before classes started and full-time undergraduate courses opened up the day before classes started. With the shift of all part-time degree programs from CPCE to the schools and the code changes that came with this shift, it became obvious that maintaining custom codes to set opening dates was no longer a good option. After discussion with multiple offices and stakeholders (academic leaders, senate, registrar), we are moving to a single standard opening date for all courses in Brightspace. Starting with Spring 2021 all courses, full-time or part-time, will open one week before the first day of classes.

Instructors Can Override Course Opening Dates

What if that timing does not work for you? Let’s say you are putting some finishing touches on your course and don’t want students confused by the last-minute changes? We have you covered. Instructors have the option to override the course opening dates and availability of courses.

Here’s how you change course availability in Blackboard

Here’s how you change course availability in Brightspace:

    1. Navigate to the course whose opening dates or availability you want to change.
    2. Click on the Course Admin link in the navbar:
      Course Navbar with course admin link highlighted
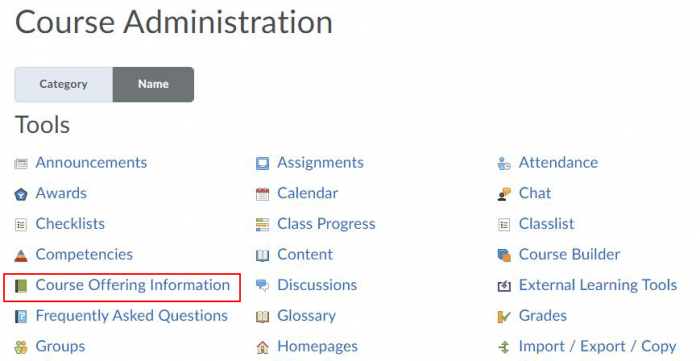
    3. Click on the Course Offering Information link
      Course Admin page sorted by category with Course Offering Information link highlightedORCourse Admin Page sorted by name with course offerings information highlighted
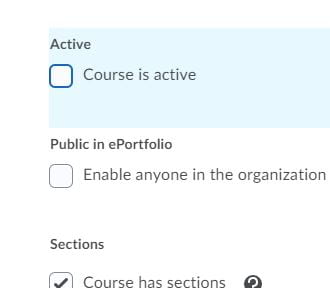
    4. To change the course availability, scroll down to the section marked “Active”
        • In Brightspace Active = Available in Blackboard.
        • To make the course unavailable uncheck the active checkbox.Course Offering Information page showing course active status checkbox
      • To change the dates the students can access the course, scroll down to the start and end dates.
        Course Offering Information page showing start and end dates fields

        • Click checkboxes for start and/or end dates and enter the dates you want students to be able to access your course.
        • Students will see a tile for active courses they are enrolled in outside of the dates they are available. They will not, however, be able to access the course until the date it opens.

February 2021: Based on advice from D2L we have disabled the ability to change course status/availability. To make a course unavailable to students, change the date range to make it unavailable. The availability dates are visible to students and this change will reduce confusion.

Revisiting Grading: Grading in Brightspace – Part 1: Averages

In an earlier post, I discussed how Blackboard calculates averages – something that can lead to confusion and suspicion that the system is not calculating grades correctly. Because we are changing Learning Management Systems (LMS), I’m revisiting this topic this time using Brightspace as the reference system.

Common problems and questions crop up every term around grading. Often grades don’t seem to be calculated correctly and we are asked if there is a bug. The most common reason grades don’t match expectations is that there is a mismatch between how an LMS performs calculations and how an instructor/student thinks the calculation should be performed.

What do we mean by average?

Average and weighted cause the bulk of our calls about miscalculations. Averages can be equal or weighted. And weighted columns can have weights on categories (which can be averaged equally or proportionally). Often, we see calculations that are identified as an average but it’s unclear whether the intent is a weighted average or equal average.

For example, let’s consider a midterm grade calculation for the following grades:

  • Homework 1 – 80%
  • Homework 2 – 100%
  • Homework 3 – 60%
  • Homework 4 – 80%
  • Project topic – 100%
  • Project annotated references – 80%

What would the average of these grades be? Most of us would calculate a simple unweighted average (add the grades up and divide by 6) and arrive at a midterm average of 83.3%.

But what about these grades:

  • Homework 1 – 4 out of 5 points
  • Homework 2 – 5 out of 5 points
  • Homework 3 – 3 out of 5 points
  • Homework 4 – 12 out of 15 points
  • Project topic – 5 out of 5 points
  • Project annotated references – 4 out of 5 points

What would be the average of these scores? Would the average be 85.2 % or 83.3 %?

(4 + 5 +3 +12 +5 + 4) ÷ 40 = 0.825 or 82.5%

[(4/5) + (5/5) + (3/5) + (12/15) + (5/5) + (4/5)] ÷ 6 = 0.833 or 83.3%

Both calculations are mathematically correct calculations, however the first weights homework 4 more heavily because it is worth more points. The second calculation is an unweighted average.  Dividing each score by the points possible normalizes the values so they are equal in weight. It’s important to know which type of average you want to calculate so you set up your gradebook appropriately. It’s also important to communicate to students how you calculate the average so that they can better understand how they are doing in your course.

Calculated Columns – What’s the math behind the columns in Brightspace?

Brightspace has two types of calculated columns, Formula and Calculated. The formula type calculation, allows you to specify a formula to calculate a grade. So for example, you have a term project with multiple components that are graded, each part contributing a different proportion to the final project grade, you can specify the columns storing the individual grades and their weights. The calculated column averages the grades using proportional weighting. A valuable feature of the Brightspace grade book is that sample calculations are provided so you can know how the grade will calculate.

Screenshot showing sample calculation

Calculated columns in Brightspace are used for calculating milestone or final grades. Milestone grades are not included in the final grade calculation and are useful for providing grade status at varying points of the semester (eg. midterm grades or to display a project grade).

Like Blackboard, Brightspace allows for a wide variety of grading systems. In the next post, I’ll discuss the different types of weighted grade calculations in Brightspace and how you can set-up the Brightspace Grade Center to handle complex grade calculations.