Content Page Overview
Click on the circular blue numbers on the image to learn more about the various options on the Content page of your Brightspace course.
Get Started
As the instructor, you can create course content in various methods. If you have taught the course before, you can copy course content over from a previous semester or if this is a new course that you are teaching, you can build and upload all the content from scratch.
Course Build Checklist
Ready To Build Your Course In Brightspace?
Preparation is key! Here are some useful tips for preparing your course. As an instructor, it is important to help your students navigate the learning management system and provide them with expectations on how to view course materials and where to submit assignments.
View our Course Build Checklist for details.
Copy Course Components
Import/Export/Copy Components
The copy components tool lets you copy quizzes, content, grade items, discussion forums, Assignments folders, and nearly every other type of component from another course offering or a course offering’s parent template. Copying components saves you from having to recreate your course’s resources and can significantly reduce the amount of work required to create or re-offer a course.
You can use the copy components feature to:
- Reuse components created in a previous course offering.
- Add components created by your peers into your own course offering.
- Set up standard components inside a course template and copy them into a new course offering each time a course is re-offered.
- Offset dates and times to coordinate with the section schedule.
Step By Step Instructions To Copy Course Components
- Make sure you’re in the course you want to copy components TO.
- On the navigation bar, click Course Admin.
- From the list, click Import/Export/Copy Components.
- Click Copy Components From Another Org Unit.
- Click Search For Offering.
- Type in the CRN of the course you want to copy components FROM.
- Click the Add Selected button at the bottom of the course list.
- Choose from Copy All Components or Select Components.
- If you choose Copy All Components, it will begin the process of copying everything from the course selected. If you choose Select Components then it will allow you to choose the components you want to copy over.
- Once everything you want to copy is selected, click the blue Continue button at the bottom of the list.
- If you’d like to offset the dates or times, change the dates accordingly otherwise click the blue Finish button.
- Your components will begin to process and copy over. When complete, click the View Content to view the content was copied over.
Post-Copy Checklist
Content Clean Up After Copying
If you copied an entire course or some components of another course, it is good practice to view the content that was brought over to the Brightspace course and make any revisions to prepare for the start of the semester. Here are some key components to focus on when cleaning up any copied content.
- Revise and replace the syllabus.
- Grade book clean-up is imperative to ensure that the correct grade items, categories, weights, and points are accurate. Check out the Grade Book tab on the left side bar menu to get more information on the Grade Book tool in Brightspace.
- Update due dates of assignments, discussions, and quizzes.
- Delete old announcements.
- Check the overall content for files, assignments, quizzes, discussions, and broken links to external webpages.
- Check setting for third-party tools.
- Verify Settings for assignments, quizzes, and discussions.
Additional Resources:
View our Post-Copy Checklist for details.
How To’s For Course Content
Step by Step tutorials, videos, and infographics on content related topics can be found here.
Create A New Module
Creating Content via Modules
You must create a module before you can add topics. You can create submodules (modules within existing modules) to establish a deeper hierarchy.
Create modules to organize your course content. For example, you can create a module for each week or for each unit
Step By Step Instructions To Create a Module
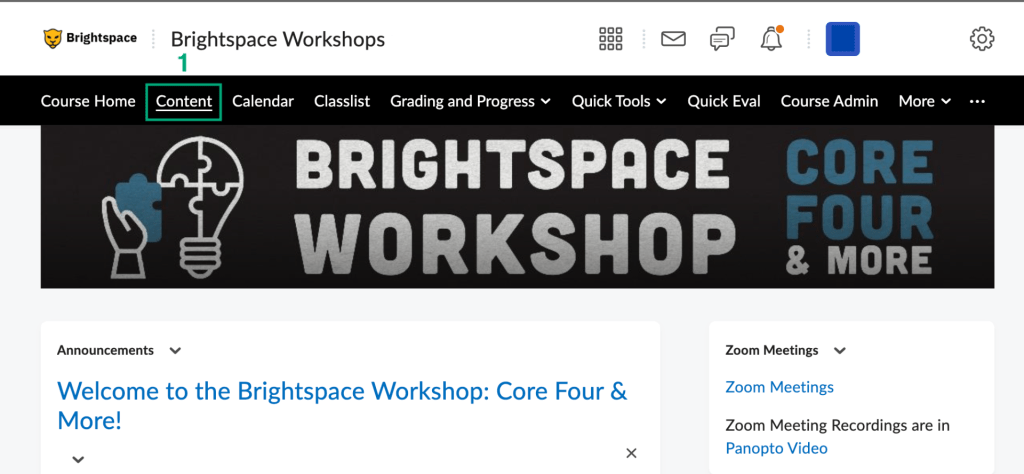
- On the navigation bar, click Content.
- In the Table of Contents panel, in the Add a Module field, enter the name of the new module and then press Enter.
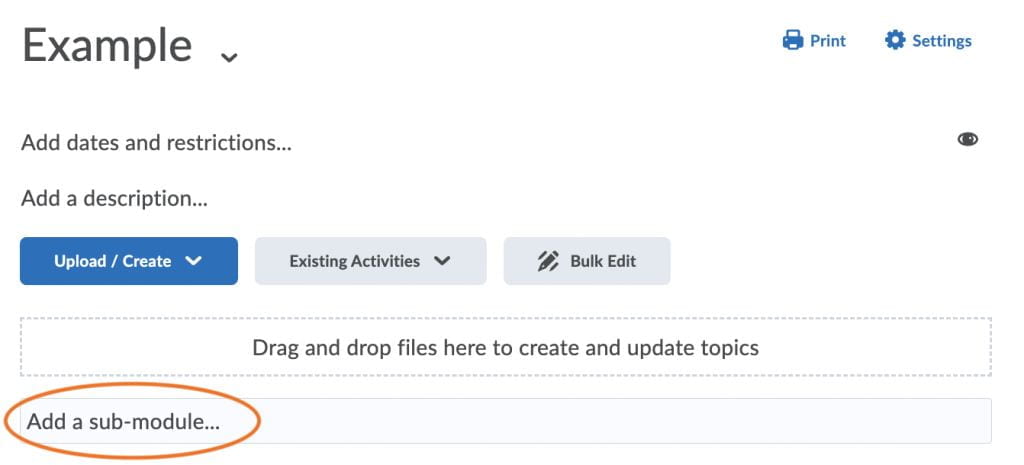
Create A Sub-Module
Step By Step Instructions To Create a Sub-Module
- Once a module is created, a sub-module may be created by clicking on the module name and click Add a Sub-Module.
- Type in the sub-module name and click Enter.

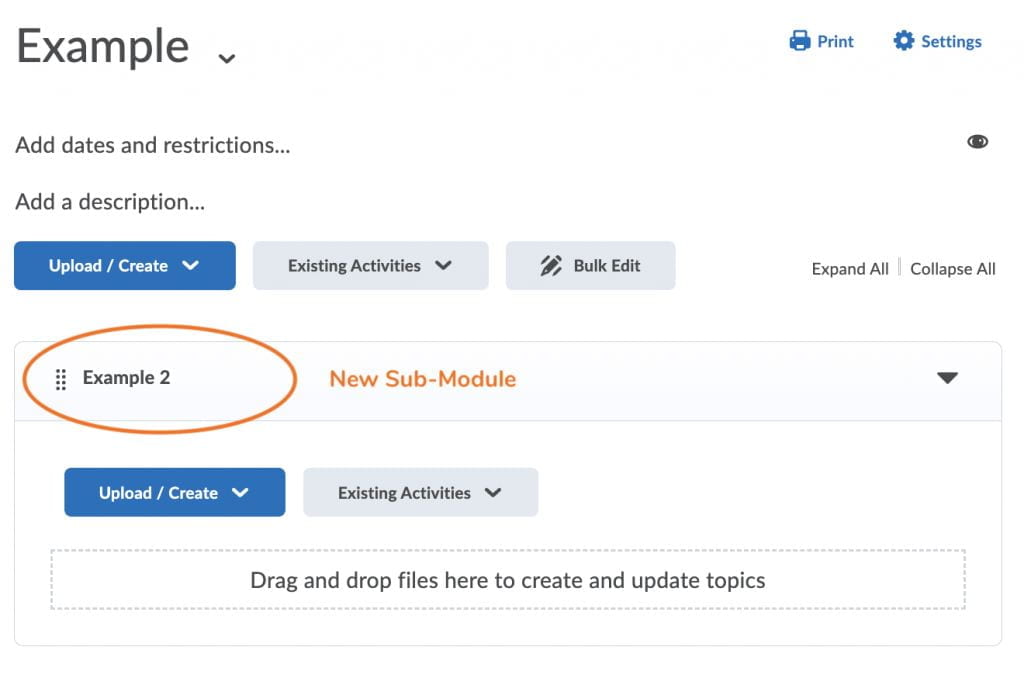
3. The image below showcases how the sub-module will look once created.
Video: Add All Kinds of Content
How to Add All Kinds of Content
Third Party Apps For Content
As the instructor, you can create course content with various third party apps that integrate seamlessly with Brightspace.
Upload Panopto Videos to A Module
Upload Your Panopto Videos To A Module
Log into your Panopto and make sure the video is able to be shared before proceeding through the following steps.
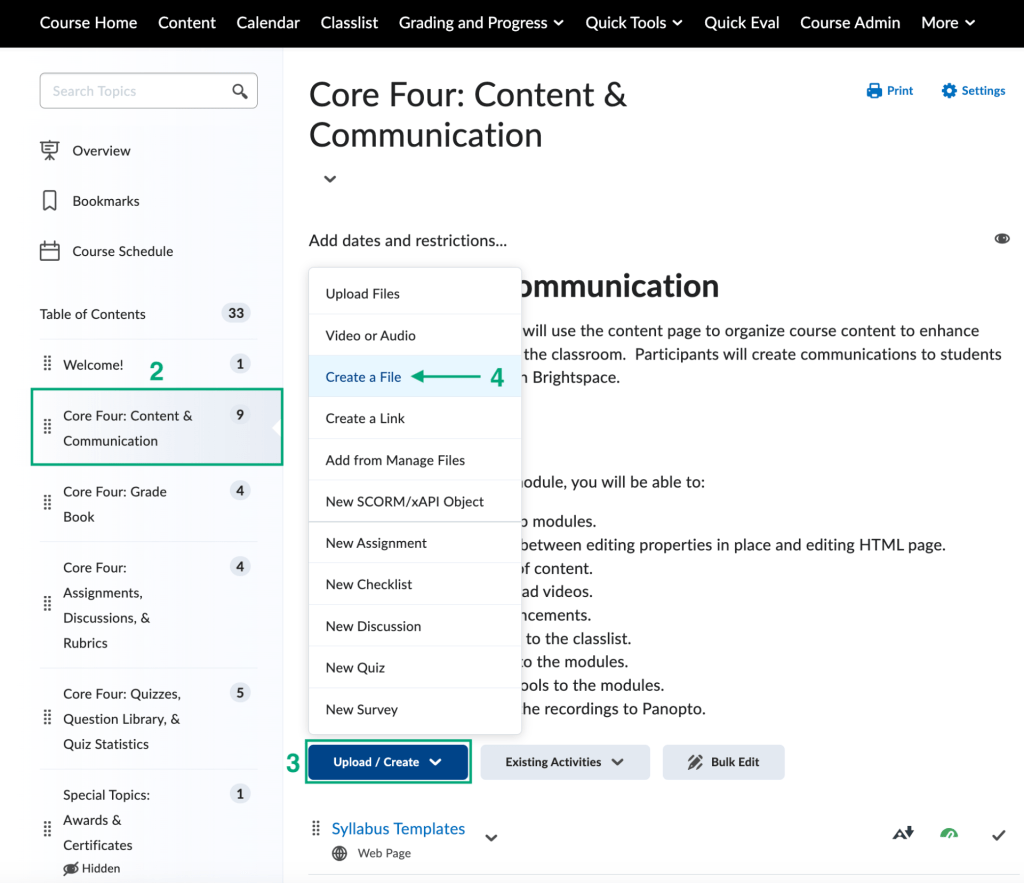
Step by Step Instructions to Upload a Panopto Video
1. On the navigation bar, choose the Content tab.
2. Choose the module/week/unit you want the Panopto video to be uploaded to.
3. Once in the module/week/unit, click the blue Upload/Create button.
4. From the drop down list, choose Create a File.
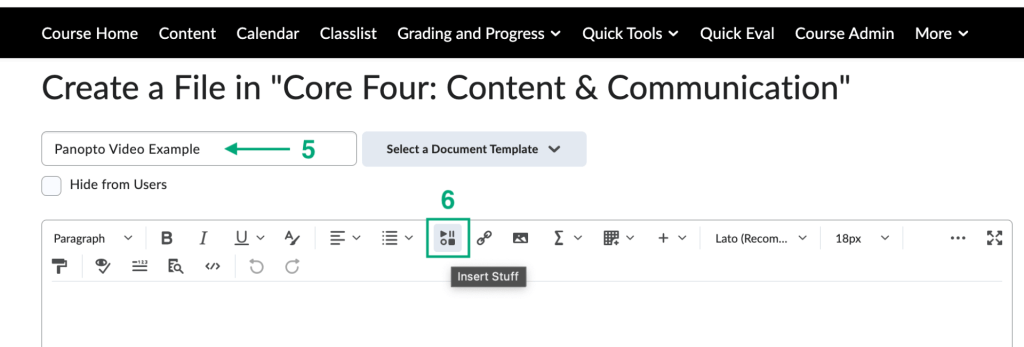
5. Name the file.
6. Click the Insert Stuff Button.
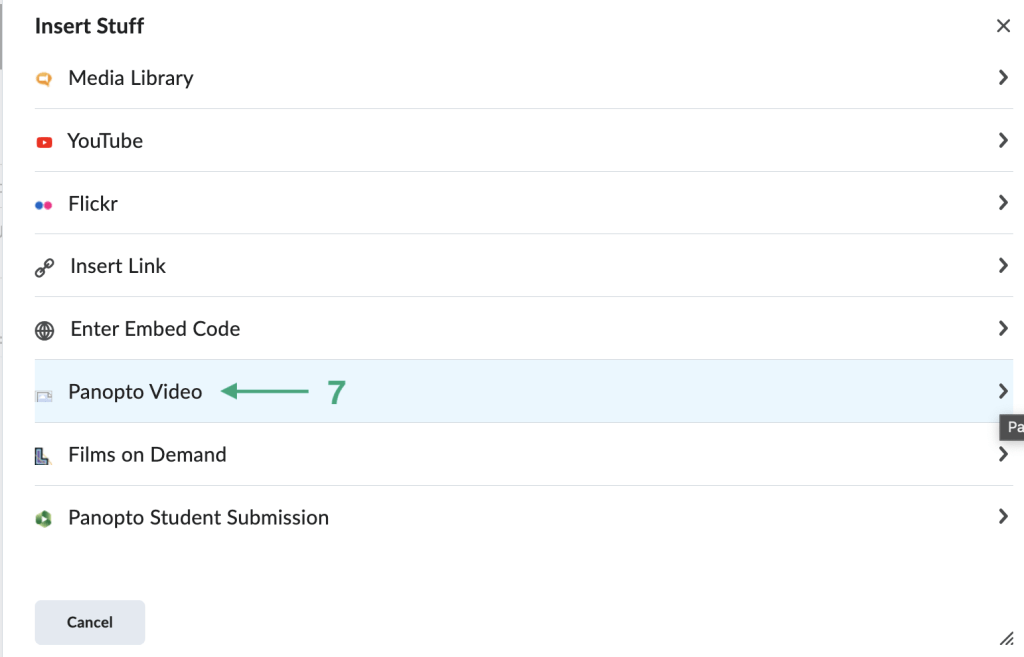
7. A pop-up will open, scroll down the list until you see Panopto Video and then click the link.
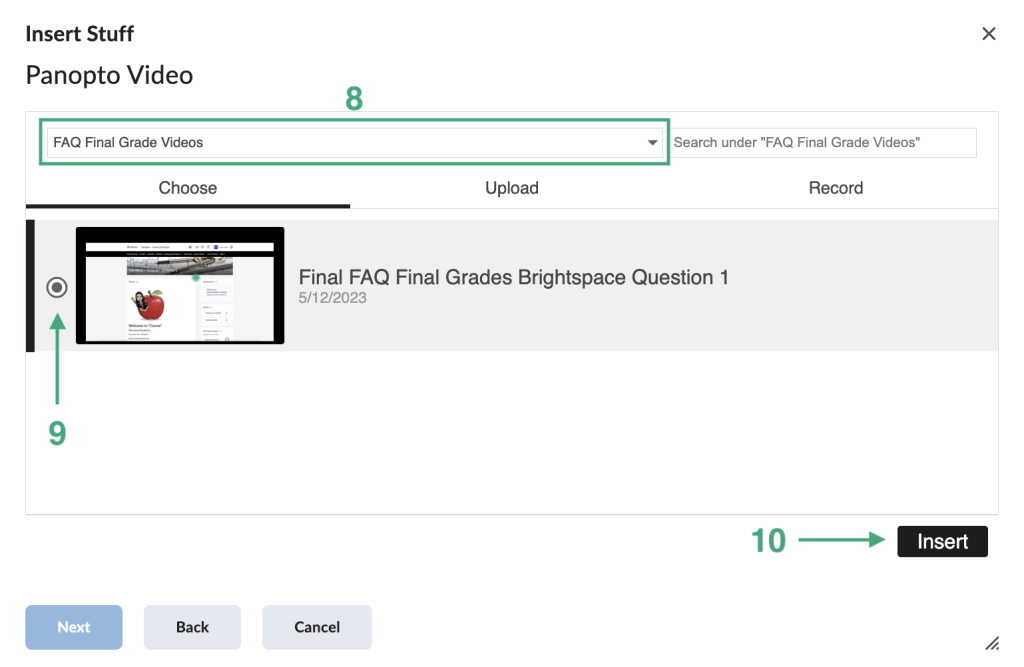
8. A pop-up will open after clicking the panopto video link in the previous step. Go to My Folder or search for the video file you want to upload.
9. Choose the file you want to upload from your list within the folder you chose by selecting the bubble next to the video.
10. Click the black Insert button.
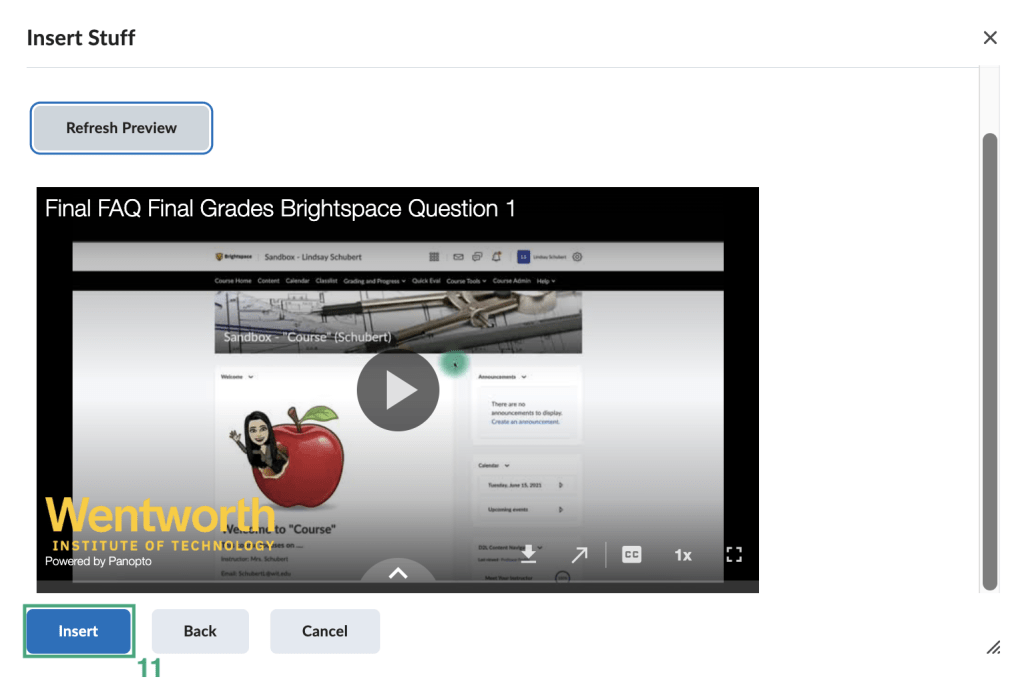
11. You can preview the video before it is officially uploaded. Click the blue Insert button.
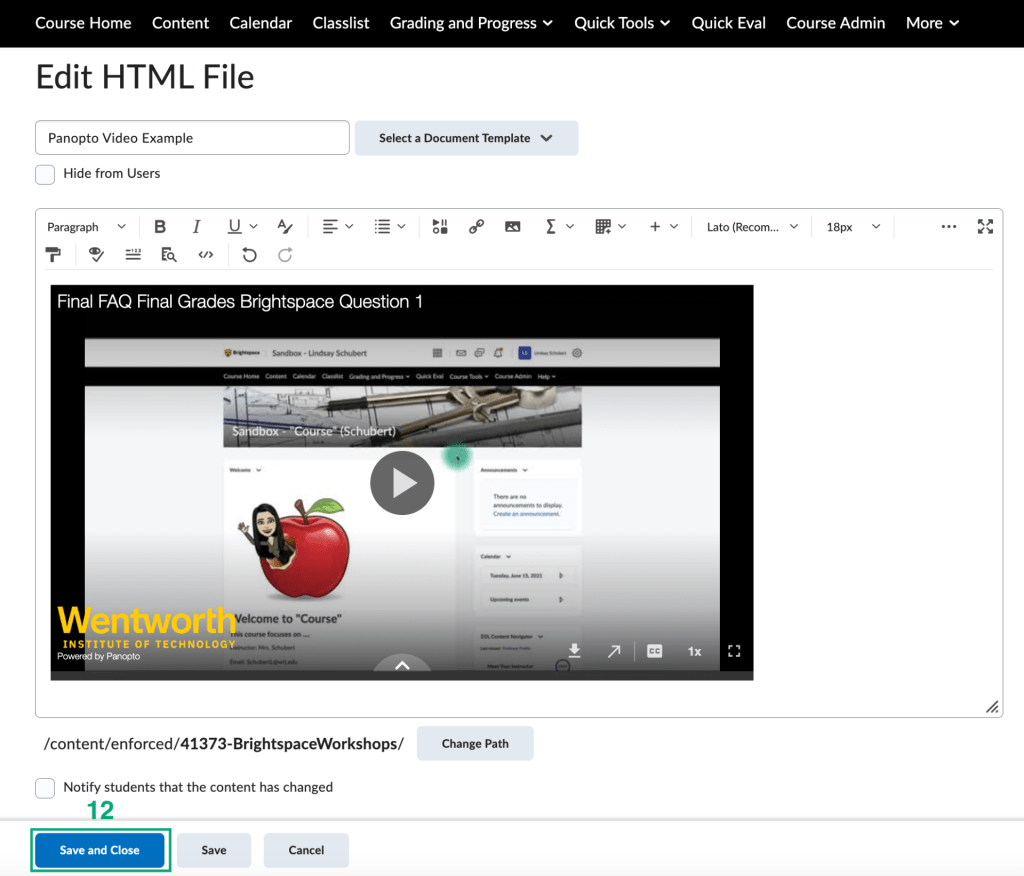
12. The Panopto video will not be embedded in the html text box. Click the blue Save and Close button.
Add MyLab And Mastering To A Module
Integrate The MyLab And Mastering App To A Module
1. On the navigation bar, choose the Content tab.
2. Navigate to the module you want to add the MyLab and Mastering link to.
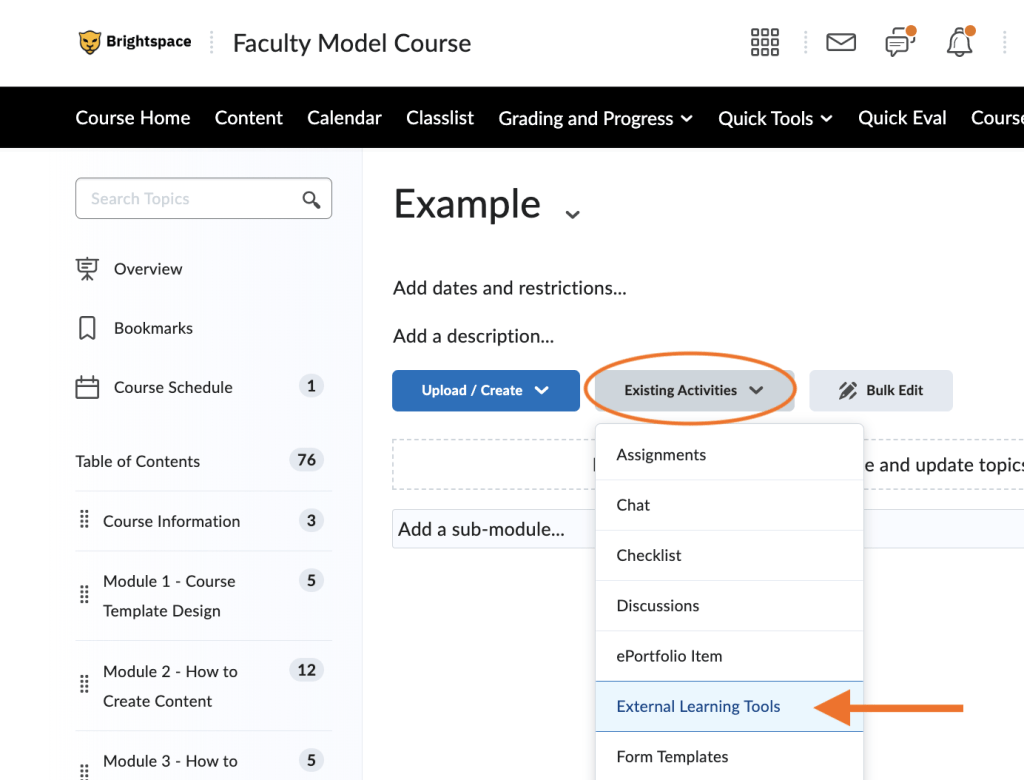
3. Click the Existing Activities button and choose External Learning Tools from the drop down list.
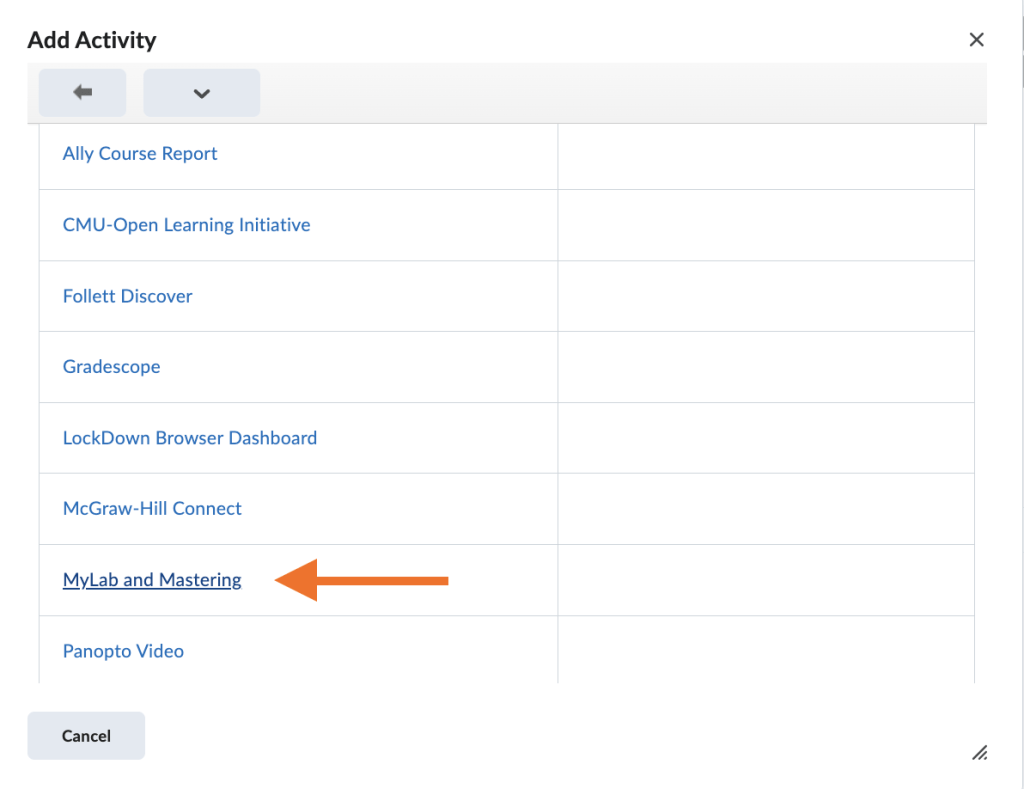
4. An Add Activity page will pop-up, scroll until you see MyLab and Mastering, click the link.
5. After clicking the link, it will populate in the module content.

Embed ThingLink To A Module
Embed A ThingLink Into A Module
1. Log into your ThingLink account and go to the ThingLink you want to embed onto your Brightspace course.
2. Click the Share button, found on the top right corner.
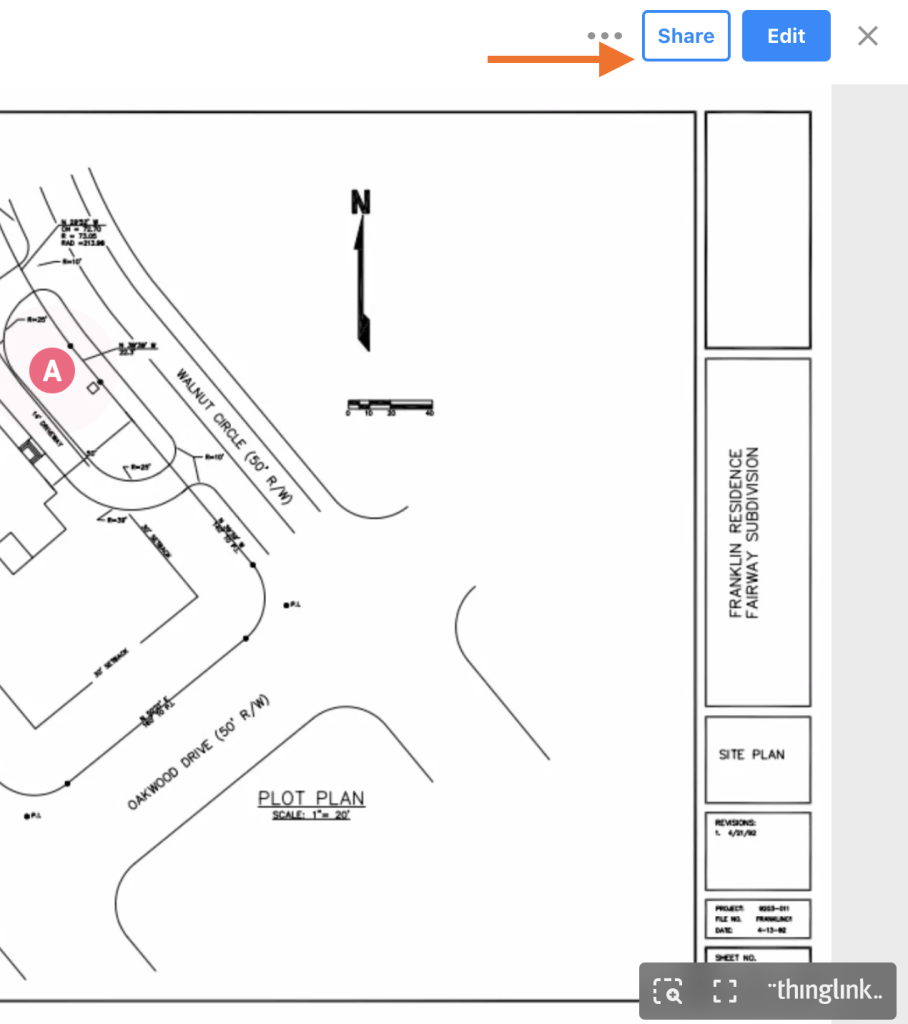
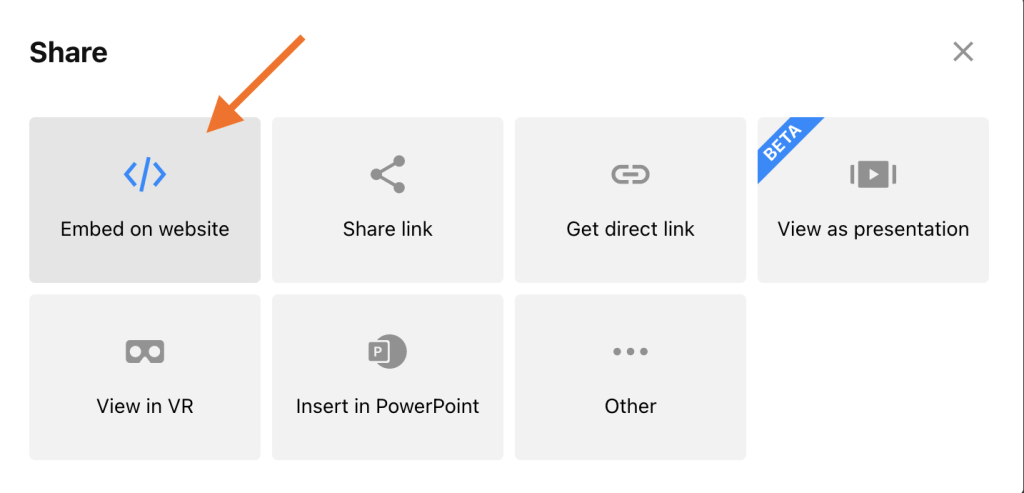
3. From the pop-up options, choose Embed On Website.
4. On the pop-up screen, click on the box next to Include web accessibility link and then click copy.

5. Go to the Brightspace course you want to embed the ThingLink file into.
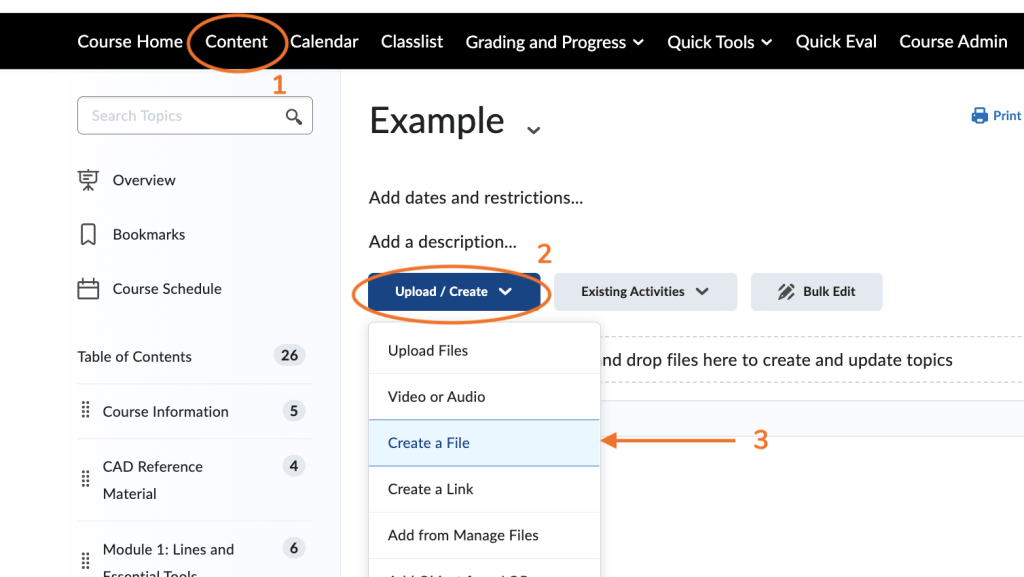
6. On the navigation bar, choose the Content tool.
7. Find the module you want to embed the ThingLink into or create a new one.
8. Click the blue Upload/Create button and from the drop down list, choose Create A File.
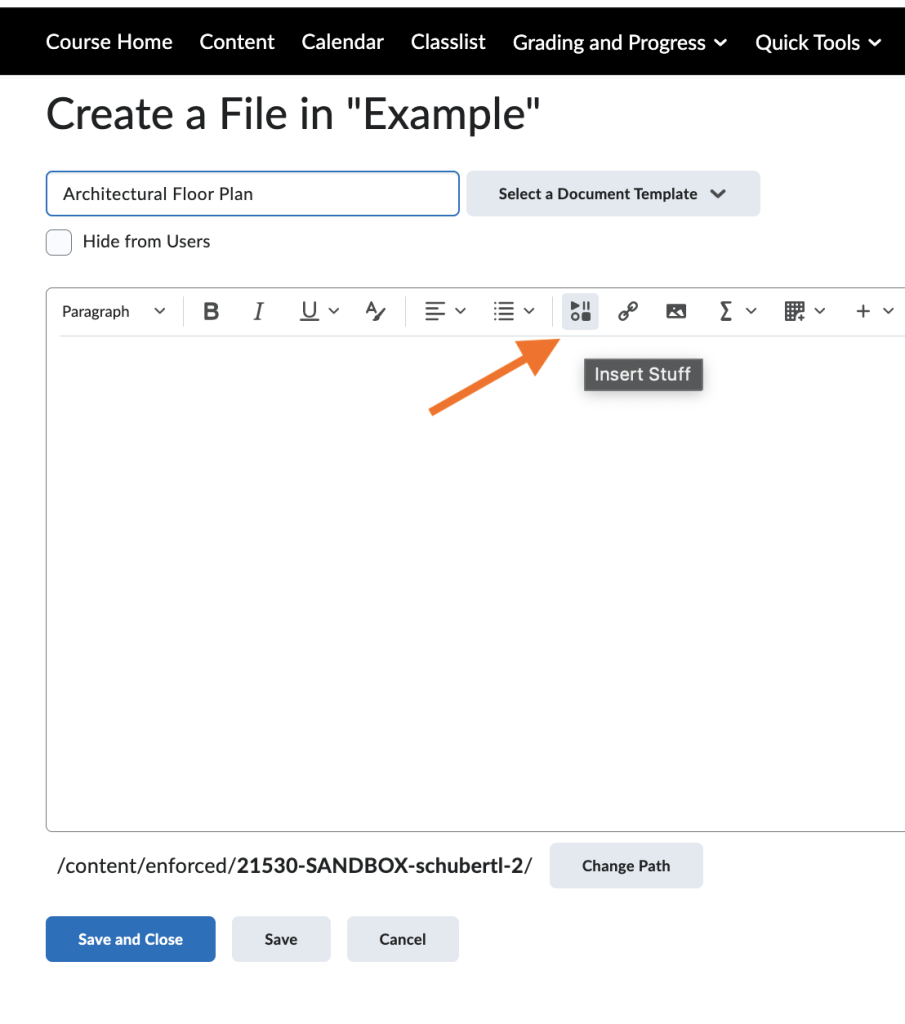
9. On the Create A File page, name the file and click the Insert Stuff button.
10. On the pop-up, scroll down until you see Embed Code and then select that option.
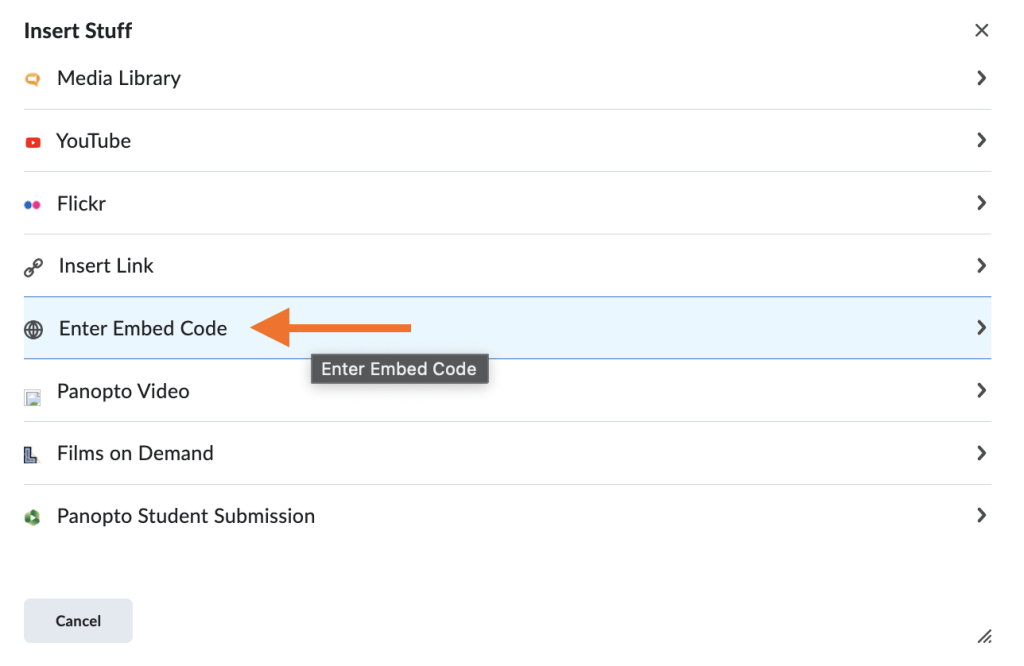
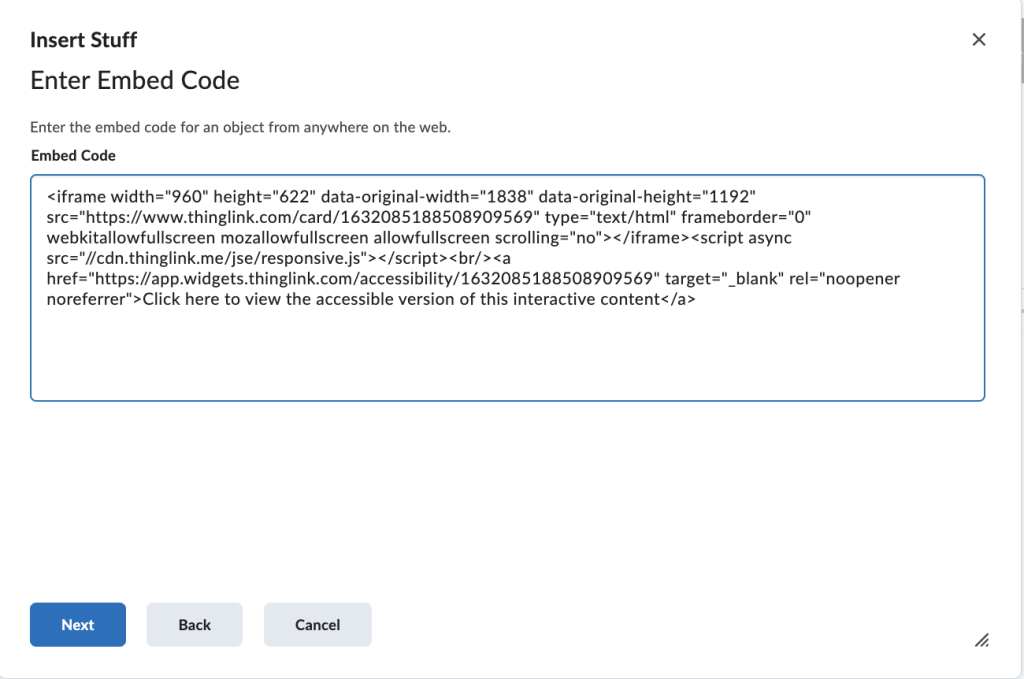
11. On the pop-up screen, paste the embed code that was copied for the ThingLink and click the blue Next button.
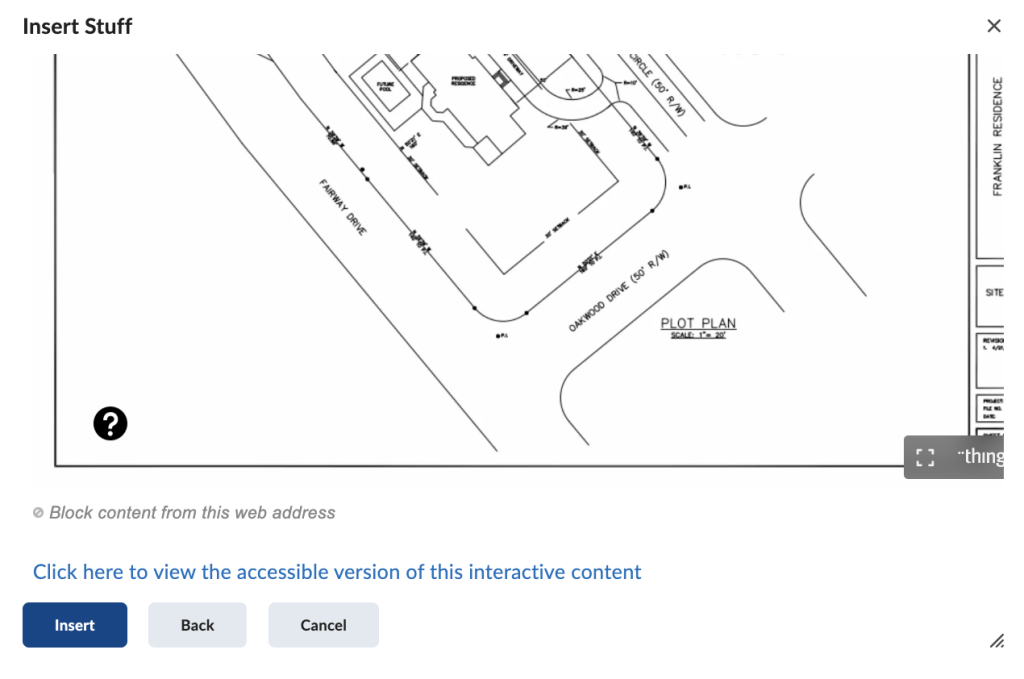
12. The screen will refresh with the ThingLink image and the accessible link to the ThingLink below. Click the blue Insert button.
13. After it is inserted into the File you created on Brightspace, click save and close.
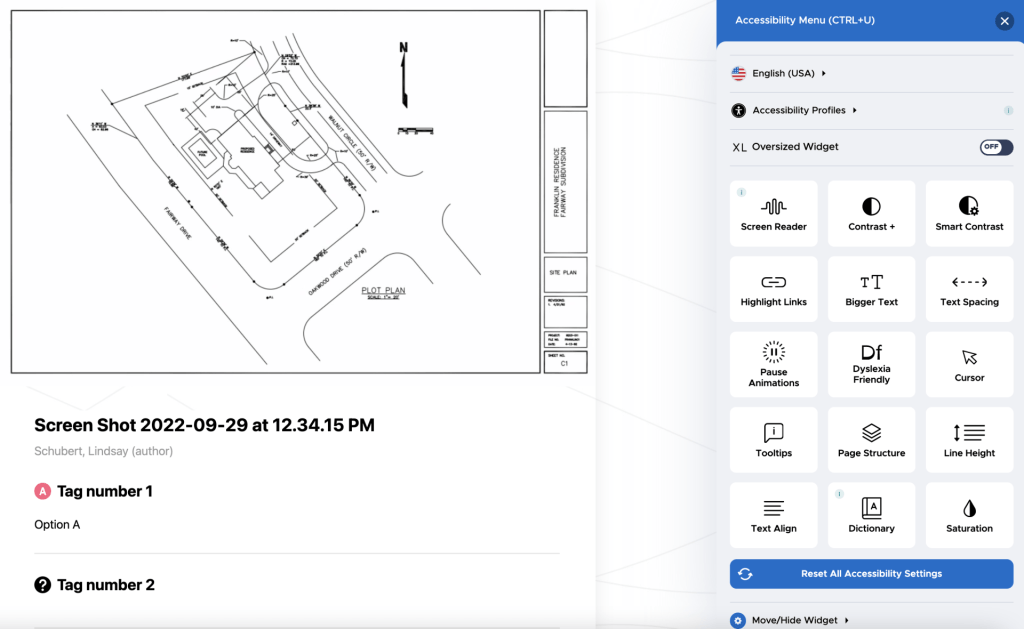
14. If you added the accessibility link, the image below will showcase what someone would see if they were too choose to view the accessible link.