
Get Started
As the instructor, you can set up the Brightspace Grade Book to best reflect your evaluation approach for your course. Follow the steps in this quick start guide to help get you started using grade book for your course or check out more specific information via the other grade book categories to create or update your grade book.
Choosing A Grading System
Grading Systems
Selecting a grading system is the first step in setting up your grade book.
Weighted
The weighted system calculates grade items as a percentage of a final grade that is worth 100%. The maximum points you assign to individual grade items can be any value, but their contribution towards the category they belong to and the final grade is the percentage value (weight) assigned to them.
For example: Assignments Category – 30% of total Grade
- Assignment 1 – 25% of the category but truly worth 7.5% towards the final grade
- Assignment 2 – 25% of the category but truly worth 7.5% towards the final grade
- Assignment 3 – 25% of the category but truly worth 7.5% towards the final grade
- Assignment 4 – 25% of the category but truly worth 7.5% towards the final grade
Total weight of the assignments together is 100% and the total weight of the overall final grade is 30%.
Grade items in a category count as a percentage of that category, not of the final grade. Therefore, grade items in a category should combine to a weight of 100%.
Points
Use the points system when you want the maximum points assigned to a grade item to be equal to its contribution to the final grade. Final grades are calculated by adding a user’s score on all grade items together and dividing by the sum of the maximum points values.
For example: Assignments Category – 400 points of total 1000 point final grade system
- Assignment 1 – 100 points of the category and is worth 10% of the overall final grade
- Assignment 2 – 100 points of the category and is worth 10% of the overall final grade
- Assignment 3 – 100 points of the category and is worth 10% of the overall final grade
- Assignment 4 – 100 points of the category and is worth 10% of the overall final grade
Grade items using the Points System must be clearly defined before the start of the course. Changing values of grade items during the course could result in grade book issues when calculating the final grade.
The Grade Book Setup Wizard
How To Set Up Your Grade Book
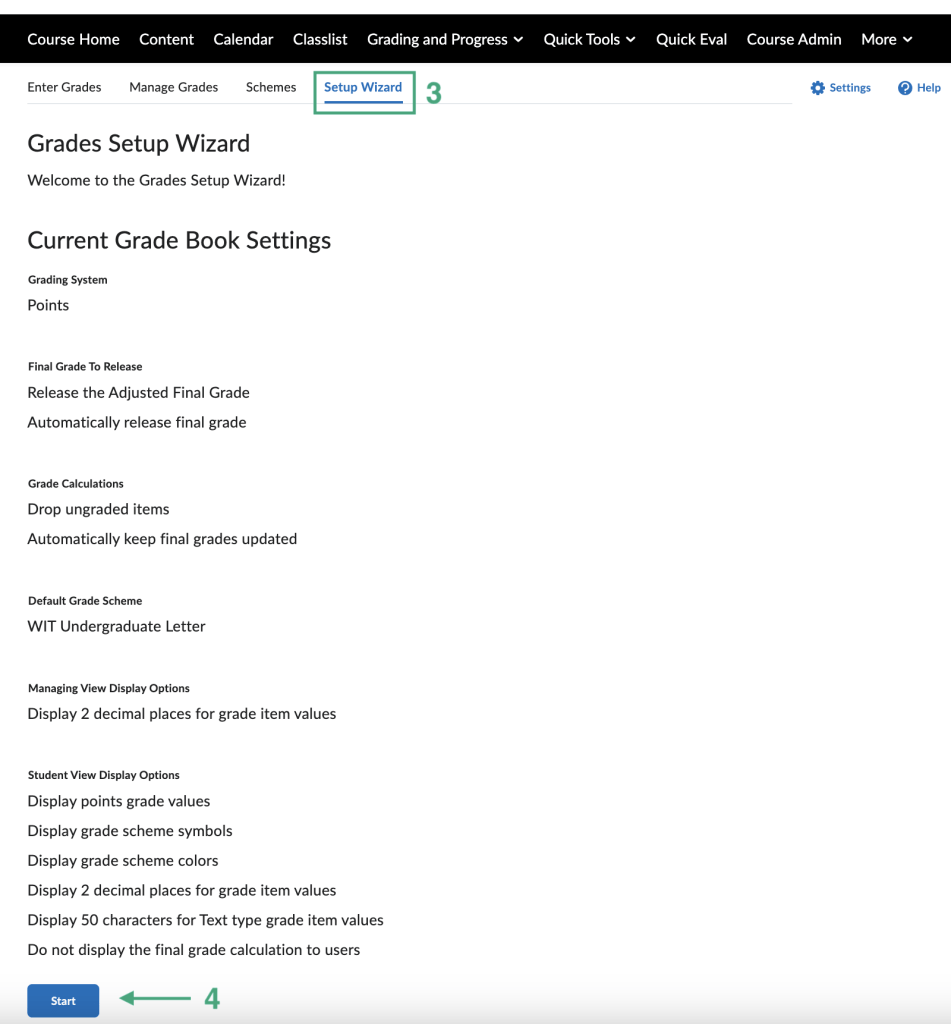
In the Grades tool, if a grade book is not set up or imported for your course, you will see the Grades Setup Wizard page when you first navigate to the tool.
Step By Step Instructions To Set Up Your Grade Book With The SetUp Wizard
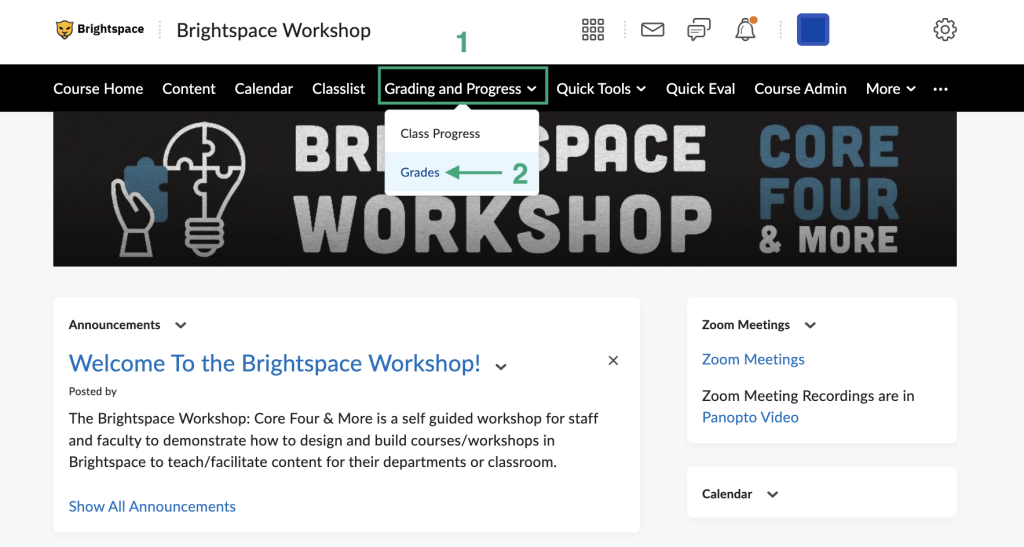
- On the navigation bar, click Grading and Progress.
- On the drop down menu, click Grades.

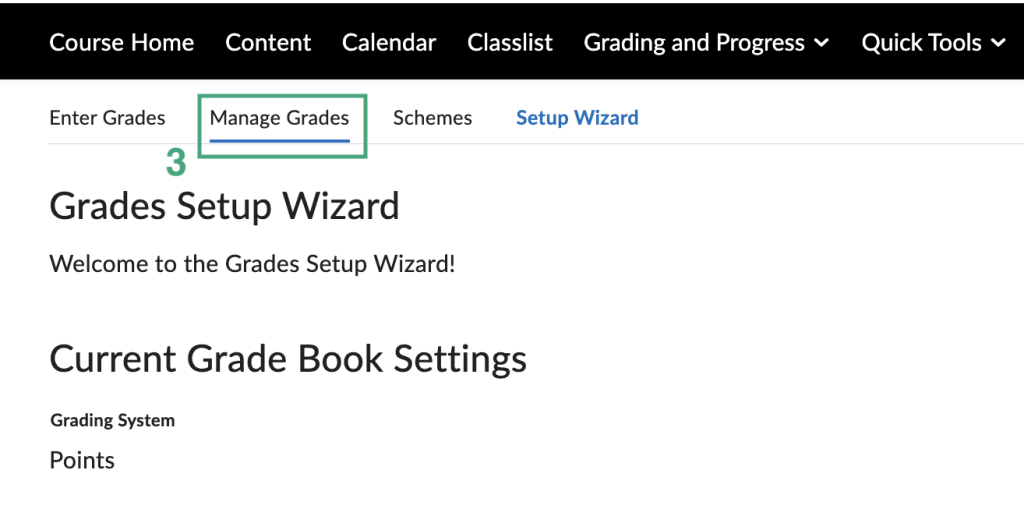
- You should now be in the Setup Wizard. If you do not see “Grades Setup Wizard,” click Setup Wizard from the top left menu options.
- On the Grades Setup Wizard page, click the blue Start button.
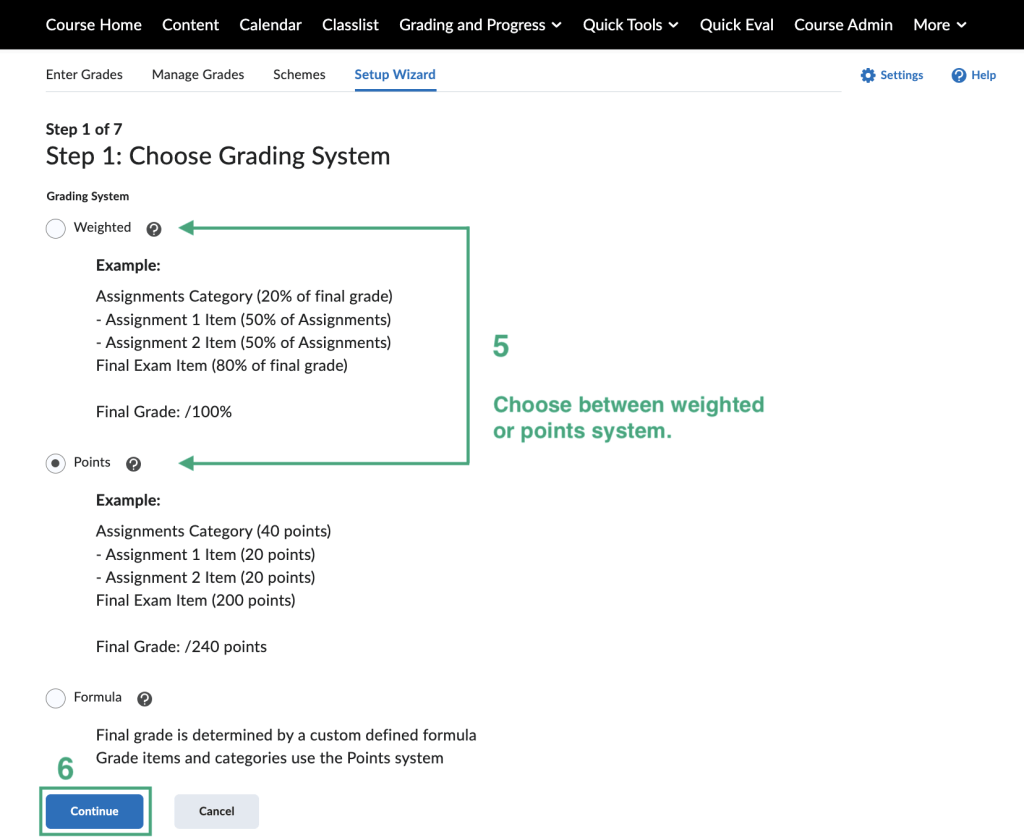
- Select your Grading System (Weighted, Points, or Formula).
- Click the Continue button.
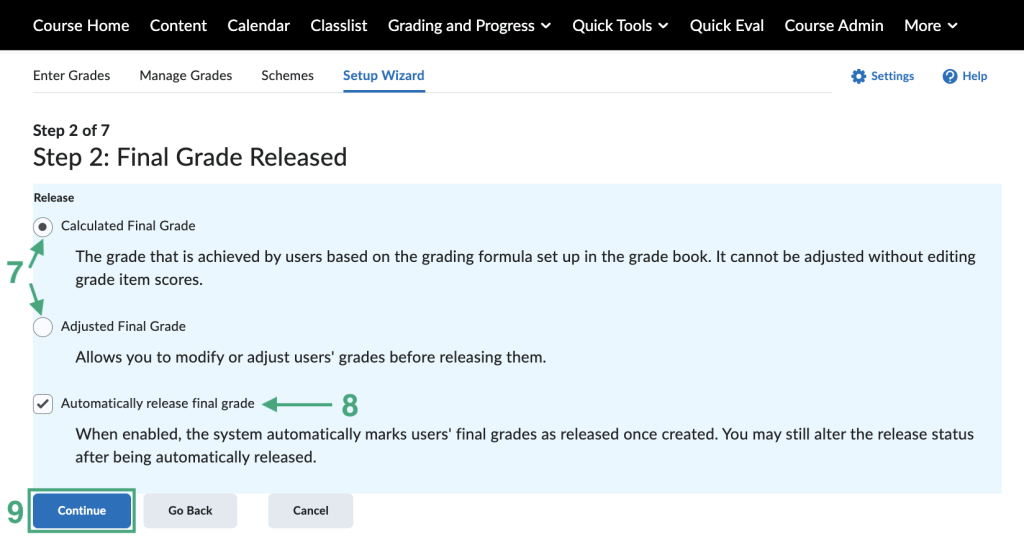
- Select how you want the final grade to be released: Calculated or Adjusted (example: student’s calculated grade is 89 but you want to adjust it to 90).
- Check the box next to Automatically Release Final Grade, if you want users’ final grades to be released automatically when you create them.
- Click the Continue button.
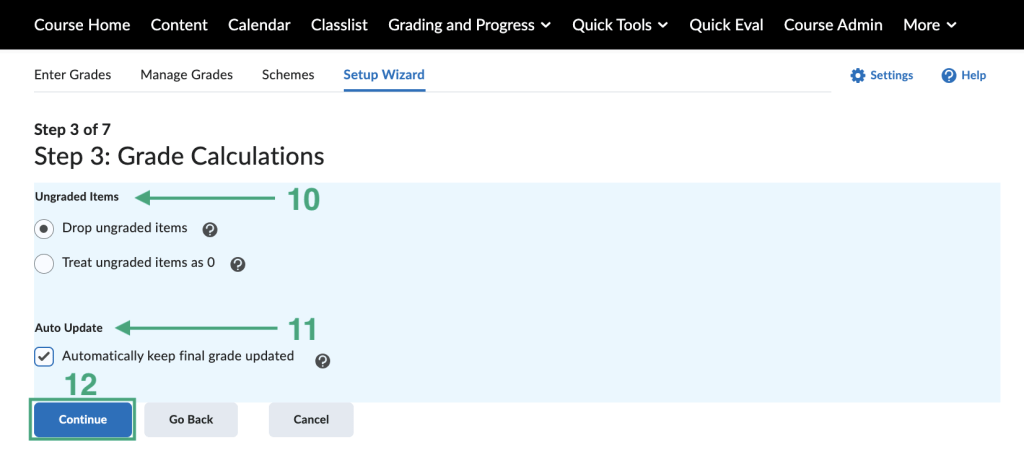
- Choose how you want to treat ungraded items. If you selected Automatically release final grade, it is recommended that you select Drop ungraded items so that the released grades better reflect the users’ current grades throughout the term. If you choose Treat ungraded items as 0, all ungraded items will calculate as 0 making the students’ grades lower until you grade more items.
- Check the box next to Automatically keep final grade updated if you want final grades to automatically adjust after changing a grade item or calculation option.
- Click the Continue button.
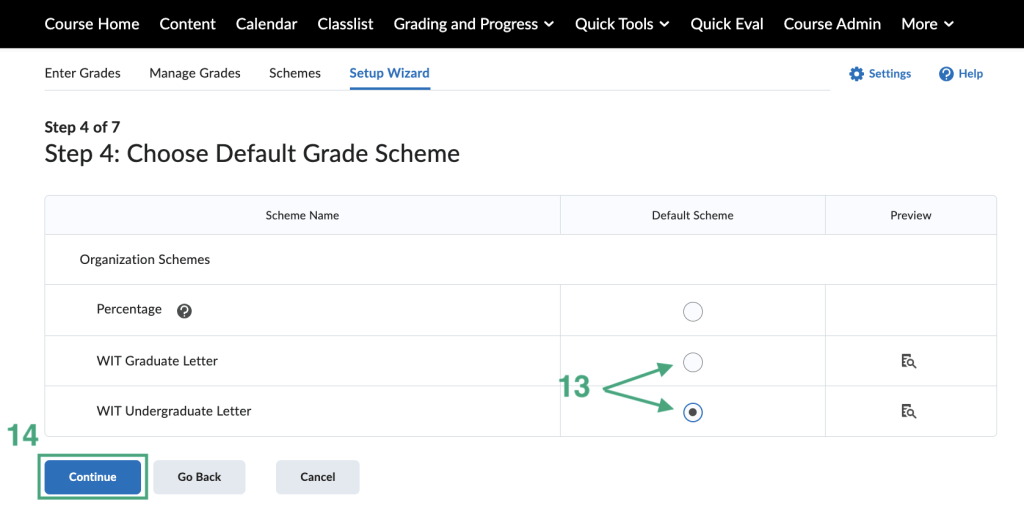
- Choose your Default Grade Scheme (graduate or undergraduate).
- Click the Continue button.
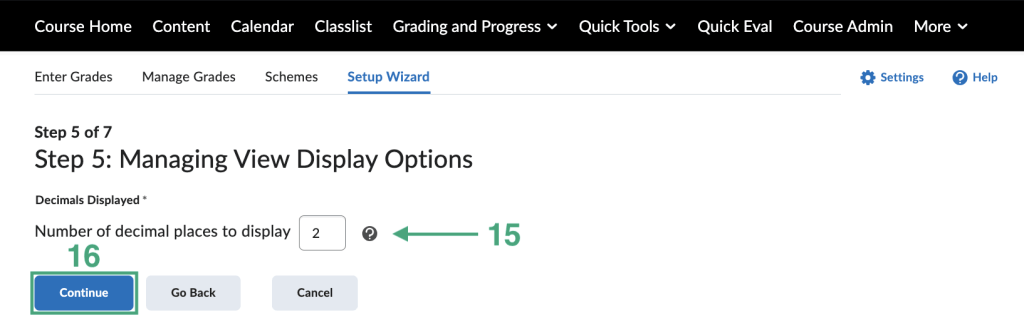
- In the Number of decimal places to display field, enter the number of decimal places to display to users who enter grades using the grade book, it is suggested to keep it at 2 decimals.
- Click the Continue button.
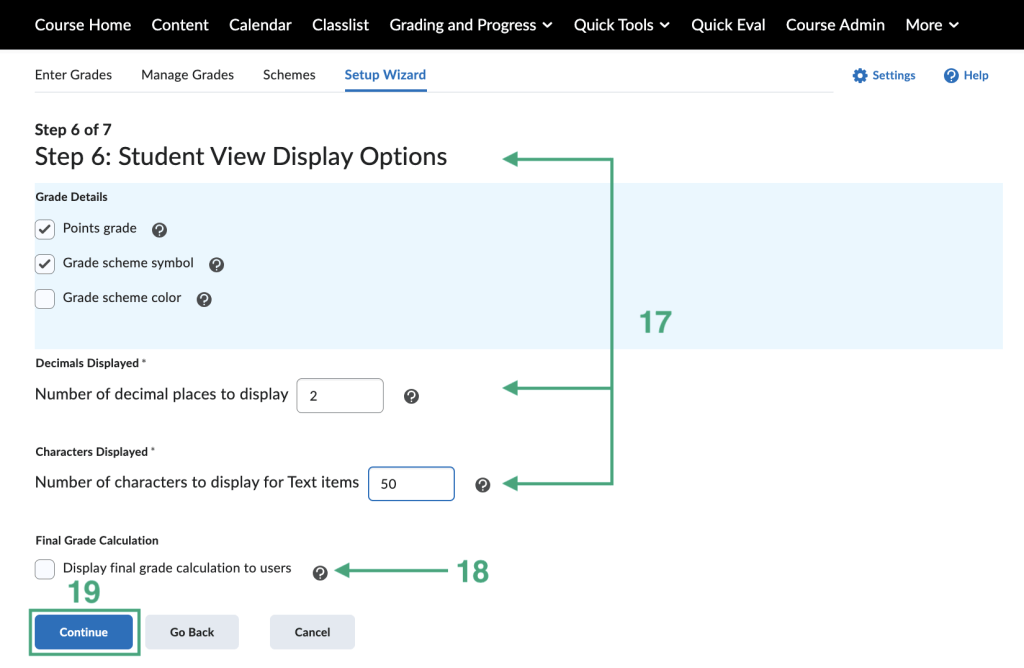
- Select the options you want for Student View Display Options (points grade, grade scheme symbol, grade scheme color), decimals displayed (keep at 2), number of characters (keep at 50).
- Check or keep the box unchecked next to Display final grade calculation to users. This setting determines whether users can see how their final grade was calculated in the student view of Grades.
- Click the Continue button.
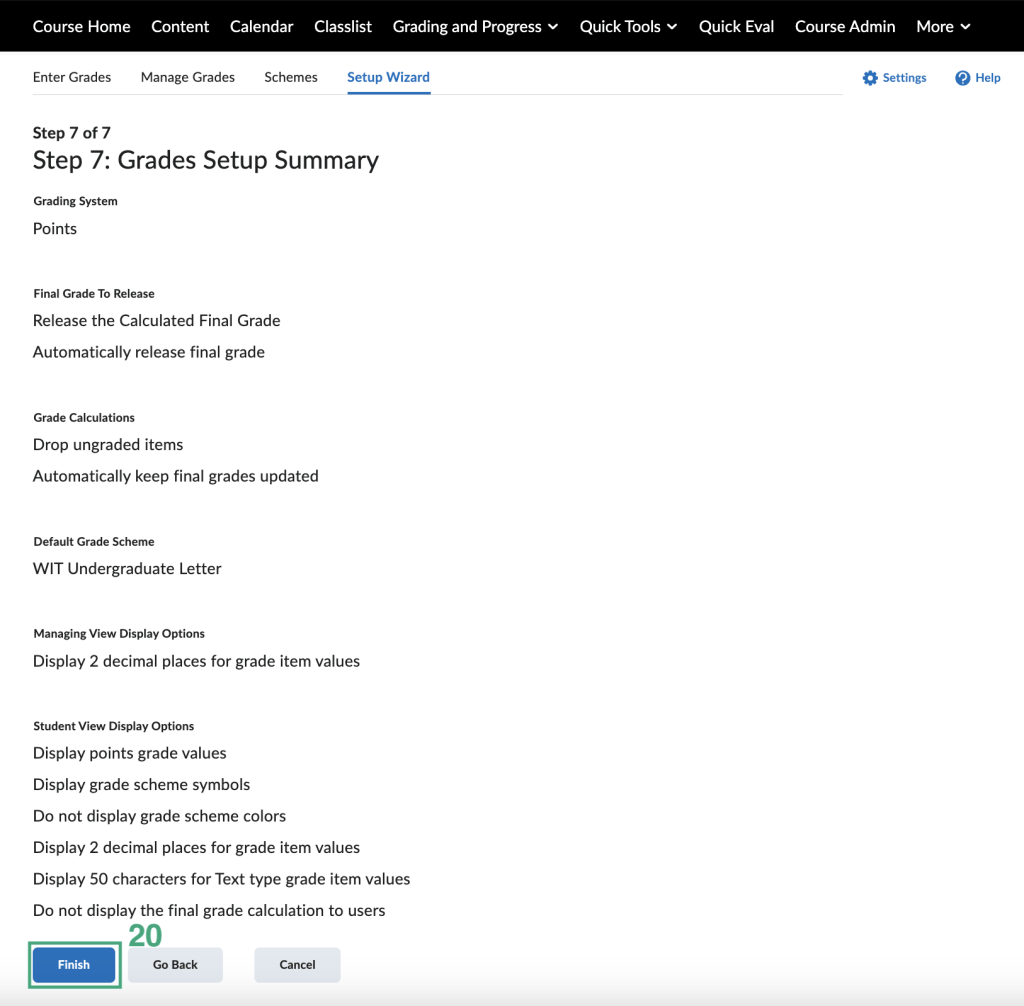
20. On the Grades Setup Summary page, review your selections and click the Finish button.
Create A Grade Category
Creating Grade Categories
Build your grade book by creating grade categories to organize assignments, quizzes, and discussions or use categories for a weighted grading system.
Step By Step Instructions To Create Grade Categories
- On the navigation bar, click Grades and Progress and then click Grades.
- Click Manage Grades from the left top menu options.
- Click the blue New button and choose Category.
- On the Properties tab and in the General area, enter your Category name.
- The Grading area will be different depending on whether you set up your grade book as Points or Weighted.
- Points System:
- Distribution:
- Unchecked Box: Grade items can be varying points for the category.
- Checked Box: Select this option if you want all items in the category to be worth the same amount.
- Choose how many points each item in the category will be worth. (example: all assignments are worth 30 points).
- Choose if you want to drop grade items for that category.
- Distribution:
- Weighted System:
- Weight:
- Enter the weight (%) that you want the category to contribute to the final grade. Grade items within the category contribute toward this weight.
- Distribution:
- Manually assign weight to each grade item (example: Assignment 1 is 10% and Assignment 2 is 5%, etc).
- Distribute weights by points across all items in the category (example: Quiz 1 is worth 15% of the Quiz Category – enter the weight (%) that you want the grade item to contribute to the category. This is seen in the grade item page if this option is selected).
- Distribute the category weight evenly among all grade items (example: Assignment 1 is 50%, Assignment 2 is 50% – these percentages will increase or decrease depending on the number of grade items you have in that category).
6. Click Save and Close.
Additional Resources:
Create A Grade Item
Creating Grade Items
Build your grade book by creating grade items.
The grades you manually enter in your grade book for quizzes, discussions, and assignments grade items are automatically synchronized back to Quizzes, Discussions and Assignments.
Step By Step Instructions To Create Numeric Grade Items
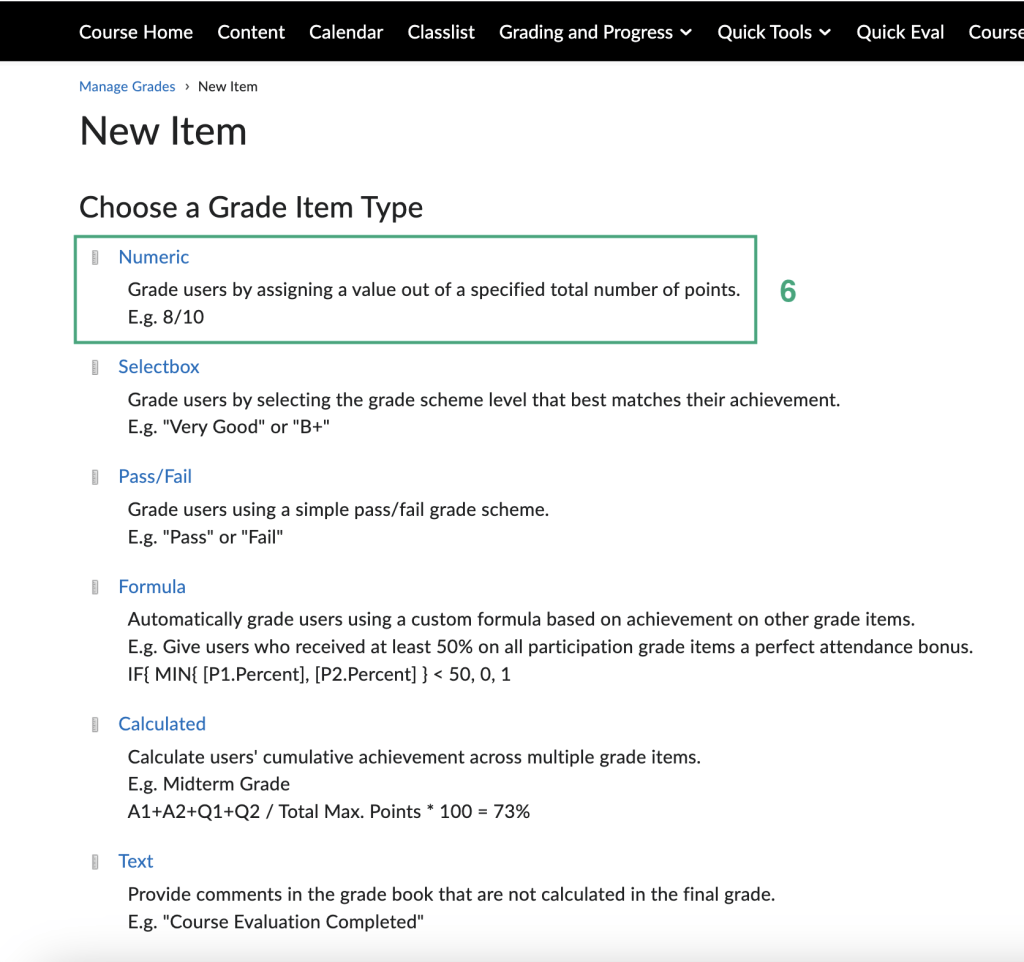
Grade users by assigning a value out of a specified total number of points. Numeric and Selectbox grade items are the only types of grade item that you can associate with course objects such as discussions, quizzes, and assignments.
1. On the navigation bar, click Grades and Progress.
2. From the drop down list, click Grades.
3. From the left top menu options, click Manage Grades.
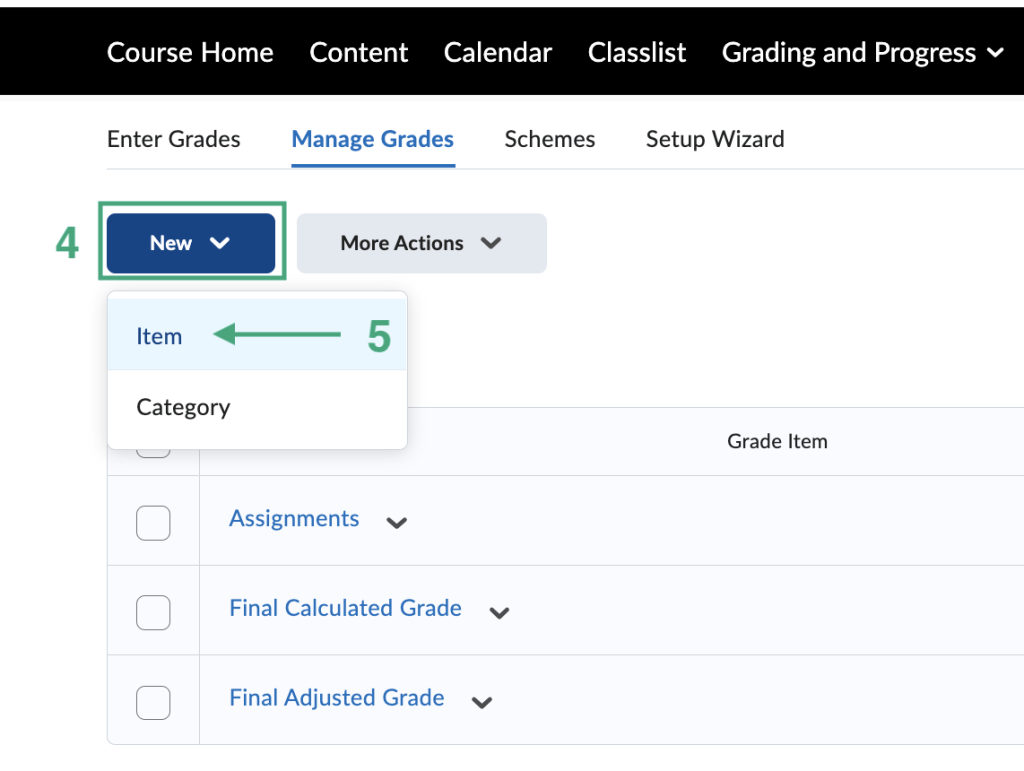
4. Click the New button.
5. From the drop down list, click Item.
6. From the Grade Item options list, select Numeric.
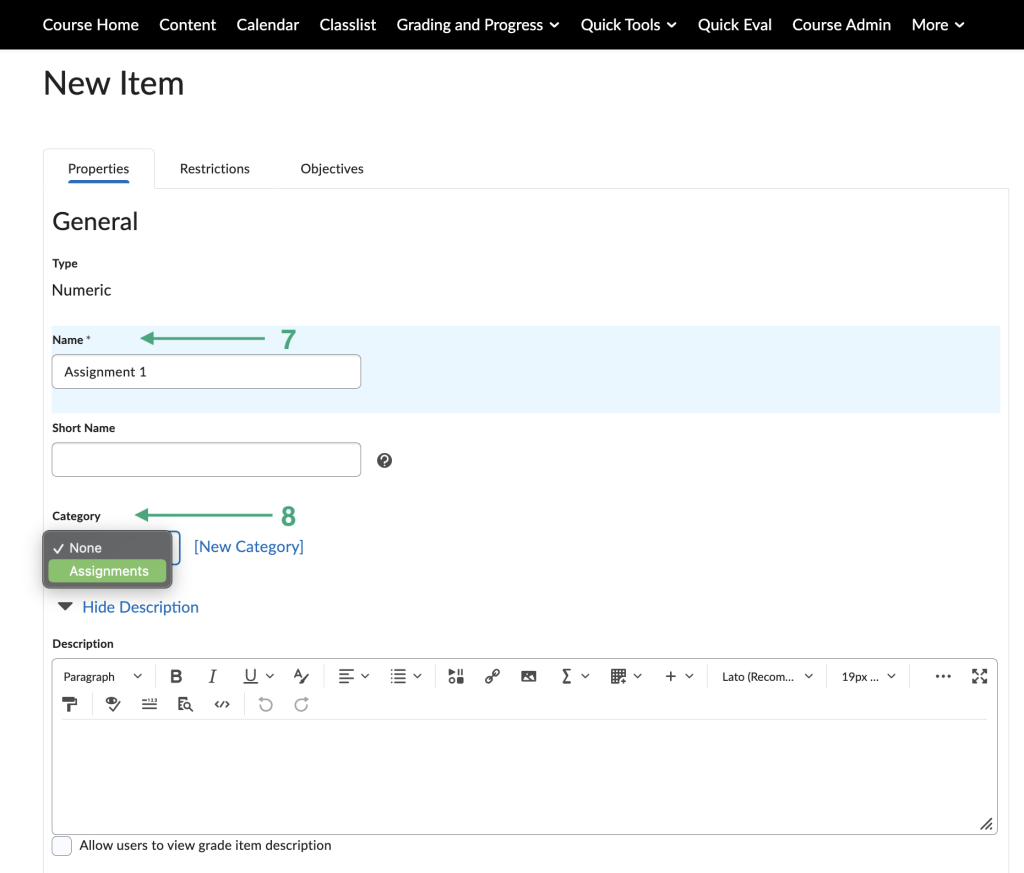
7. On the Properties tab and in the General area, type in the Grade Item Name.
Optional: Type in a grade item description.
8. Under Category heading, choose the category the grade item belongs in from the drop down list.
Note: The Grading area will be different depending on whether you set up your grade book as Points or Weighted.
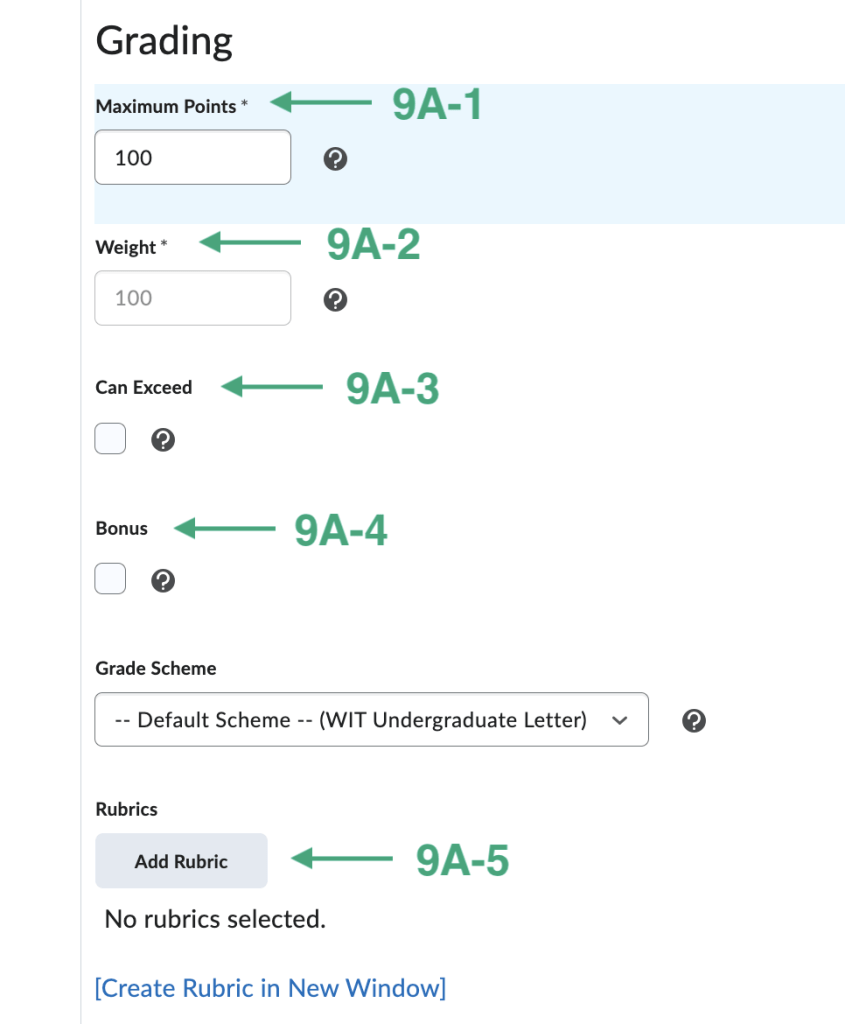
9. A – Weighted System:
- 9A-1. Type in the Maximum Points for the Grade Item. Note: the default is 10 but this must be equal to the actual assignment/quiz/discussion post/rubric points.
- 9A-2. Weight: Depending on the options chosen for the grade category you will be able to type in a specific weight or if, evenly distribute weight across all grade items, was checked on, the weight will be greyed out and will change as you add more grade items to that category.
- 9A-3. Can Exceed: Check the box to allow users’ grades to exceed the maximum points specified for the item. Note: this selection only applies to the grade item. Can Exceed may need to be selected for the grade category also.
- 9A-4. Bonus: Check the box to make the grade item a bonus.
- 9A-5. Optional Rubrics: Click the Add Rubric button to attach a rubric to the grade item. Note: Only attach a rubric in this location is students are submitting the grade item in person or via NuVu.
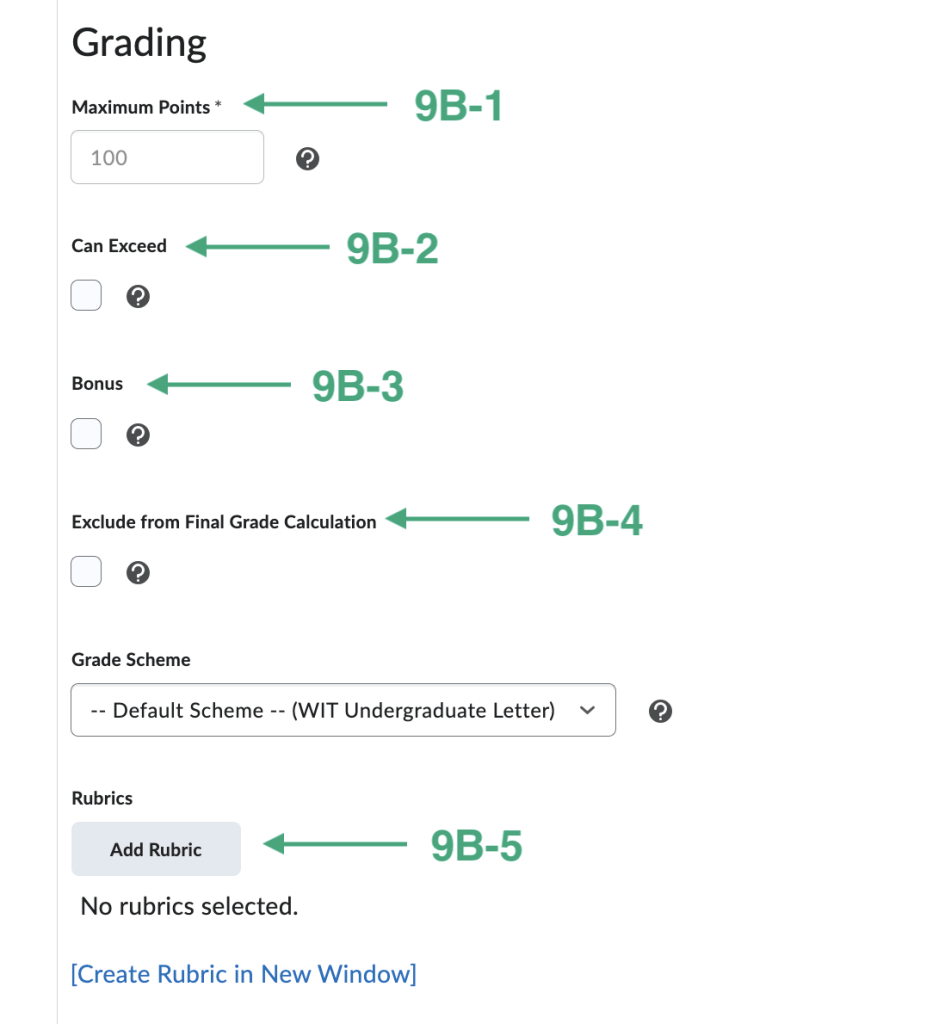
9. B – Points System:
- 9B-1. Type in the Maximum Points for the Grade Item. Note: the default is 10 but this must be equal to the actual assignment/quiz/discussion post/rubric points. If the Maximum points is greyed out that is due to the settings for how points will be distributed among grade items within the category.
- 9B-2. Can Exceed: Check the box to allow users’ grades to exceed the maximum points specified for the item. Note: this selection only applies to the grade item. Can Exceed may need to be selected for the grade category also.
- 9B-3. Bonus: Check the box to make the grade item a bonus.
- 9B-4. Exclude From Final Grade Calculation: Check the box to exclude this grade item.
- 9B-5. Optional Rubrics: Click the Add Rubric button to attach a rubric to the grade item. Note: Only attach a rubric in this location is students are submitting the grade item in person or via NuVu.
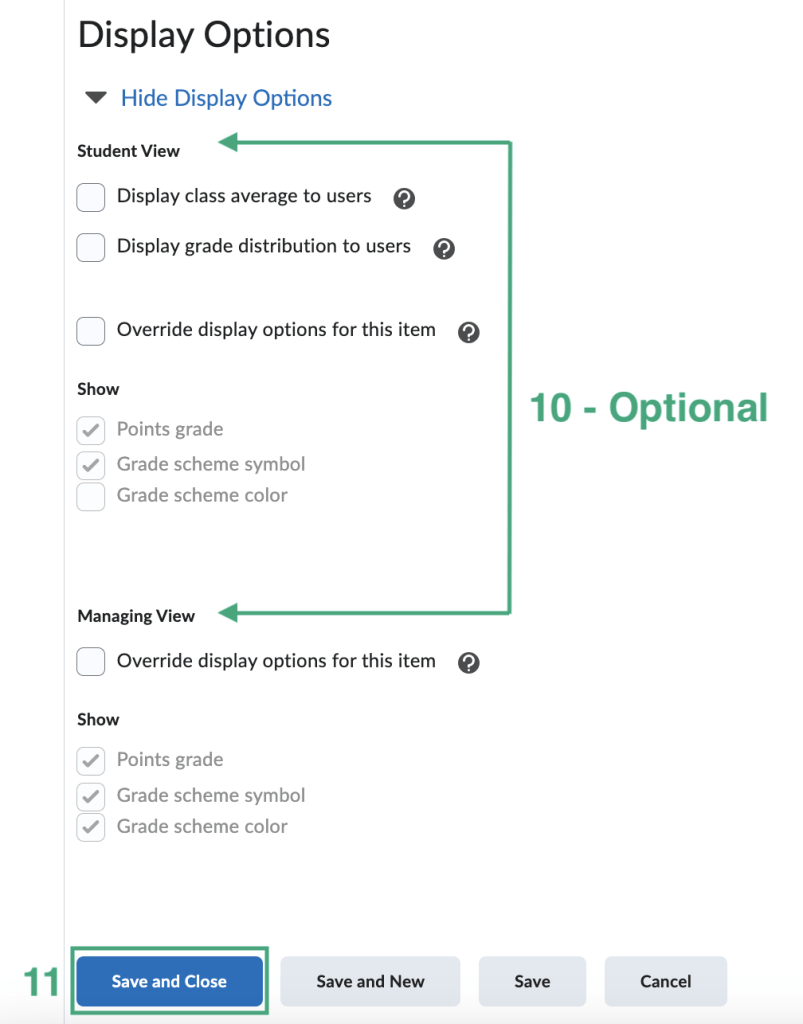
10. Optional: Choose the Student Display Options from display class average to users, display grade distribution to users, or override display options for this item from the set up wizard.
11. Click the Save and Close button.
Additional Resources:
Delete A Grade Item
Delete Grade Items Or Categories
Note the following:
- Selecting a category does not select the grade items that reside in it. If you delete a category, the grade items associated with it become independent grade items.
- You cannot delete grade items that are associated with another course object, such as a quiz, discussion topic, or assignment. To delete the item you must first remove the association. Click the Information icon for a grade item with an association to view details about where the item is used.
Step By Step Instructions To Delete A Grade Item or Category
- On the navbar, click Grades.
- On the Manage Grades page, from the More Actions button, select Delete.
- Select the check box for each grade item or category want to delete.
- Click Delete.
Restore a deleted grade item
- On the navbar, click Grades.
- On the Manage Grades page, from the More Actions button, select Event Log.
- Beside the appropriate grade item select Restore.
Note: Formula and Calculated grade items cannot be restored.
Linking Grade Items
All grade items from the Assignment, Quiz, and Discussion tools should be linked to their perspective grade item. As the instructor, grade items can be created prior to creating the aforementioned three assessment types or the grade items can be created as you create the various assessments needed for your course.
Link An Assignment To A Grade Book Item
Step By Step Instruction To Link An Assignment
1. On the edit Assignment page, click the Grade Out Of text box, type in the points you would like the assignment to be out of or the correlating points to an existing grade item in your grade book.
2. Click In Grade Book.
3. From the drop down list, click Edit Or Link To Existing.
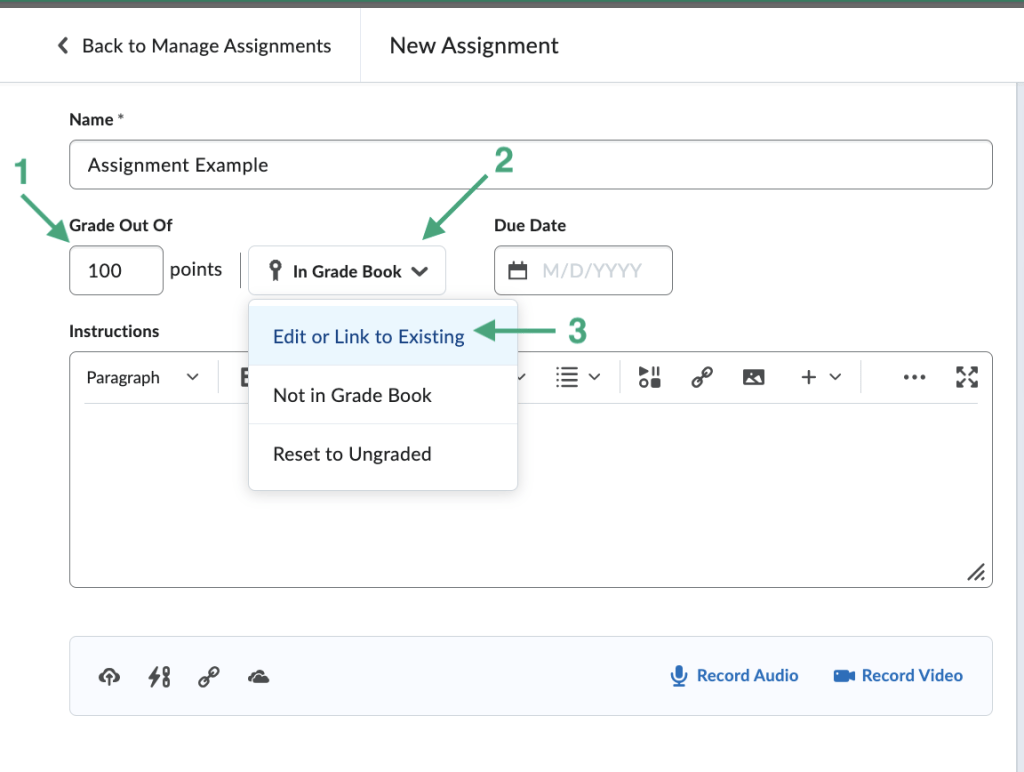
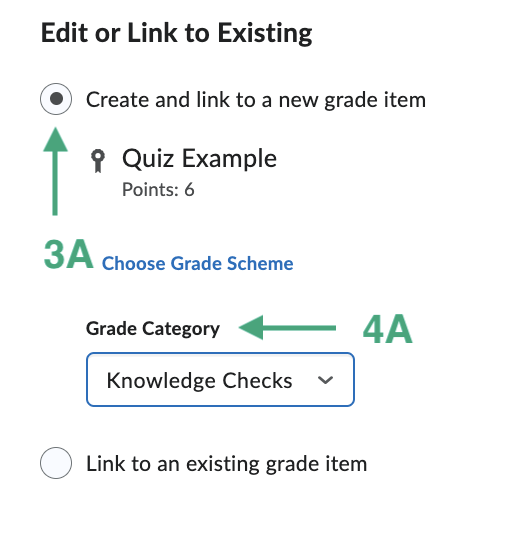
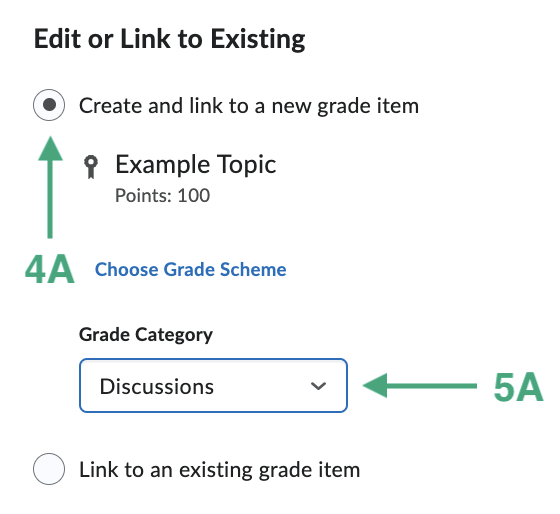
4 & 5. There are two options: Create And Link To A New Grade Item or Link To An Existing Grade Item. Below are instructions on both options.
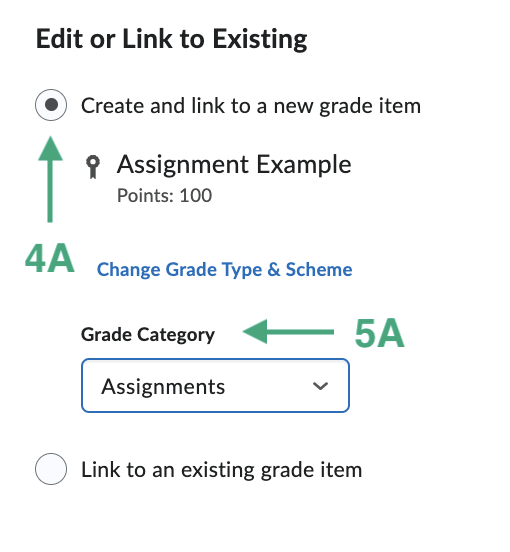
- Option 1: Create And Link To A New Grade Item. Choose this option if you have NOT created a grade item already in the grade book.
- 4A. Select the bubble next to Create And Link To A New Grade Item
- 5A. Select the Category, if applicable, from the drop down list.
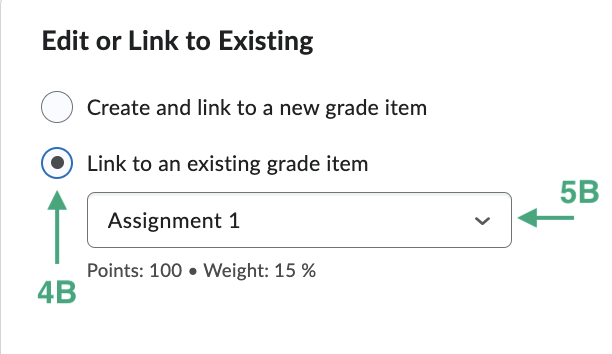
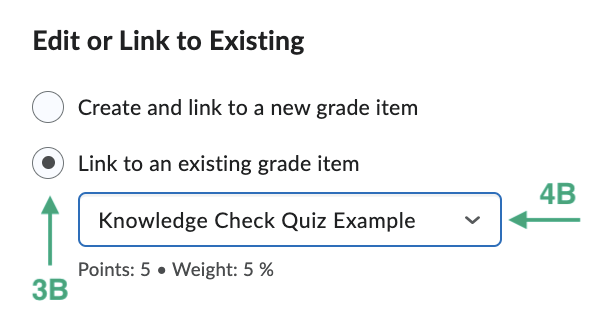
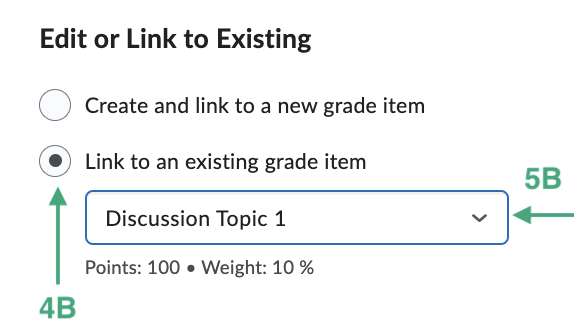
- Option 2: Link To An Existing Grade Item. Choose this option if you HAVE created a grade item already in the grade book.
- 4A. Select the bubble next to Link To An Existing Grade Item
- 5B. From the drop down menu, choose the grade item that correlates with the assignment you just created.
6. Click Save and Close.
Link A Quiz To A Grade Book Item
Step By Step Instruction To Link A Quiz
1. On the edit Quiz page, click Not in Grade Book.
2. From the drop down list, click Edit or Link to Existing.
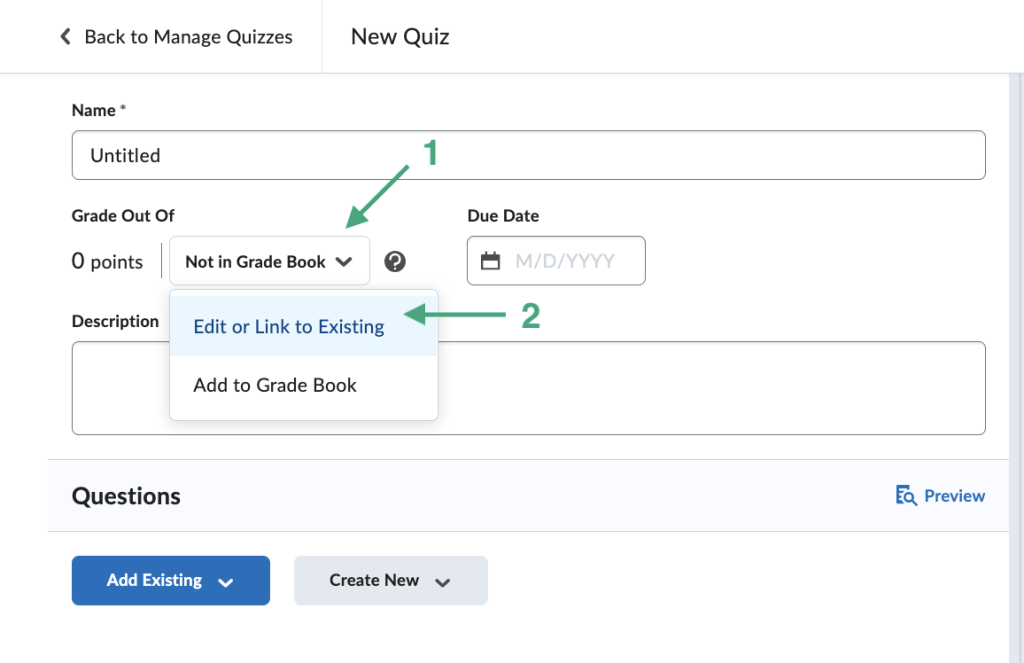
3 & 4. There are two options: Create And Link To A New Grade Item or Link To An Existing Grade Item. Below are instructions on both options.
- Option 1: Create And Link To A New Grade Item. Choose this option if you have NOT created a grade item already in the grade book.
- 3A. Select the bubble next to Create And Link To A New Grade Item
- 4A. Select the Category, if applicable, from the drop down list.
- Option 2: Link To An Existing Grade Item. Choose this option if you HAVE created a grade item already in the grade book.
- 3B. Select the bubble next to Link To An Existing Grade Item
- 4B. From the drop down menu, choose the grade item that correlates with the assignment you just created.
5. Click Save and Close.
Link A Discussion To A Grade Book Item
Step By Step Instruction To Link A Discussion
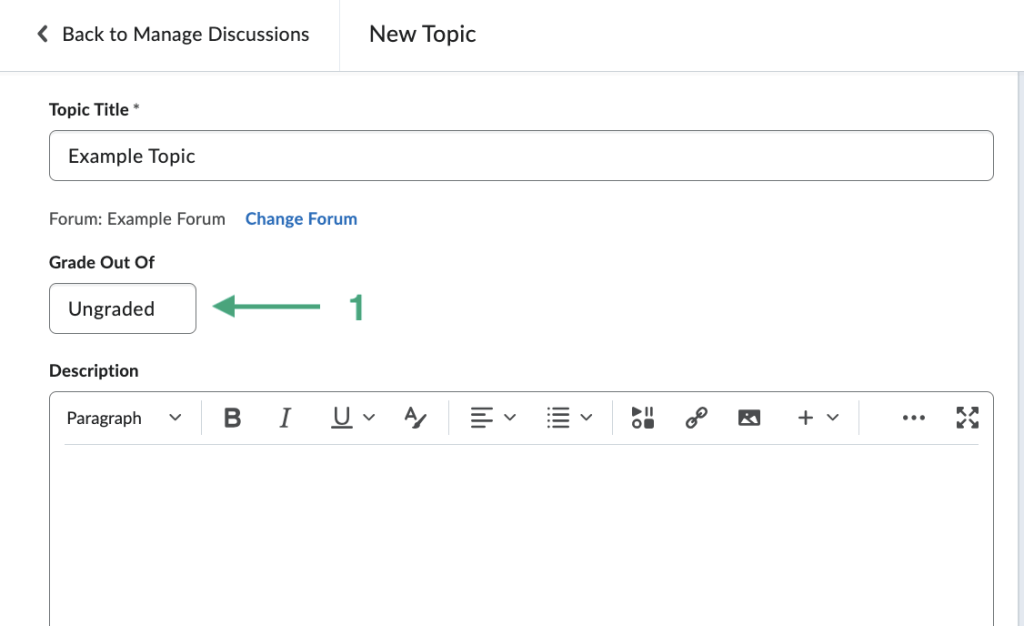
1. On the edit Discussions page, click Grade Out Of – Ungraded. Type in the number of points that discussion topic will be out of. This should correlate with the grade book item and the rubric if applicable.
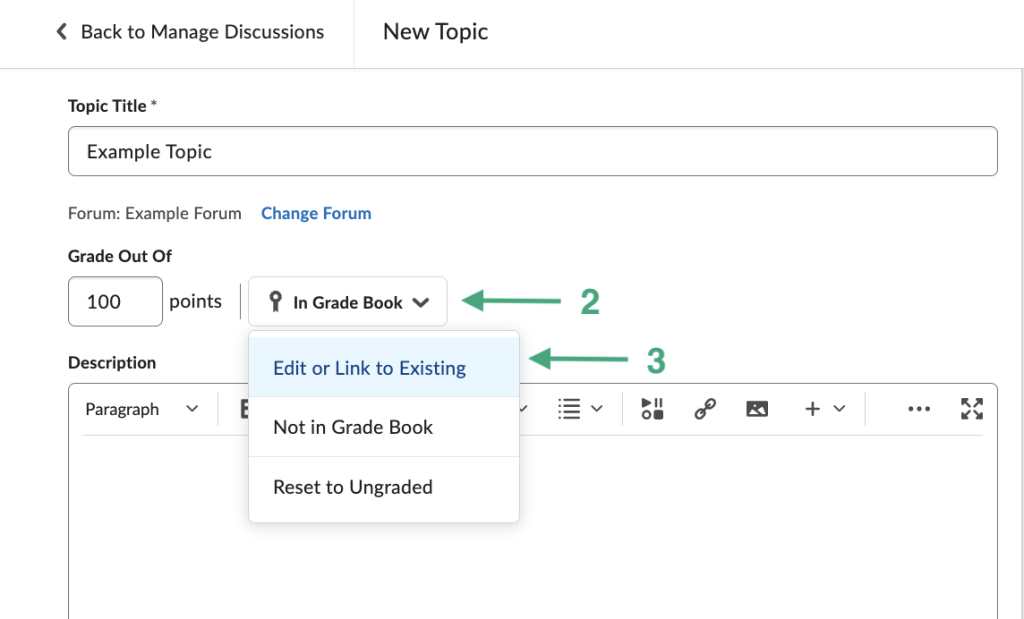
2. Click the In Grade Book.
3. From the drop down list, click Edit or Link to Existing.
4 & 5. There are two options: Create And Link To A New Grade Item or Link To An Existing Grade Item. Below are instructions on both options.
- Option 1: Create And Link To A New Grade Item. Choose this option if you have NOT created a grade item already in the grade book.
- 4A. Select the bubble next to Create And Link To A New Grade Item.
- 5A. Select the Category, if applicable, from the drop down list.
- Option 2: Link To An Existing Grade Item. Choose this option if you HAVE created a grade item already in the grade book.
- 3B. Select the bubble next to Link To An Existing Grade Item.
- 4B. From the drop down menu, choose the grade item that correlates with the assignment you just created.
6. Click Save and Close.
Grading How To’s
There are various methods to grade students’ assignment, quizzes, and discussions by accessing various tools but the following step by step directions are the most direct methods to grade items.
How To Grade Assignments
Follow this step by step process to locate assignment submissions for grading.
- Go to Course Tools on the navbar and choose Assignments from the drop down menu.
- Click the carrot button next to the Assignment Title and select View Submissions from the drop down menu.
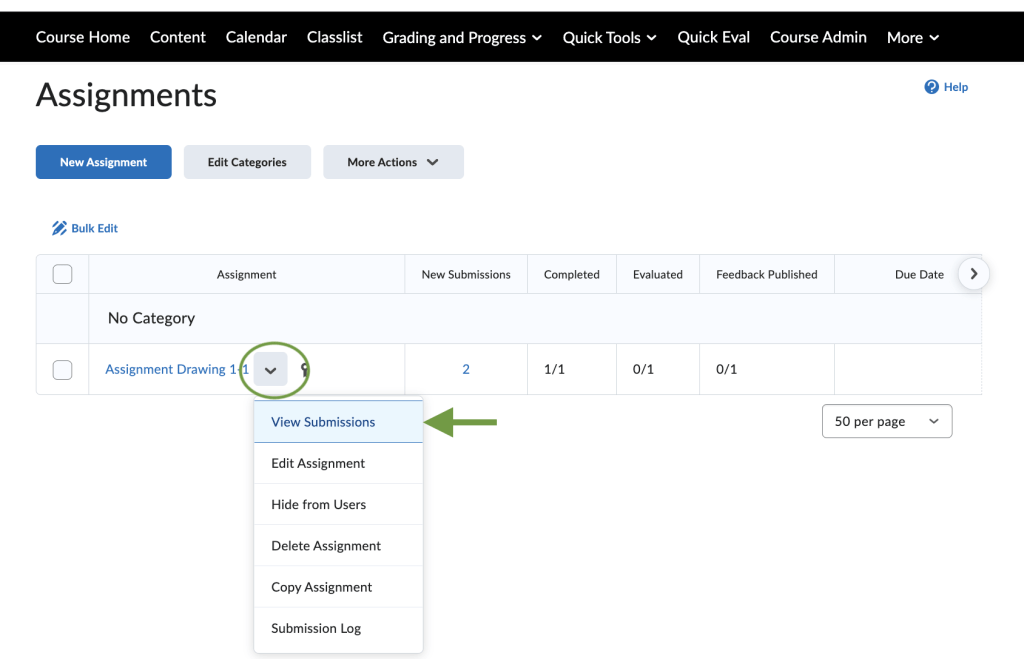
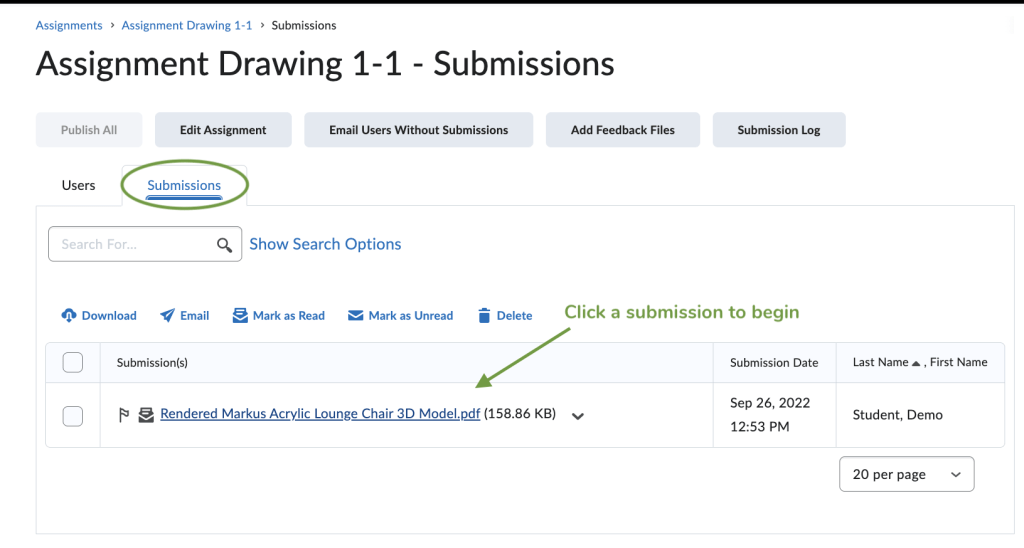
3. Select the Submissions tab and click on a submission to begin grading.

How To Grade Discussions
Follow this step by step process to grade a discussion topic
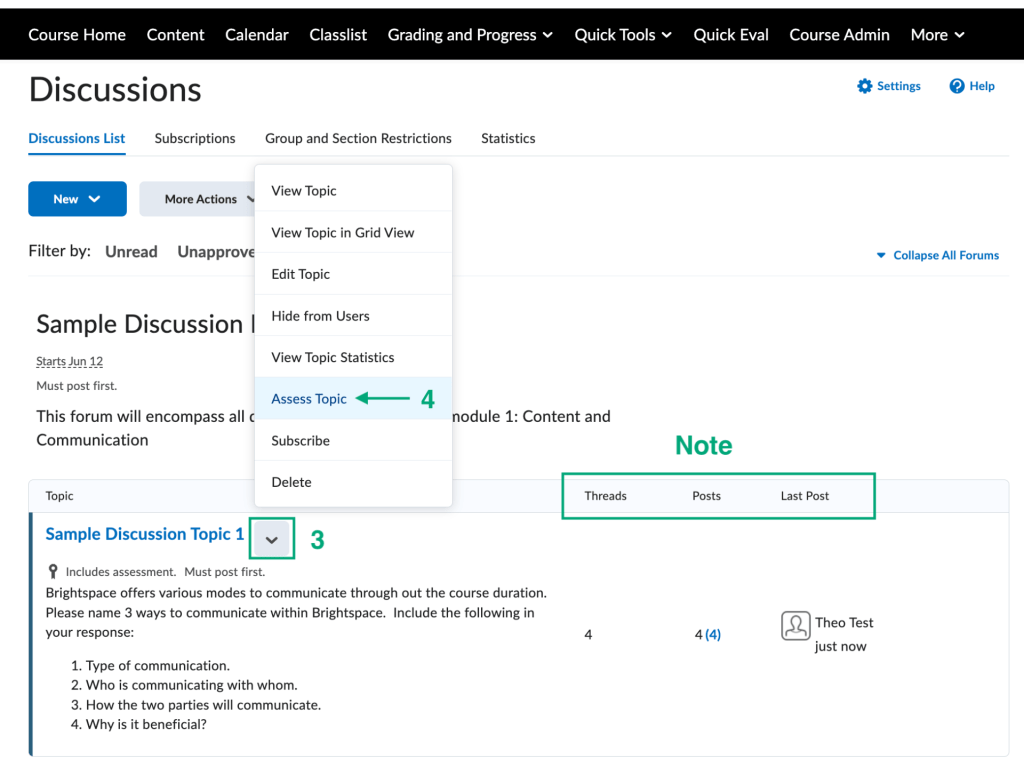
1. Go to Quick Tools on the navigation bar.
2. From the drop down list, select Discussions.

3. Click the arrow button next to the Discussion Topic Title you want to grade.
4. From the drop down list, select Assess Topic.
Note: On the right side of the discussion topic, the number of threads, posts, and which learner posted most recently will be viewable.
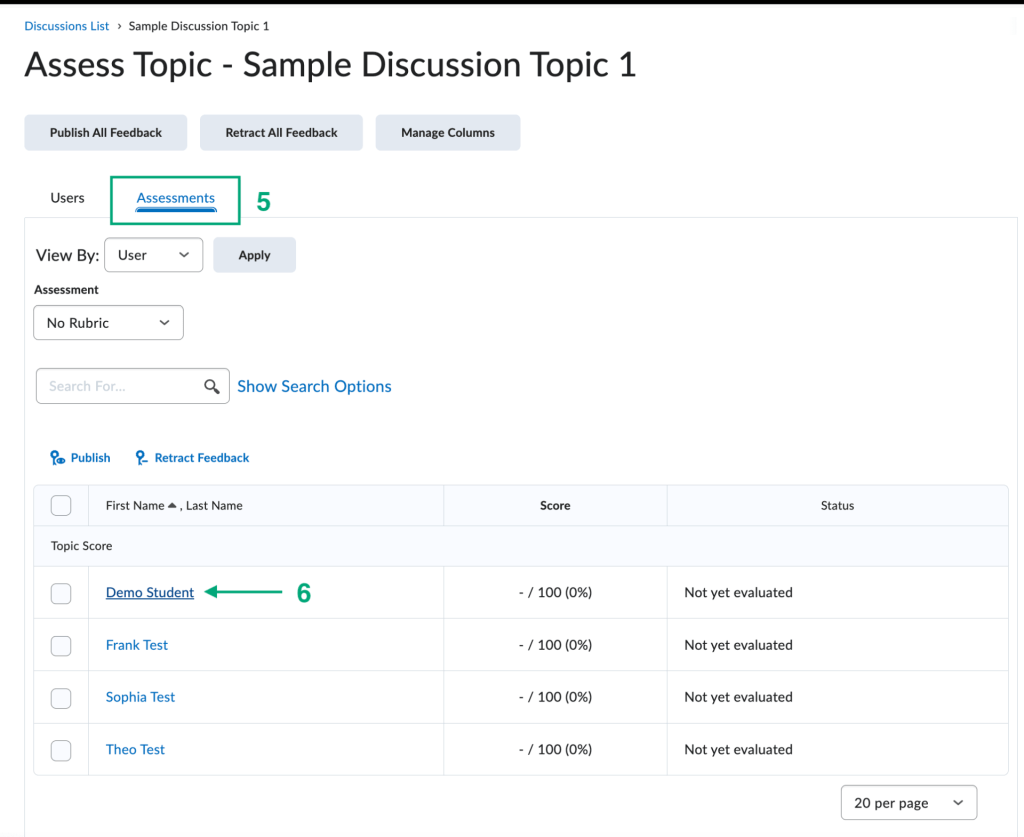
5. Select the Assessments tab.
6. Click on a learners’ name to be brought to the assessment grading page.
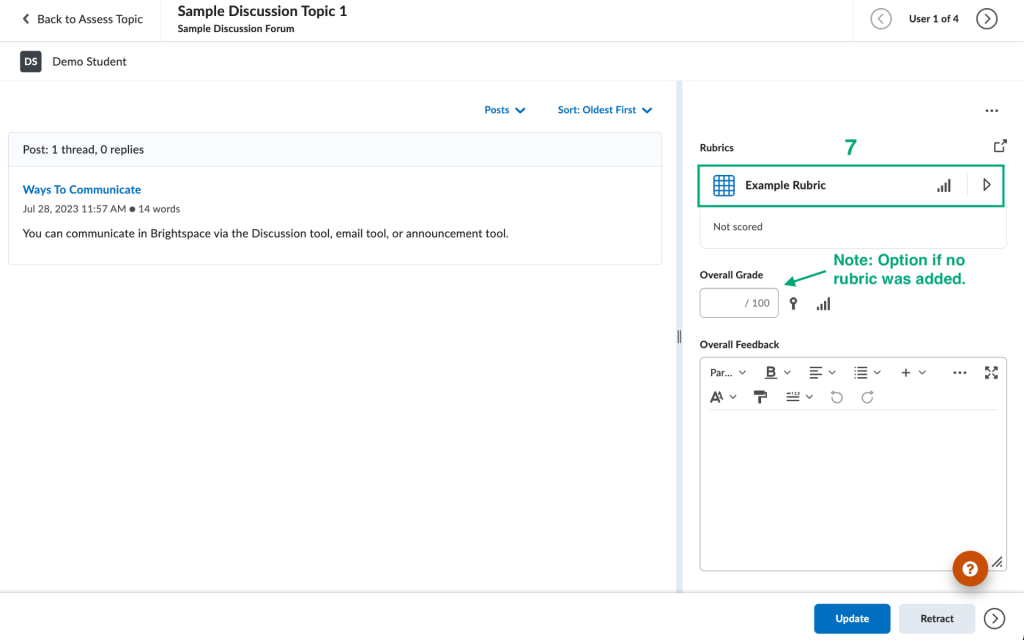
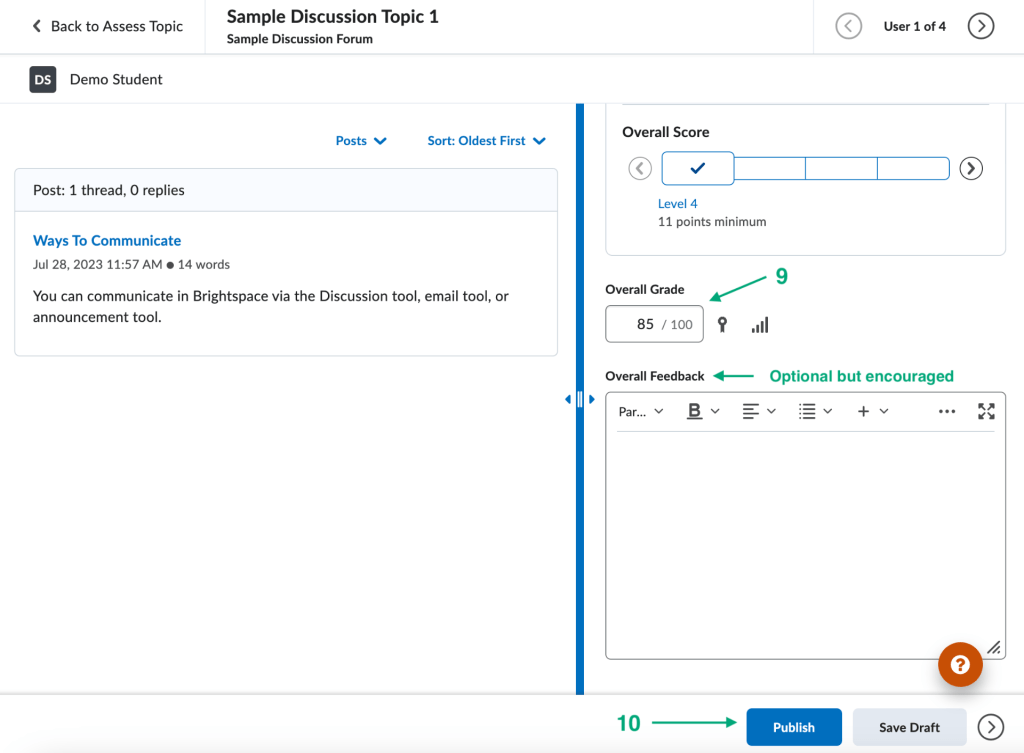
7. On the right side of the discussion topic assessment screen, is the option to grade via rubric. Expand the rubric criteria by clicking the arrow.
Note: If no rubric was added, type in the grade for the discussion topic in the Overall Grade box and then click the publish button at the bottom of the screen.
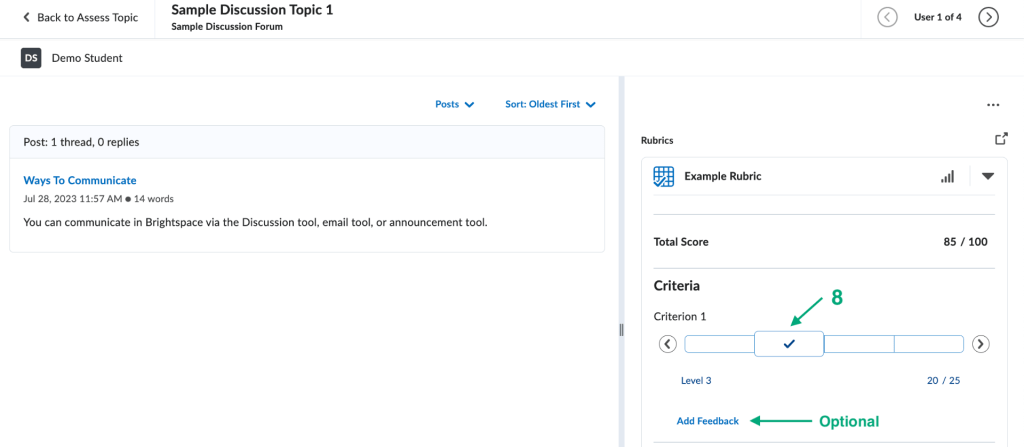
8. Use the rubric and toggle the slider to the level/grade for each criteria.
Optional: Add individual feedback to each criteria instead of or in addition to the overall feedback.
9. Overall Feedback will automatically calculate if a rubric was used to grade the submission. If no rubric was used, type in the overall grade.
Optional: Add in an overall feedback message to the learners.
10. Click the Publish button to publish the learner’s score to the grade book.
Additional Resources
How To Grade Quizzes
Follow this step by step process to locate quiz submissions for grading.
- Go to Course Tools on the navigation bar and choose the Quizzes tool from the drop down menu.

2. Click the carrot button next to the Quiz Title and select Grade from the drop down menu.

3. Select the Attempts tab and click on a student attempt to begin grading.

4. On the Attempt page, scroll down to Quiz Results. Here you can view a students answer, score, and leave feedback for each question. Once the scoring is complete remember to select the blue Update button at the bottom right of the screen.

5. To return back to the attempts page, click the “< Back” button at the top left of the page.
How To Calculate A Mid Term Grade Item
Step By Step Instructions To Calculate A Midterm Grade
- Go to Grading and Progress on the navigation bar.
- Choose the Grades tool from the drop down list.
- Go to the Manage Grades tab.
- Click the blue New button.
- Choose Item from the drop down list.
- Choose Calculated from the Grade Item Type list.
- Enter Grade Item Name: Midterm Grade.
- Scroll down until you see the Calculation section. Check off the grade book items that will be included in the midterm grade calculation.
- Click Save and Close at the bottom of the screen.
To view the midterm grades:
- Go to the Enter Grades tab at the top of the screen
- Scroll to the right of the grades list and find the Midterm Grade column to verify the information.
To reorder the midterm grade column:
- Go to Grade Items.
- Click Manage Grades.
- Click on More Actions.
- Select Reorder.
- Choose the number from the drop down list to change the order in which you see the midterm grade in the grade book.
How To Calculate A Pass/Fail Grade Item and Assignment
Step By Step Instructions To Calculate A Pass/Fail Grade Item And Assignment
1. Go to Grading and Progress on the navigation bar and choose Grades from the drop down menu.

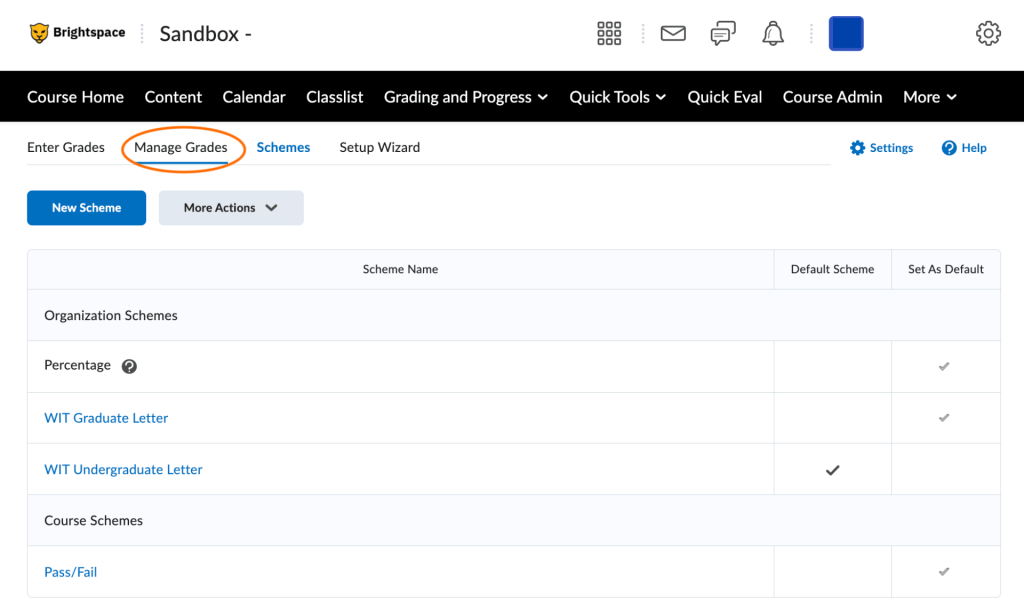
2. On the left side of the screen, click the Schemes link.
3. Select the blue, New Scheme button.
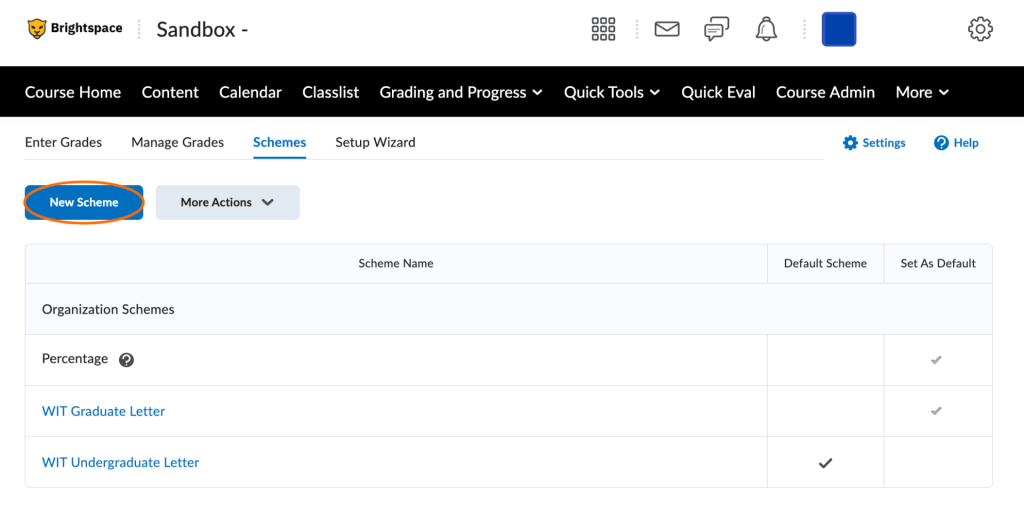
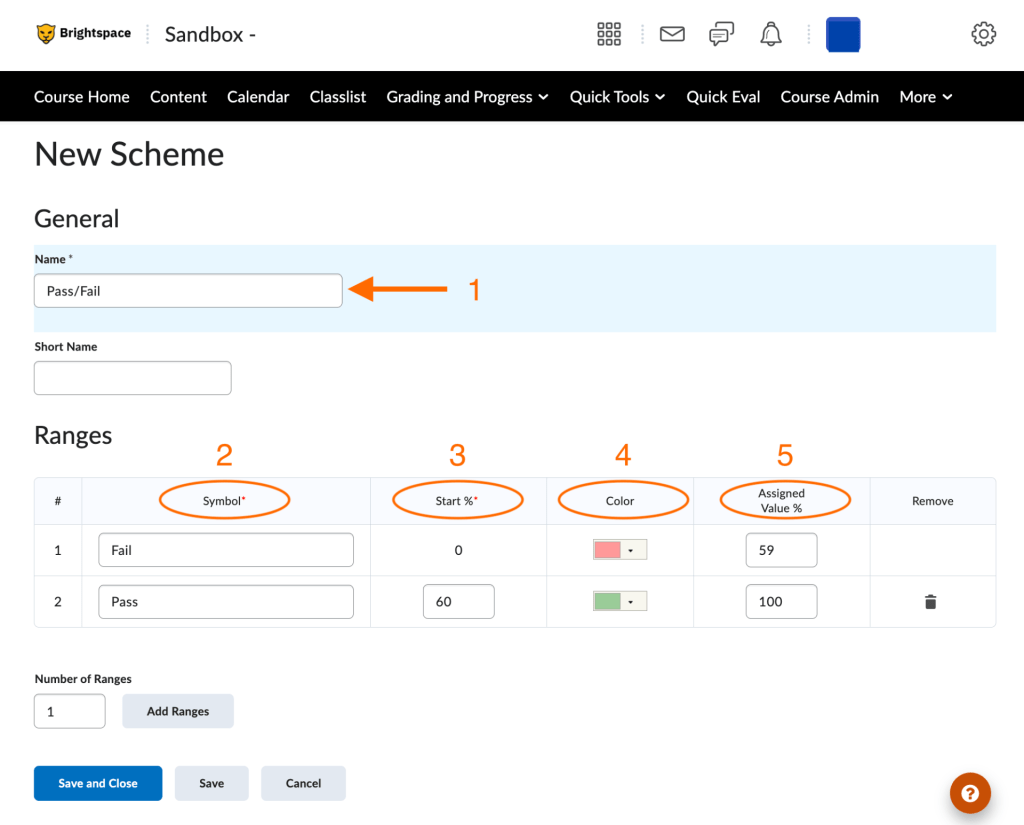
4. In the Ranges section, delete the third range by clicking the trash can icon in the remove column.
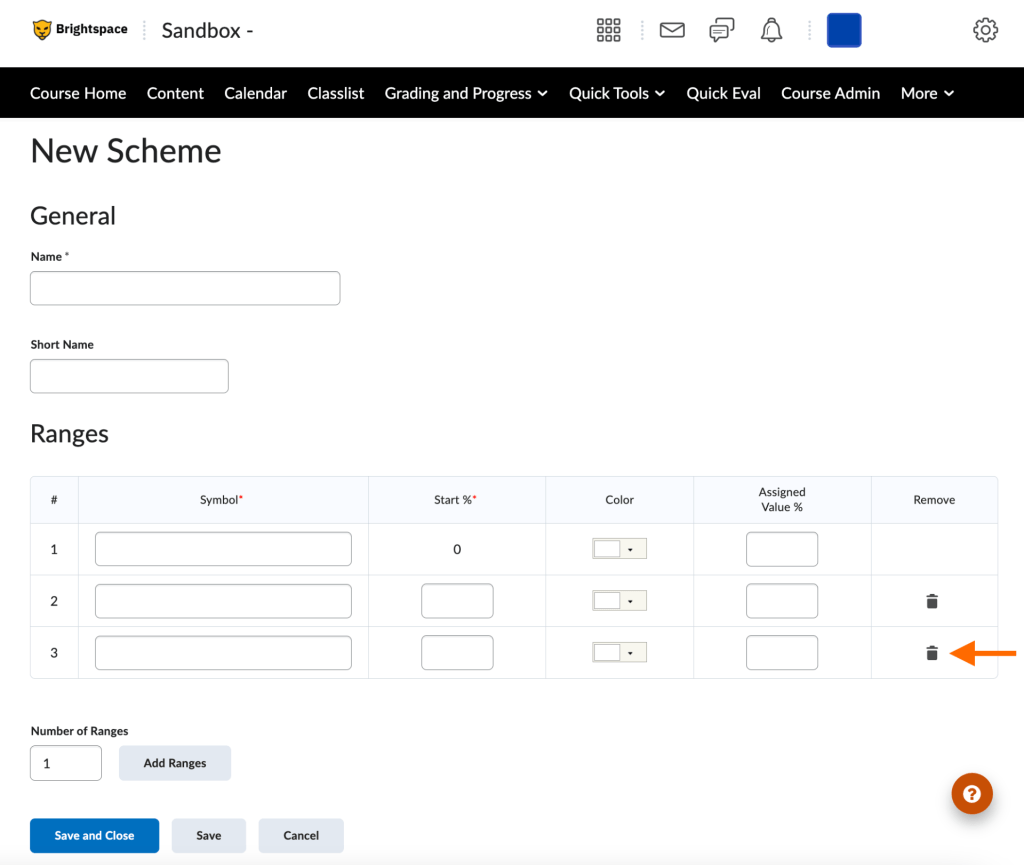
5. In the name text box type: Pass/Fail.
6. In Symbol box 1 type in Fail, set the color to red, and assign the value to 0%.
7. In symbol box 2, type in Pass, set the color to green, and assign the value to 100%.
8. Click the blue save and close button.
9. On the left side of the screen, click the Manage Grades link.
10. Select the blue, New button.
11. From the drop down choose Item.
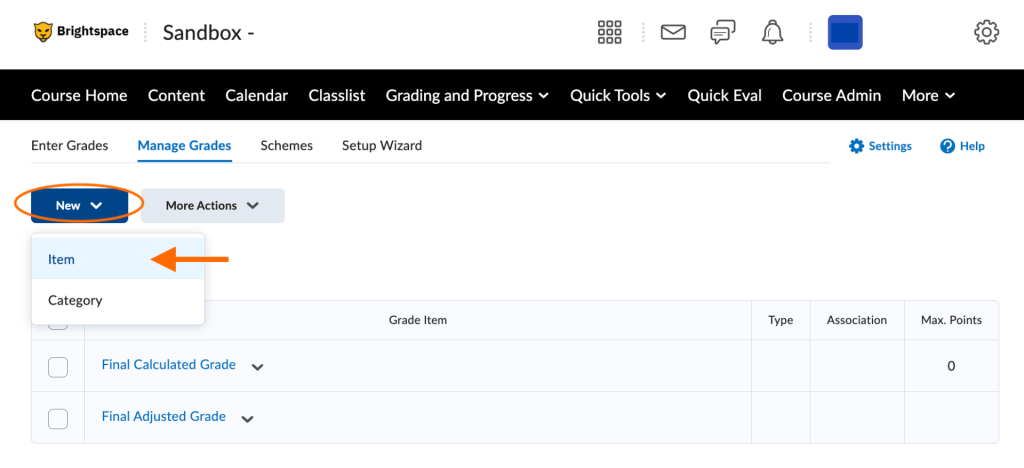
12. From the Choose Grade Item Type list, select Selectbox.
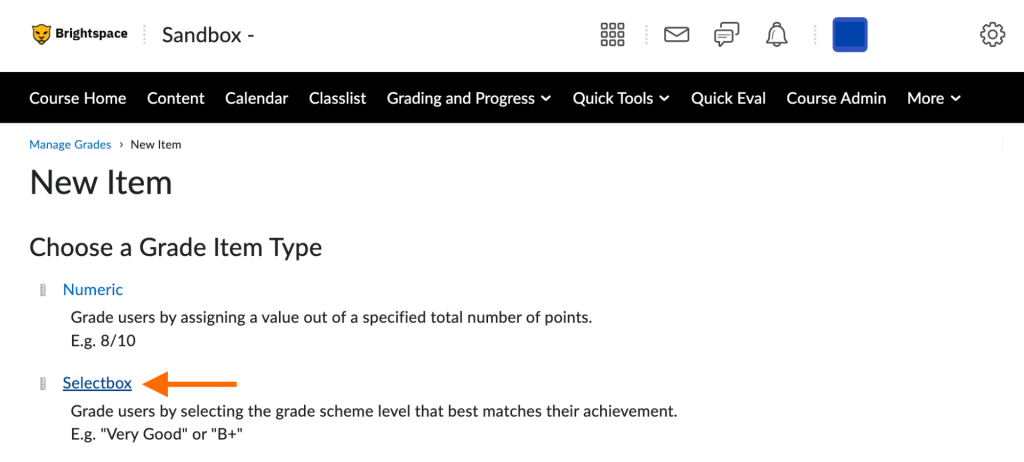
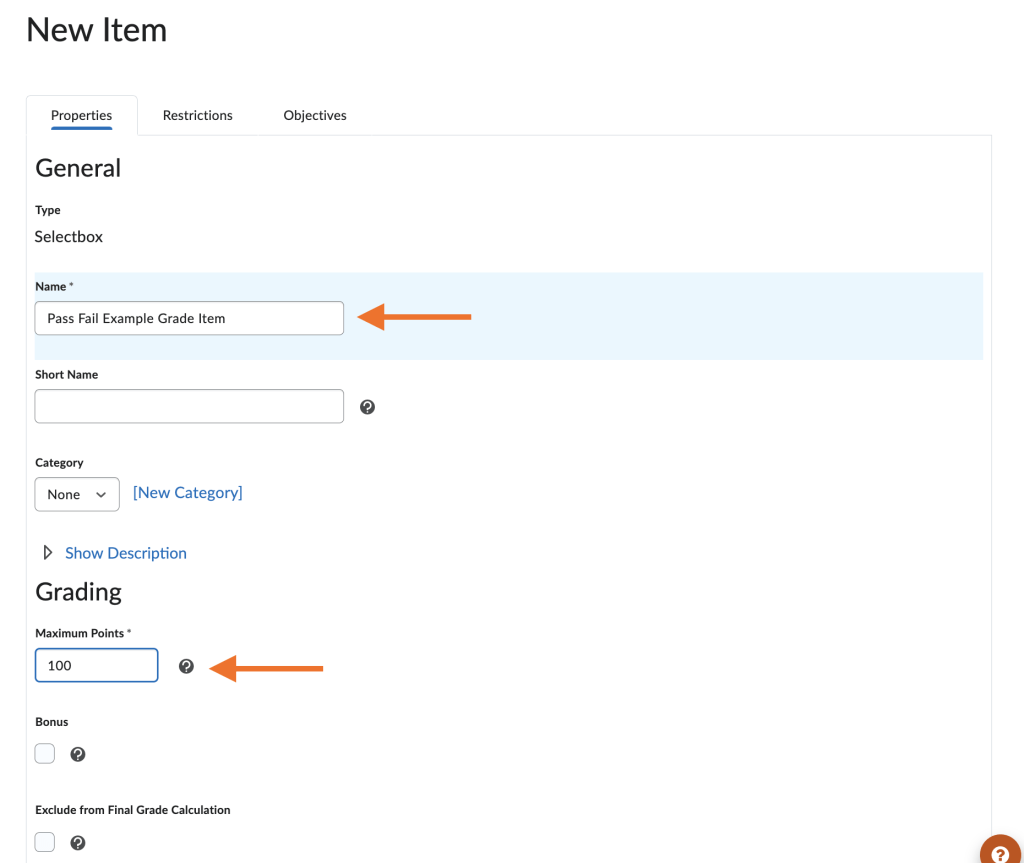
13. Type in a name for the grade item.
14. Choose the grade category, if there is one, that you want this grade item to reside in.
15. Choose the number of points this grade item is.
16. Choose whether to exclude from final grade or not.
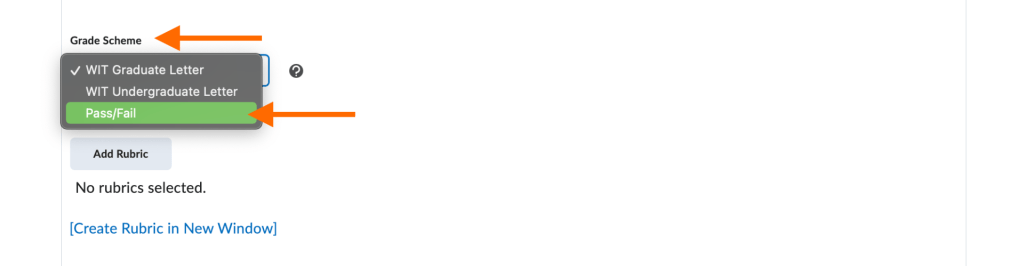
17. Click the Grade Scheme drop down box and select the new Pass/Fail grade scheme.
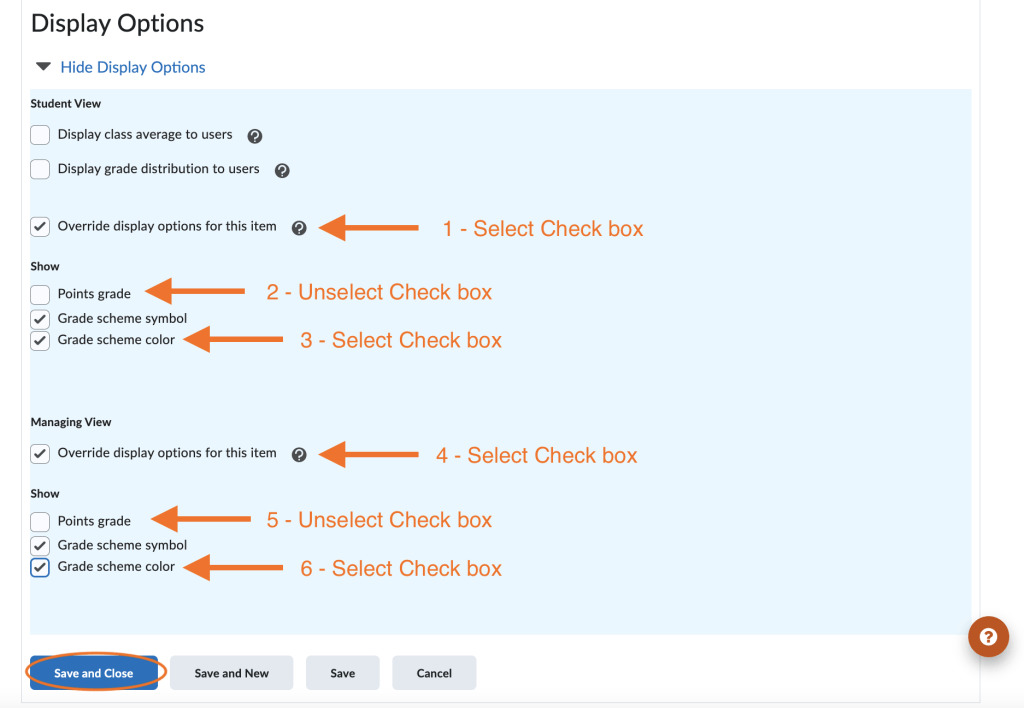
18. Scroll down until you see Display options.
19. Click the Override display options for this item under Student view.
20. Deselect the check box for points grade.
21. Select the check box for grade scheme color.
22. Click the Override display options for this item under Managing view.
23. Deselect the check box for points grade.
24. Select the check box for grade scheme color.
25. Click the blue, Save and close button.
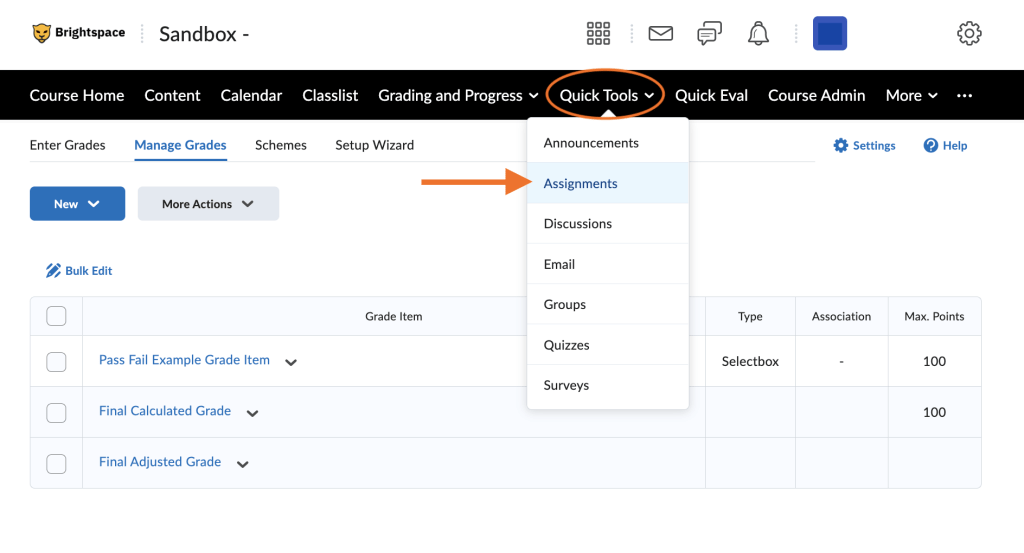
26. Click Quick Tools on the navigation bar.
27. From the drop down menu, select Assignments.
28. On the assignment page, click the blue New Assignment button.
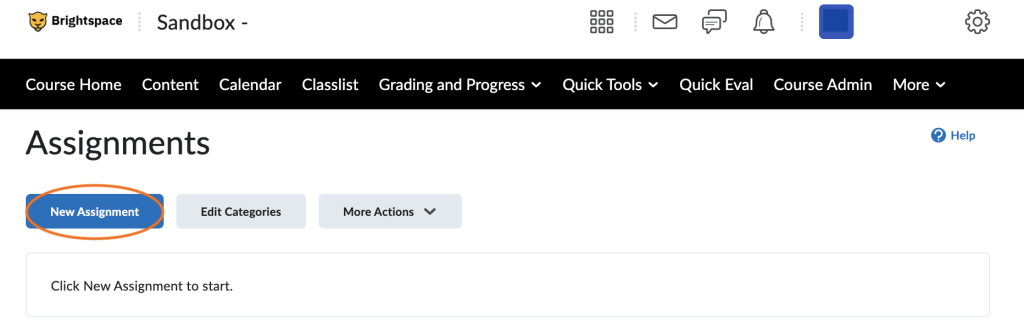
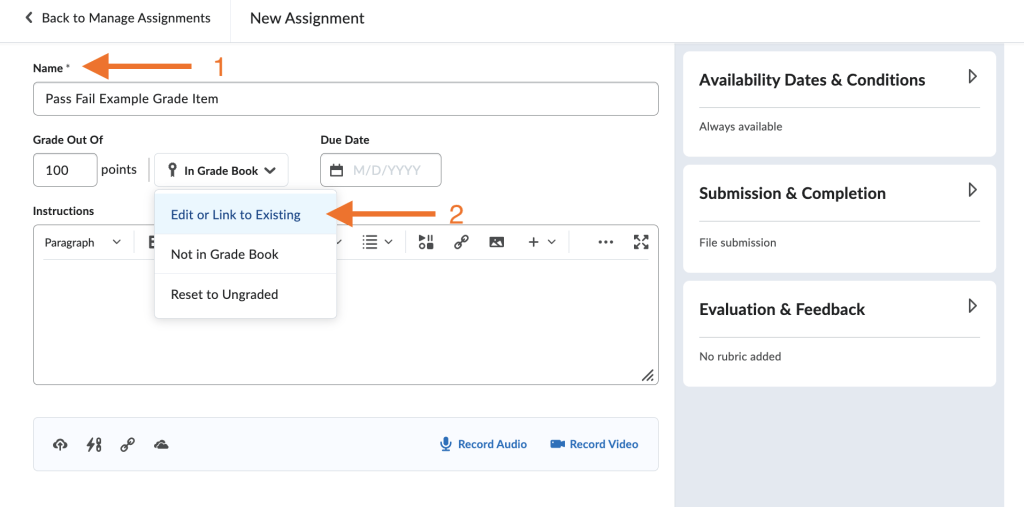
29. On the edit assignment page, name the assignment, add in point value, and the description.
30. Select the Not in Grade Book and from the drop down menu select Edit or Link to Existing.
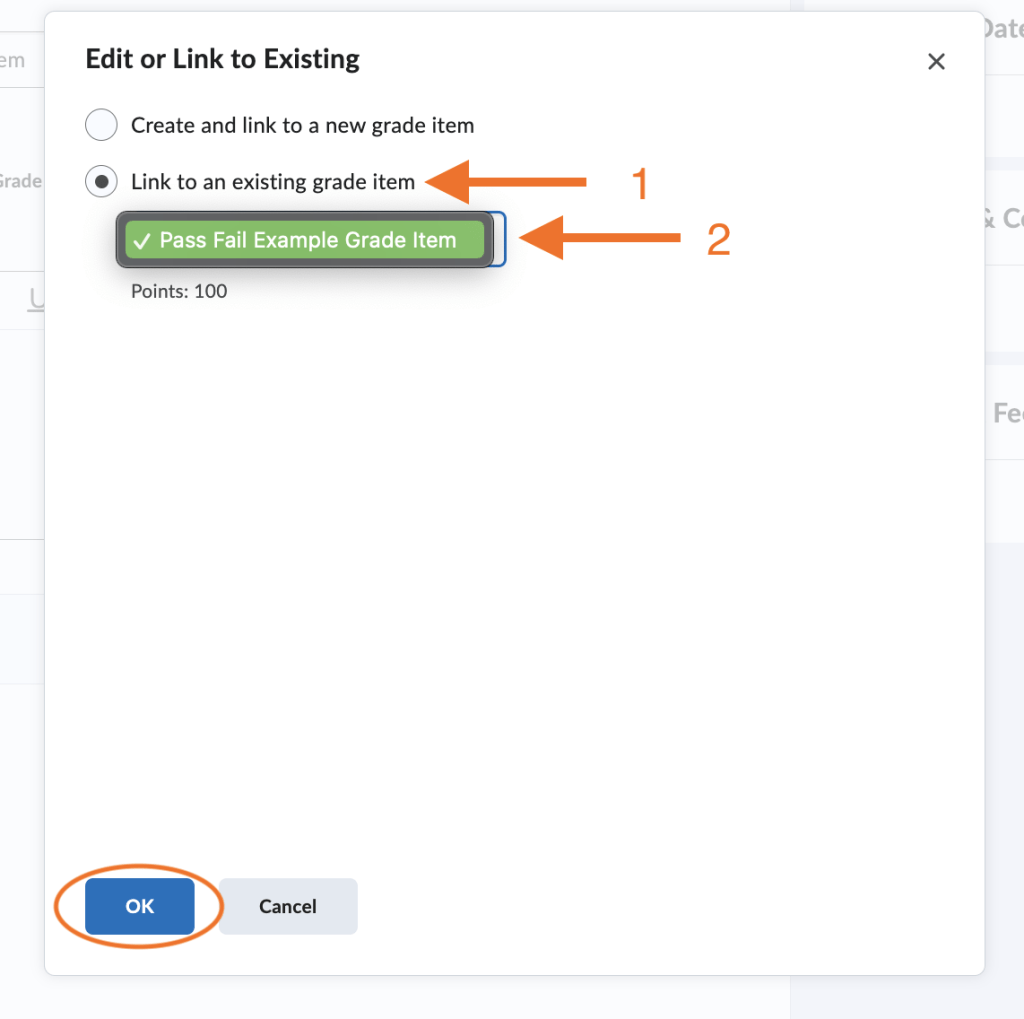
31. Click the bubble next to link to existing.
32. From the drop down menu, select the correlating grade item for pass/fail.
33. Click ok.
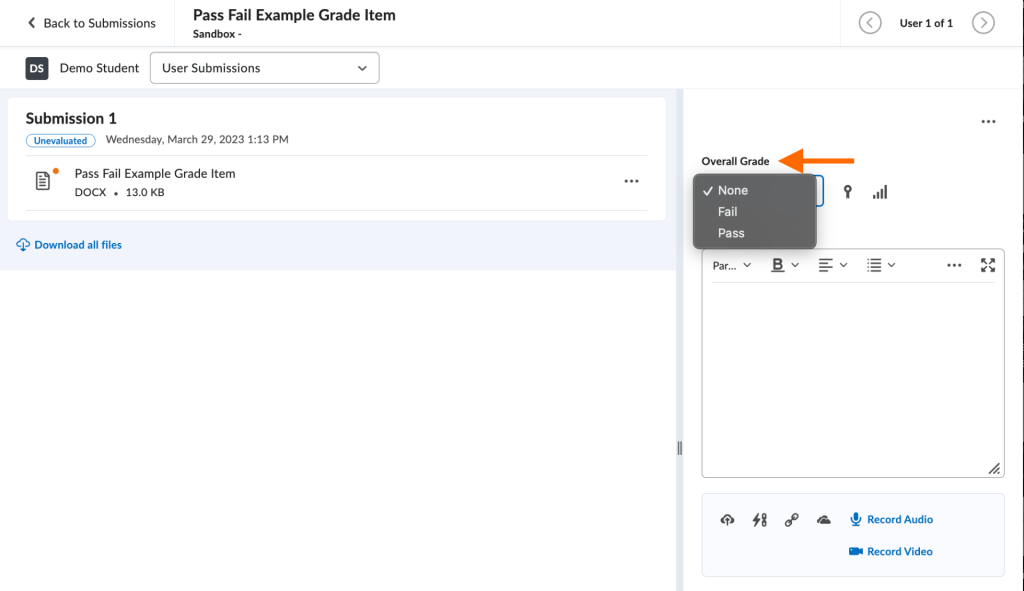
34. In the Assignment Submissions page, select the Evaluate link to begin grading this assignment.
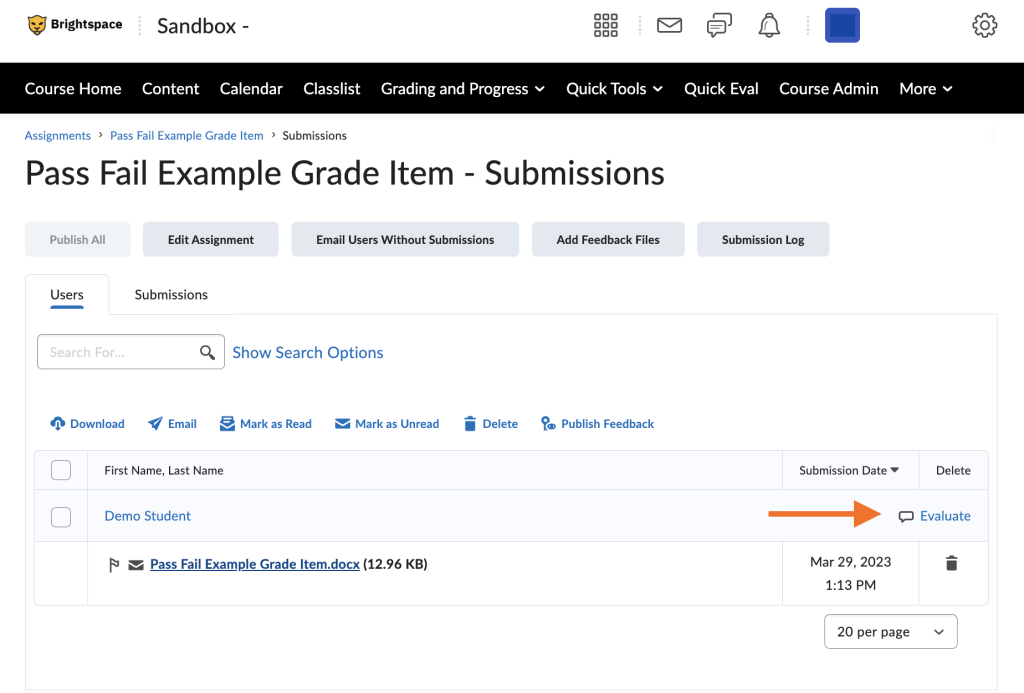
35. On the right side of the screen under Overall Grade, select none for the drop menu to show and choose between pass or fail.
36. Click the blue Update button on the bottom to update the grade to the grade book.
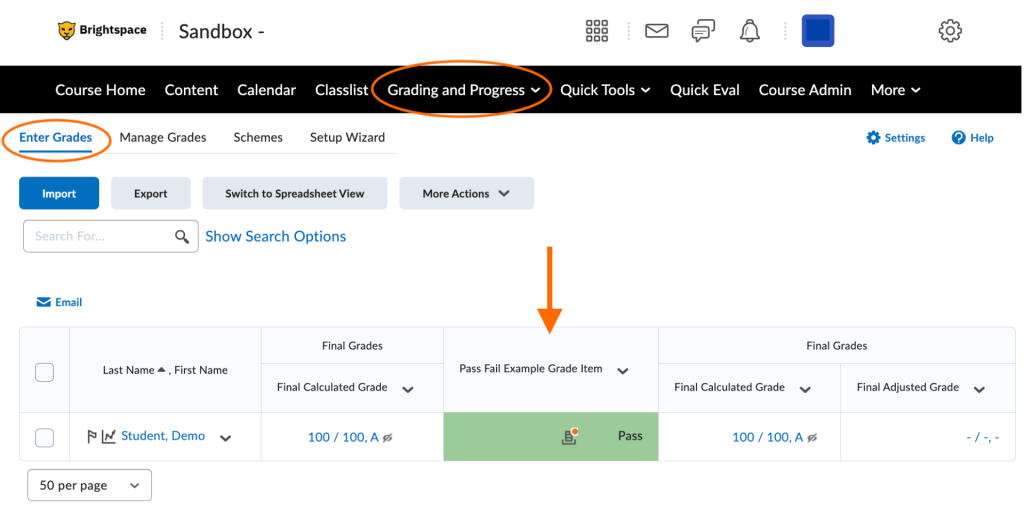
37. Go to Grading and Progress and choose the Grades tool.
38. On the Enter Grades screen you will now see the graded item with a pass or fail indicator.
How To Release Final Grades
Troubleshoot Your Grade Book
If you’re running into issues with your grade book or grade items, check the following to see if your issue is listed. If it’s not and you need further assistance, please email our team at Teach@wit.edu
Video Playlist: Brightspace Grade Book And Assessments
Final Grade Questions In Brightspace
Final grades reflect all scored assessments in your course, and represent the overall learner achievement. Final grades can be calculated or adjusted. This presentation will cover common questions you may have about final grades and a quick video on how to release the final grades in Brightspace.
Why are my learners’ final grades not being calculated correctly?
You may see inaccurate final grades if you did not select the “Automatically Keep Final Grades Updated” option when setting up your grade book, there are grade items that are missing grades, or you didn’t change your selection from Drop Ungraded Items to Treat Ungraded Items as 0 at the end of the course.
Solution:
- Go to Grading & Progress on the navigation bar.
- Go to the Grades tool.
- Click the Settings button.
- Go to Calculations Options tab.
- Change the settings accordingly.
How do I exclude grade items from the final grade?
There may be some grade items that you don’t want included in your learners’ final grades for example, a practice assessment.
Solution:
- Go to Grading & Progress on the navigation bar.
- Go to the Grades tool.
- Select Manage Grades tab.
- Find the Grade Item you want to exclude.
- Click the down arrow and choose Edit from the drop down list.
- Scroll down until you see the Grading section and select the box: Exclude From Final Grade Calculation.
My course is set as”adjusted final grade” but I want to give calculated final grades to some learners.
Your grade book setup must have “Adjusted Final Grades Selected” under the Grades tool Settings and the Calculations Options tab.
Solution:
- Go to Grading & Progress on the navigation bar.
- Go to the Grades tool.
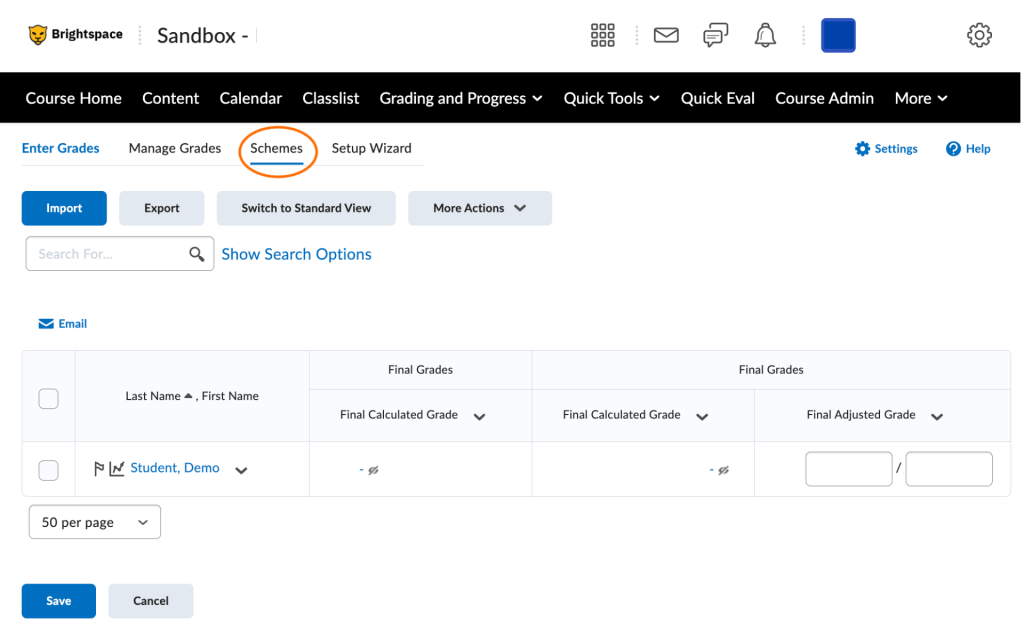
- Click the down arrow next to Final Adjusted Grade and choose Enter Grades from the drop down list.
- Under the Final Adjusted Grade, click the side arrow next to the grade to Transfer Final Calculated Grade for the student.
- Click the box next to Release grade if you’re ready to release grades to students.
How do I enter an adjusted final grade?
Your grade book setup must have “Adjusted Final Grades Selected” under the Grades tool Settings and the Calculations Options tab.
Solution:
- Go to Grading & Progress on the navigation bar.
- Go to the Grades tool.
- Click the down arrow next to Final Adjusted Grade and choose Enter Grades from the drop down list.
- Under the Final Adjusted Grade, change the student’s grade accordingly.
- Click the box next to Release grade if you’re ready to release grades to students.
Can final grades be automatically released?
The option to automatically release final grades is possible and can be set up prior to the course or during the course at any time.
Solution:
- Go to Grading & Progress on the navigation bar.
- Go to the Grades tool.
- Click the Settings button.
- Go to Calculations Options tab.
- Select Automatically Release Final Grade.
- **Select Automatically Keep Grades Updated if you would like grades to automatically update as well for the automatic release.**
What will my learners see when I release final grades?
Your learners can see their final grades in two places: in the Grades tool or in Class Progress.
Solution to Impersonate Demo Student:
- Go to Class List on the navigation bar.
- Click the arrow next to the Demo Student and choose Impersonate from the drop down list.
Solution:
- Go to Grading & Progress on the navigation bar.
- Go to the Grades tool to see how to the learner can view their calculated or adjusted final grade.
- Go back to Grades & Progress on the navigation bar.
- Choose Class Progress tool to see how learned can see an overall summary of their grade.
What if I don’t want my learners to know how I calculated their final grades?
If you are using adjusted final grades or would prefer for your learners not to see how their final grade was calculated, make sure you have deselected the option Display How Final Grade Was Calculated To Users.
Solution:
- Go to Grading & Progress on the navigation bar.
- Go to the Grades tool.
- Click the Settings button.
- Go to the Org Unit Display Options tab.
- Deselect the box next to Display How Final Grade Was Calculated To Users option.
How do I un-release final grades?
Grades can release or unreleased at any point during the course duration.
Solution:
- Go to Grading & Progress on the navigation bar.
- Go to the Grades tool.
- Under Final Calculated Grade column, click the drop down arrow and choose Enter Grades.
- Select the box next to First Name, Last Name to select all of the students within the course.
- Click Release/Unrelease.
When should I release final grades? Is there any benefit to releasing them before the end of a course?
You can release final grades whenever you want your learners to see them. You may decide to release final grades once all course assessments are graded, or you can release them at the beginning of your course.
Students will be able to see their grades in Class Progress or in Grades. This can include their current grade, their graded assessments, feedback from the professor, etc.
Why can’t my students see a grade book item in their Grades Tool but can see their graded submission in the Assignments Tool?
The option of Setting Start and End Dates or Hide From Users is available in the restrictions tab when creating a grade book item. By choosing Hide From Users when creating the grade book item, it will only restrict students’ visibility of the item in their Grades Tool but not the graded submission in their Assignment Tool.
Solution:
- Go to the Grades Tool on the navigation bar.
- Find the grade book item that needs to be changed.
- Click the drop down arrow and choose Edit.
- Select the Restrictions tab.
- Unselect Hide From Users.
- Click Save and Close.
The following images show what the students would see in the scenario. Notice in the first image that the “Wheel Spacer Drawing Assignment” is visible to the demo student in the Assignment Tool while in the second image, that same assignment is not visible to the demo student in the Grades Tool list.


LeopardWeb Grades
How do I submit grades to LeopardWeb?
Check out our step-by-step guide for submitting grades to LeopardWeb.
As of Spring 2023, a new method of submitting grades to LeopardWeb is available. Our friends from the Registrar’s Office have the most up-to-date information. Learn more at their Faculty Resources page.