
Why Use Rubrics?
As the instructor, you can use the Rubric Tool to support learning by assessing the students’ work efficiently, consistently, objectively, and quickly.
Rubrics provide students with a clear understanding of what is expected of them on an assignment, project, paper, etc.
Rubric Types Available
Holistic Rubrics
Single criterion rubrics (one-dimensional) used to assess participants’ overall achievement on an activity or item based on predefined achievement levels. Holistic rubrics may use a percentage or text only scoring method.
Analytic Rubrics
Two-dimensional rubrics with levels of achievement as columns and assessment criteria as rows. Allows you to assess participants’ achievements based on multiple criteria using a single rubric. You can assign different weights (value) to different criteria and include an overall achievement by totaling the criteria. With analytic rubrics, levels of achievement display in columns and your assessment criteria display in rows. Analytic rubrics may use a points, custom points, or text only scoring method. Points and custom points analytic rubrics may use both text and points to assess performance; with custom points, each criterion may be worth a different number of points. For both points and custom points, an Overall Score is provided based on the total number of points achieved. The Overall Score determines if learners meet the criteria determined by instructors. You can manually override the Total and the Overall Score of the rubric.
Create A Rubric
Create A Rubric To Assess Students
Rubrics enable you to evaluate an activity or item based on a set of predefined criteria. Use the Rubrics tool to create rubrics and add them to assessment activities and items within your course. Use rubrics to evaluate quizzes, assignment submissions, discussion activities, grade items, and manual assessment activities in Competencies. You can also use rubrics in ePortfolio for assessing artifacts, collections, reflections, and presentations.
Step By Step Instruction To Create A Rubric
1. On the navigation bar, select More.
2. From the drop down menu, select More Course Tools.
3. From the drop down menu, select the Rubrics tool.

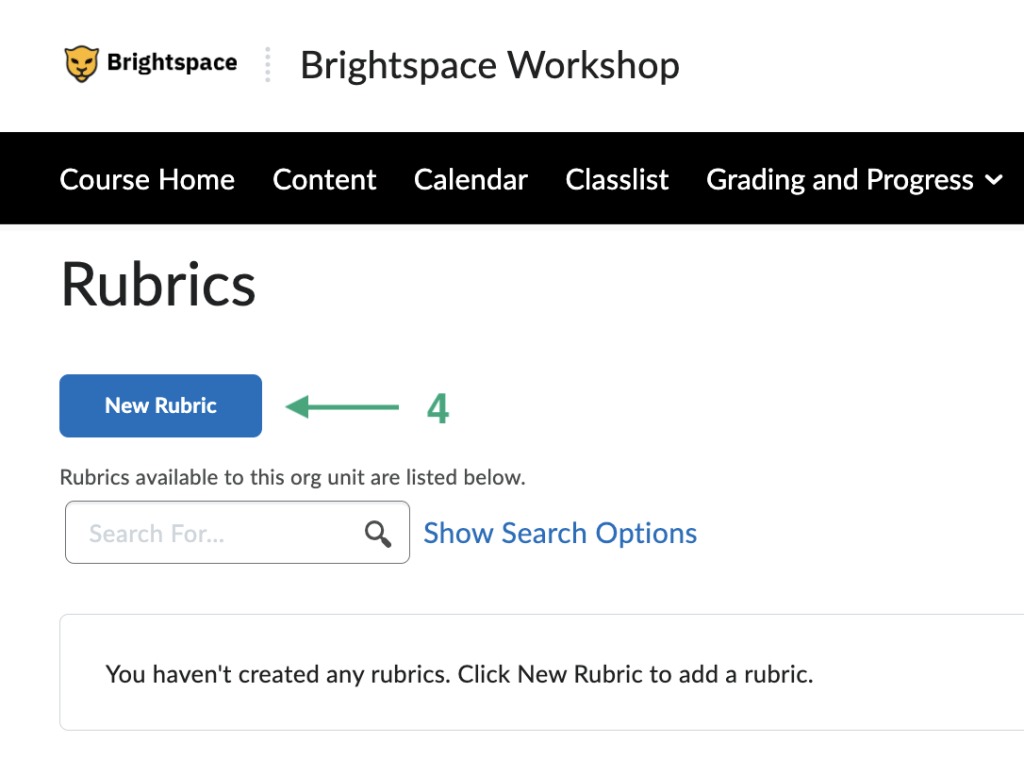
4. Select the blue New Rubric button.
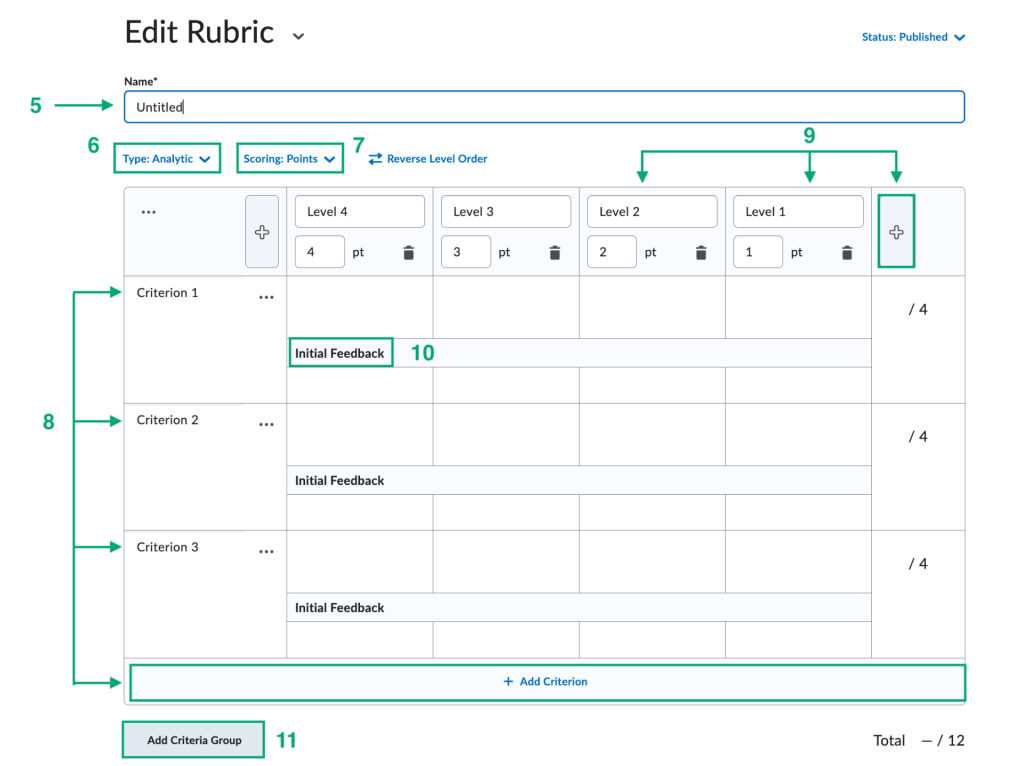
5. Name the rubric.
6. Rubric Type: Choose either a Holistic or Analytic Rubric.
7. Score the Rubric: Choose either No Score, Points (all criteria are worth the same point value), Custom Points (allows each criteria to have different point values).
8. Criterion: Click in the box to begin editing or typing. Add a New Criteria Group by clicking the grey button.
9. Levels: Click on Level 4 -1 and edit the name. Example: Exceeds Expectations, etc. Click in the box to begin editing or typing in the details for the various levels.
10. Initial Feedback: Click in the box to begin editing or typing in the initial feedback to provide the students with the rubric. Example: Great job!
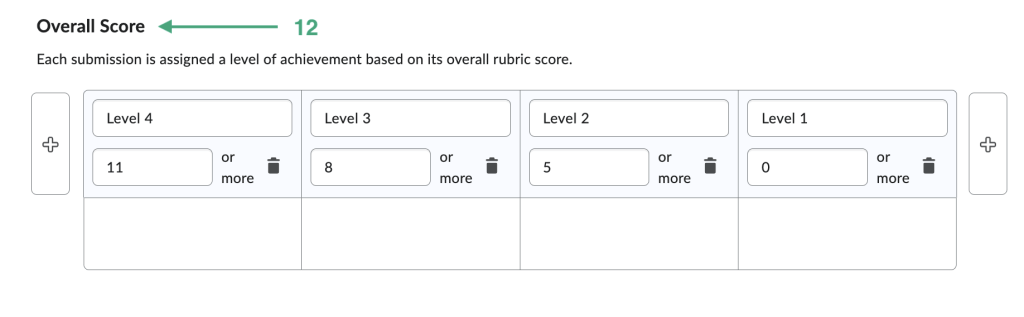
11. Overall Score: Each submission is assigned a level of achievement based on its overall rubric score.
12. Overall Score: Each submission is assigned a level of achievement based on its overall rubric score.
13. Status: Select from the drop down if you want the rubric to be Published, Draft, or Archived on the top right corner of the rubric page.
14. Click the grey Close button. Rubrics automatically save. There is no save button.
Edit A Rubric
Step By Step Instruction To Edit A Rubric
- On the navigation bar, select More.
- From the drop down menu, select More Course Tools.
- From the drop down menu, select the Rubrics tool.
- Find the rubric title you want to edit and click the arrow next to the title.
- From the drop down menu, select Edit.
- On the Edit Rubric page, edit the components you want.
- Click the grey Close button when complete.
How To Attach A Rubric To A Discussion Topic
Step By Step Instruction To Attach A Rubric To A Discussion
1. On the navigation bar, select Quick Tools.
2. From the drop down menu, select Discussions.

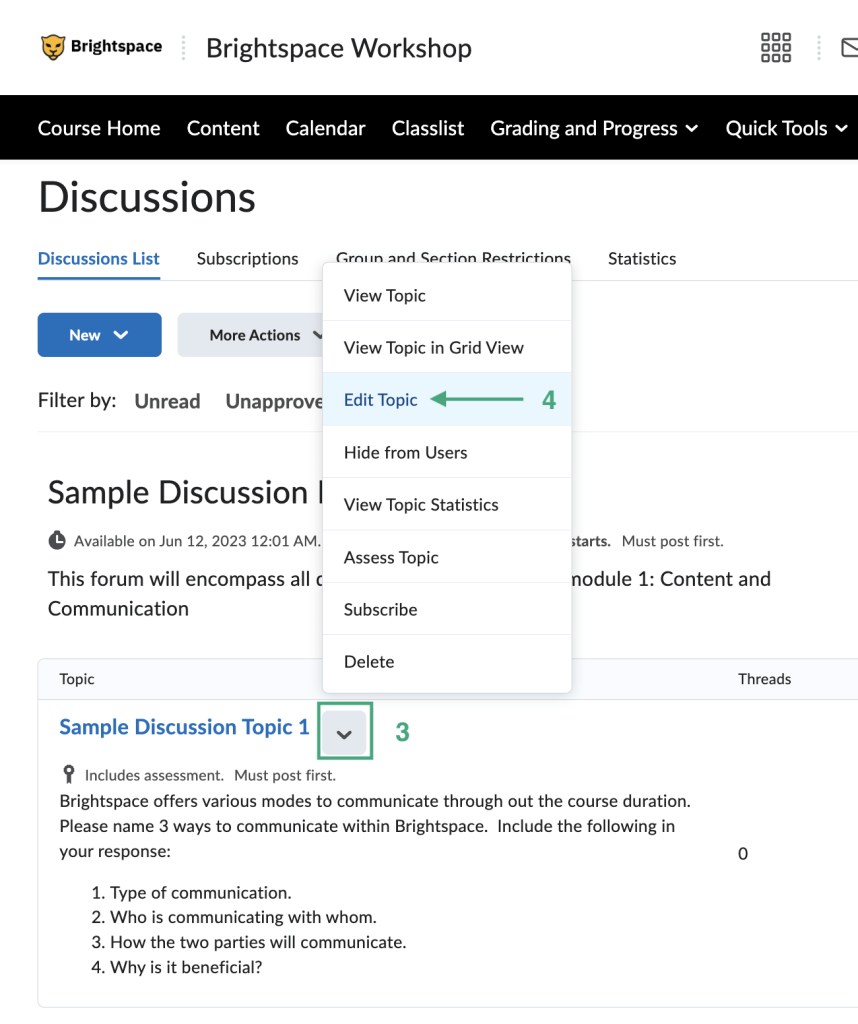
3. Find the Discussion you want to attach a rubric to from the list and click the arrow next to the title.
4. From the drop down menu, select Edit Topic.
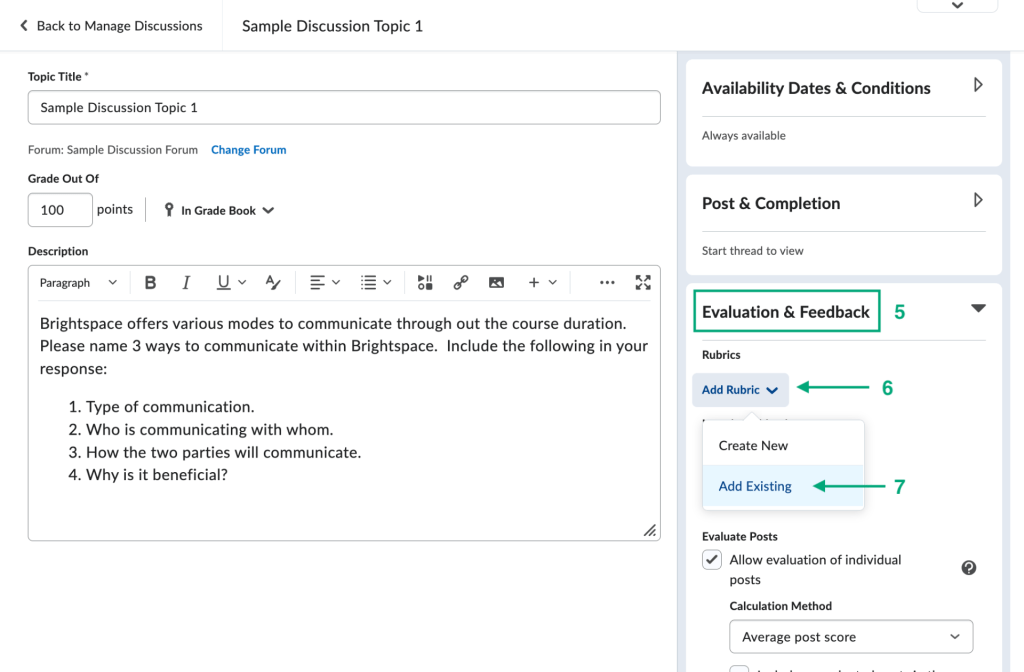
5. On the Edit Assignment page, click the Evaluation & Feedback on the right side of the page.
6. Click the Add Rubric button.
7. From the drop down, select the Add Existing.
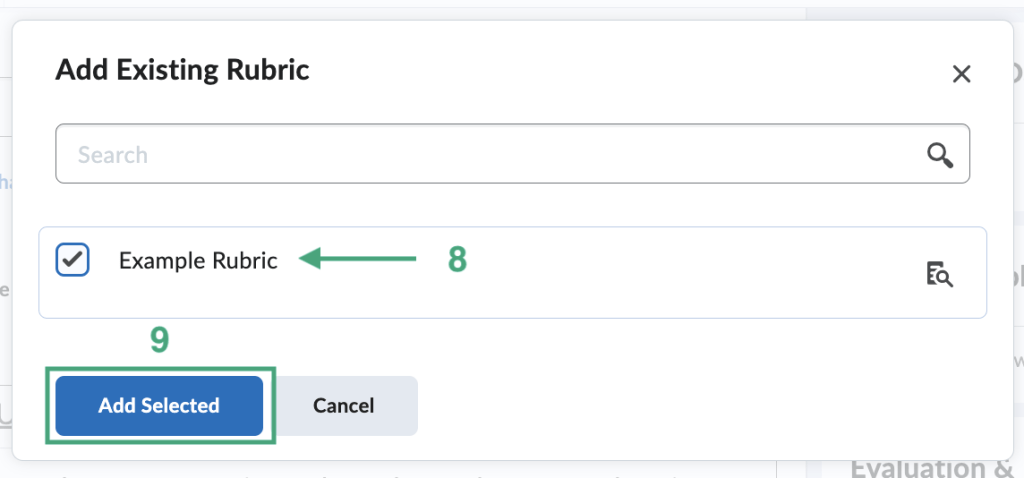
8. From the pop-up list of existing rubrics, select the one you want to attach and click the Add Selected button.
9. Click the Add Selected button.
10. Click the Save and Close button on edit topic page.
How To Attach A Rubric To An Assignment
Step By Step Instruction To Attach A Rubric To An Assignment
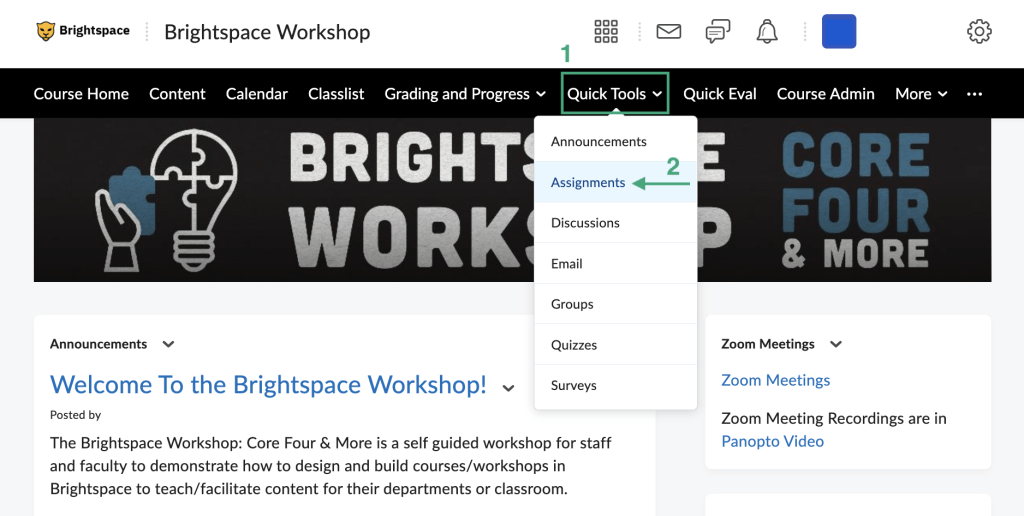
1. On the navigation bar, select Quick Tools.
2. From the drop down menu, select Assignments.
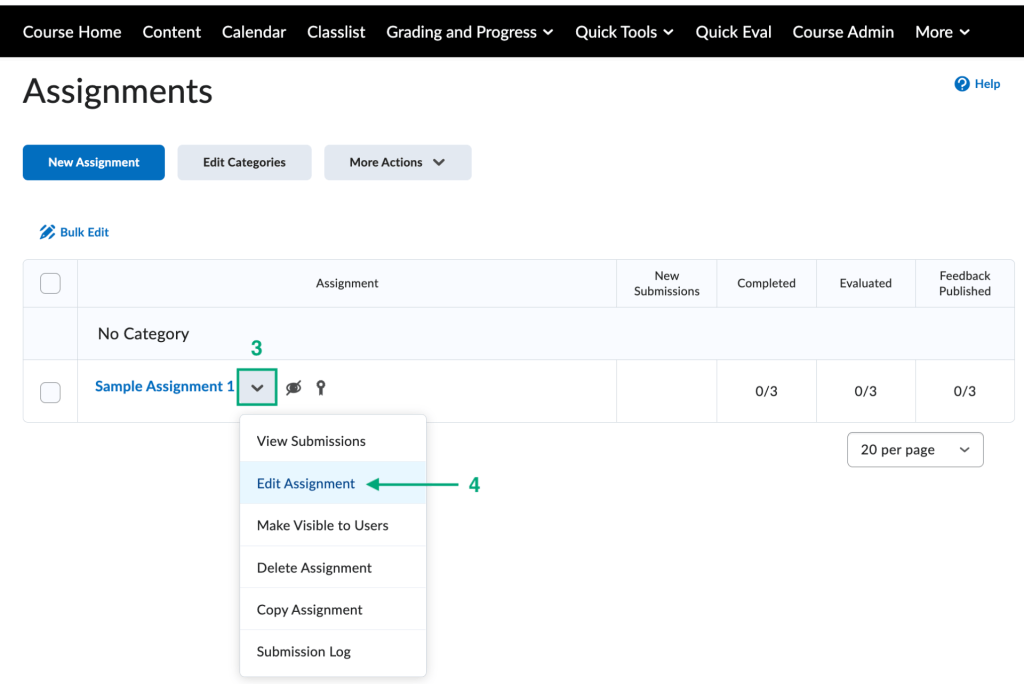
3. Find the assignment you want to attach a rubric to from the list and click the arrow next to the title.
4. From the drop down list, select Edit Assignment.
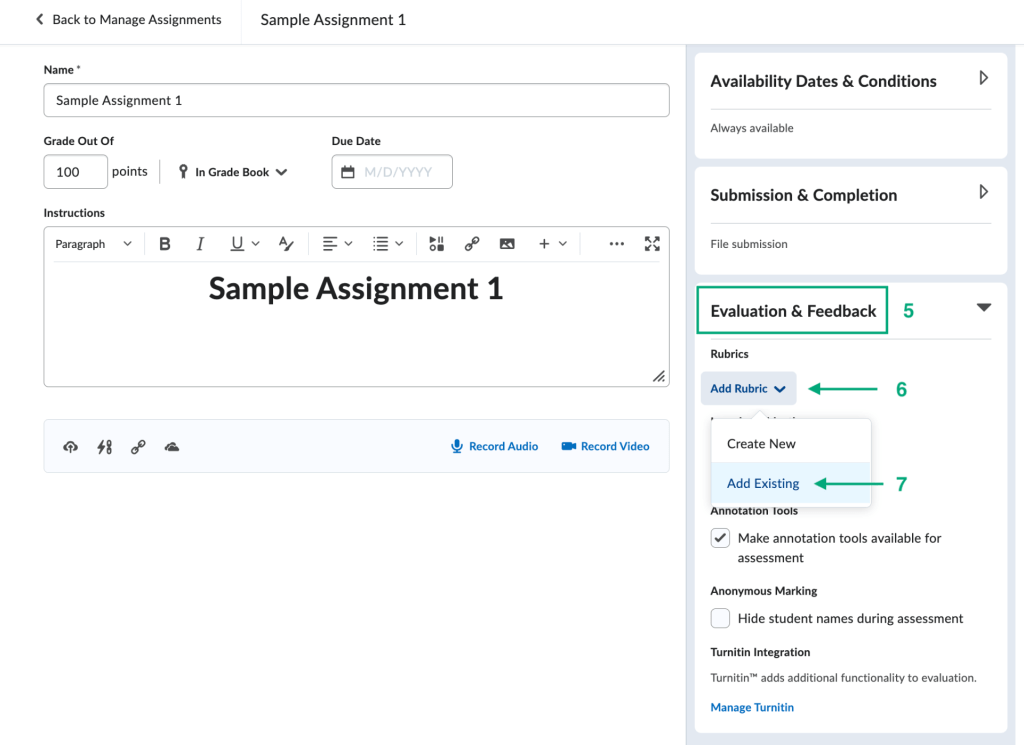
5. On the Edit Assignment page, click the Evaluation & Feedback on the right side of the page.
6. Click the Add Rubric button.
7. From the drop down, select the Add Existing.
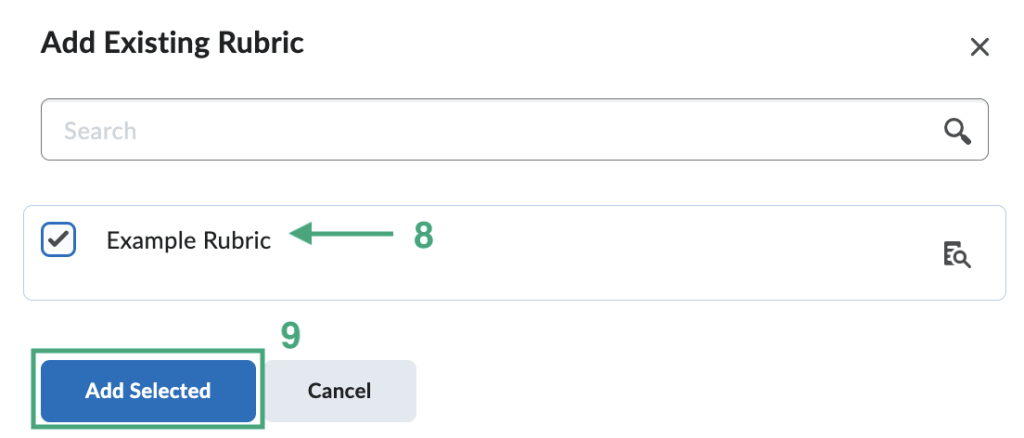
8. From the pop-up list of existing rubrics, select the one you want to attach and click the Add Selected button.
9. Click the Add Selected button.
10. Click the Save and Close button on edit assignment page.
Why Use Groups?
Create group work areas for users with the Groups Tool. You can use groups to organize users’ work on projects and assignments, or you can create special work areas for users with different learning needs.
Users can belong to multiple groups within the same course. For example, each user can simultaneously belong to a group for class projects, a group for special interest discussions, and a group for advanced users. Each group can have its own discussion forums, assignments, and locker area to work in. You can grade members of groups individually or as a team.
Group Enrollment Types
Group Type Descriptions
The following descriptions explain the enrollment type options available when creating a new category and provide conceptual information on when you should use them.
- # of Groups – No Auto Enrollments: Selecting this option creates a specified number of groups, for which you can add any number of users using the Enroll Users page.
- Use this enrollment type when you know how many groups you want to create and which users you want in each group. Select this option when you have a teaching model that divides course participants into specific learning levels or when you want to divide users by skill or interests.
- Groups of #: Selecting this option creates the minimum number of groups needed to place users in groups of a specified maximum size. More groups are created when they are needed to accommodate users. In the Members column of the Groups table, capacity markers display in the form x/y, where x is the number of enrolled students and y is the capacity.
- Use this enrollment type when you know how many users you want in each group. Select this option when you have assignments that require work to be divided between a specific number of users, or when you can only accommodate a set number of users in a lab or work area at one time.
- # of Groups: Selecting this option creates a specified number of groups.
- Use this enrollment type when you know how many groups you want to create, but want the system to place users in groups for you. Select this option when you want group membership to be indiscriminate, or when classroom, resource, or teaching assistant availability restricts the number of groups you can have.
- Groups of # – Self Enrollment: Selecting this option creates the minimum number of groups needed to accommodate users in groups of a specified maximum size automatically. Users choose the group they want to enroll in from the Groups page. In the Members column of the Groups grid list, capacity markers display in the form x/y, where x is the number of enrolled students and y is the capacity.
- Use this enrollment type when you know how many users you want in each group, but you want to allow users to choose their own groups. By default, users cannot self-enroll in more than one group. Select this option when you want users to choose their groups based on friendship, learning style, schedules, or geographic location.
- # of Groups – Self Enrollment: Selecting this option creates a specified number of groups, which users enroll in from the Groups page.
- Use this enrollment type when you want to make a specific number of groups available for users to join. Select this option when you want to organize groups on specific topics, which users can join based on interest, or for creating groups that are responsible for specific aspects of a larger project, which users can join based on knowledge or task preferences. By default, users cannot self-enroll in more than one group at one time.
- # of Groups, Capacity of # – Self Enrollment: Selecting this option creates a specified number of groups with a specified number of enrollments per group. Users choose the group they want to enroll in from the Groups page. In the Members column of the Groups table, capacity markers display in the form x/y, where x is the number of enrolled students and y is the capacity.
- Use this enrollment type when you know how many users you want in each group, you want to allow users to choose their own groups, and you want each group to have a maximum number of users. Select this option when you want users to choose their groups based on areas of interest or responsibility in larger projects, but you want to limit membership in each group to a certain number of users.
- Single user, member-specific groups: Using this option creates a group with a single user where the first name and last name of the learner is the name of the group. When a new learner is enrolled in the course a group is automatically created for them.
- Select this option when you want to create journal type groups with a single member.
Additional Resources
Create A Group Category
What Are Group Categories?
Create categories to set up, organize, and manage related groups. You must create a category and its groups before adding students to groups.
Step By Step Instruction To Create A Group Category
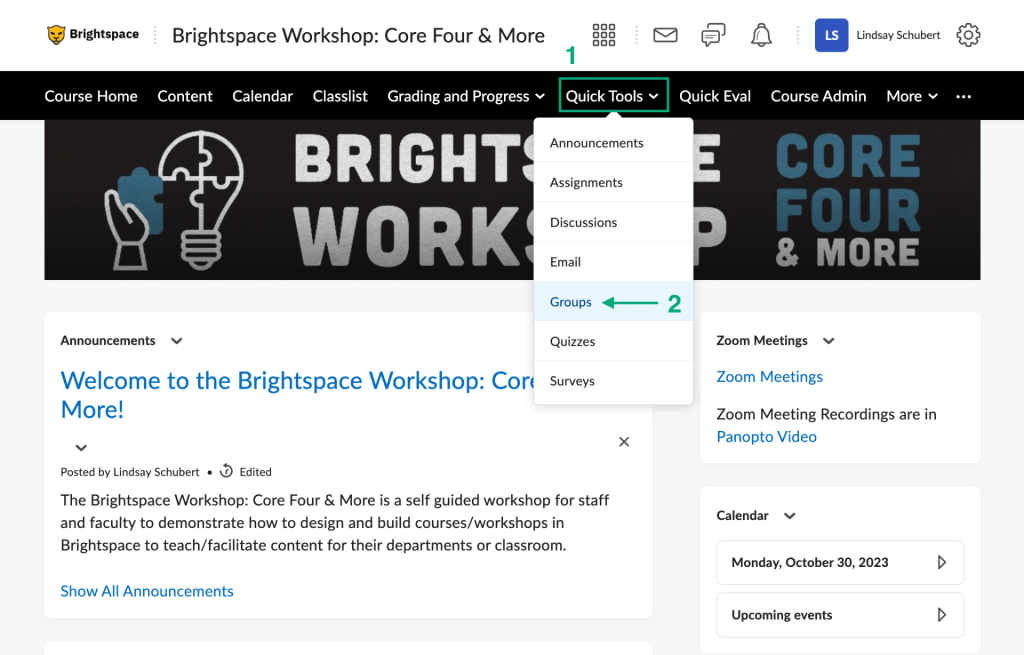
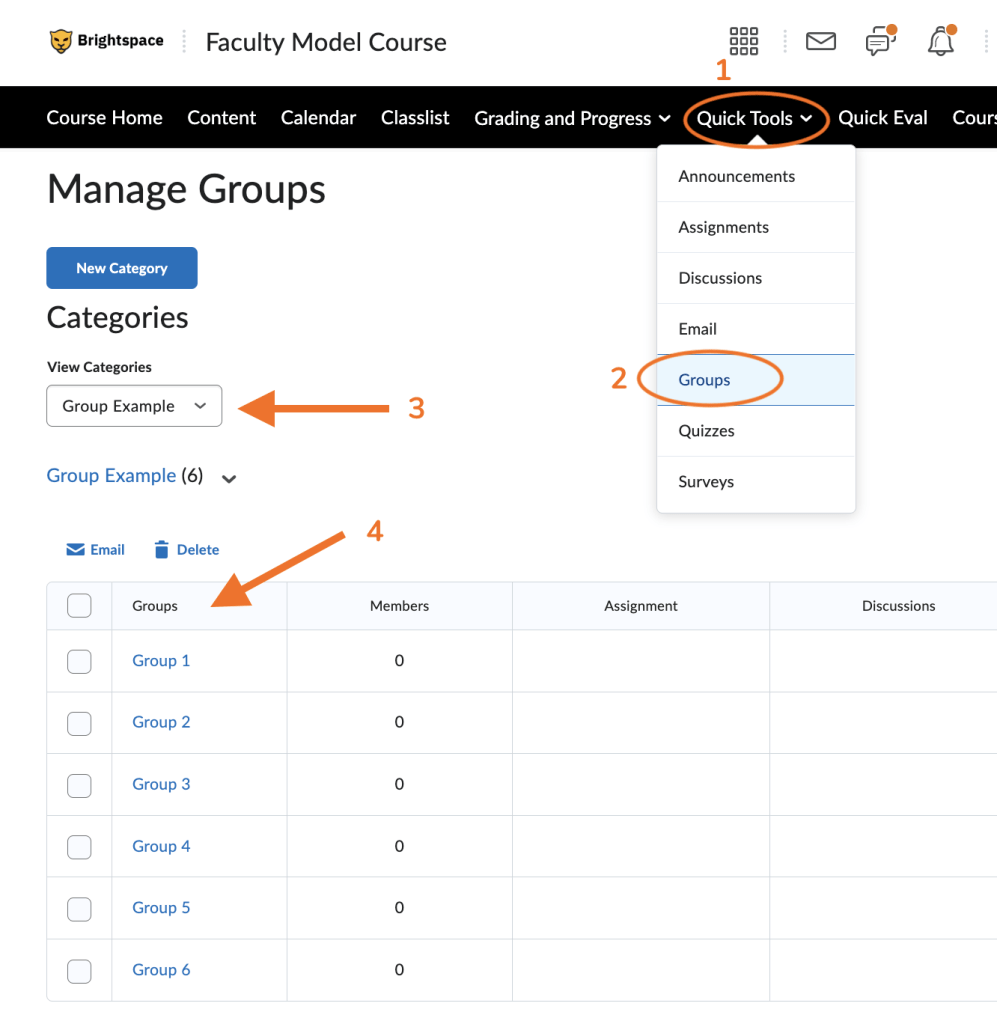
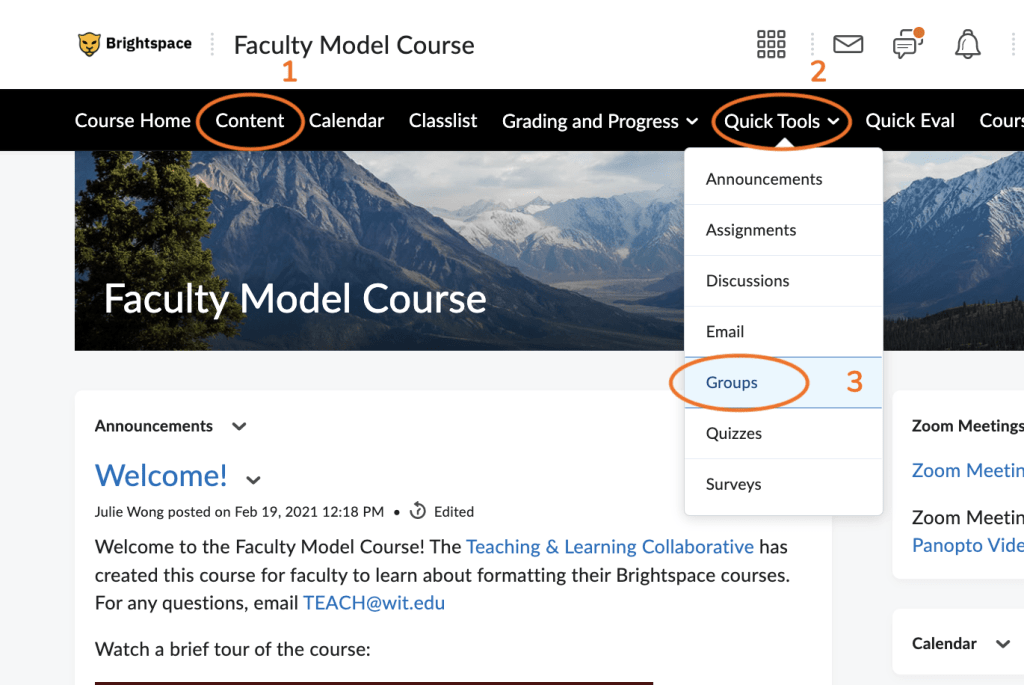
1. On the navigation bar, select Quick Tools.
2. From the drop down list, select the Groups tool.
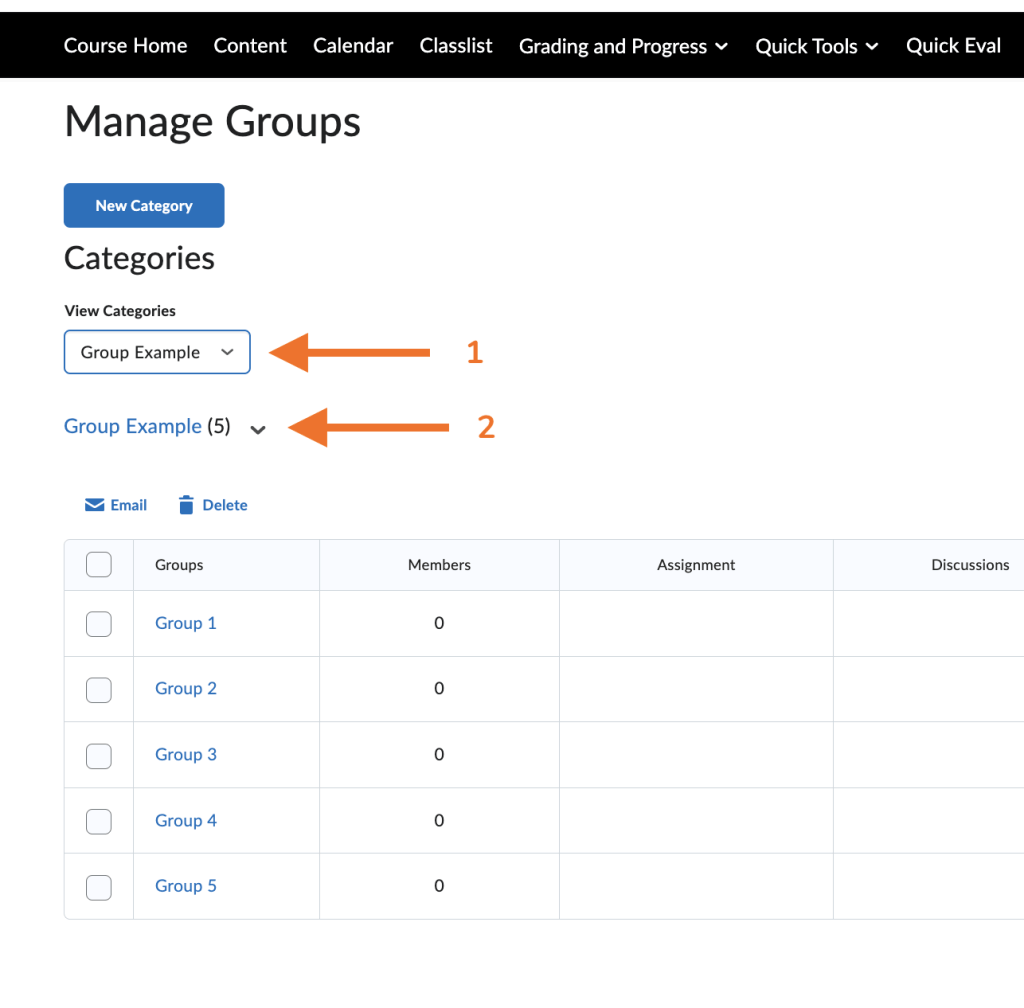
3. On the Manage Groups page, select the blue New Category button.

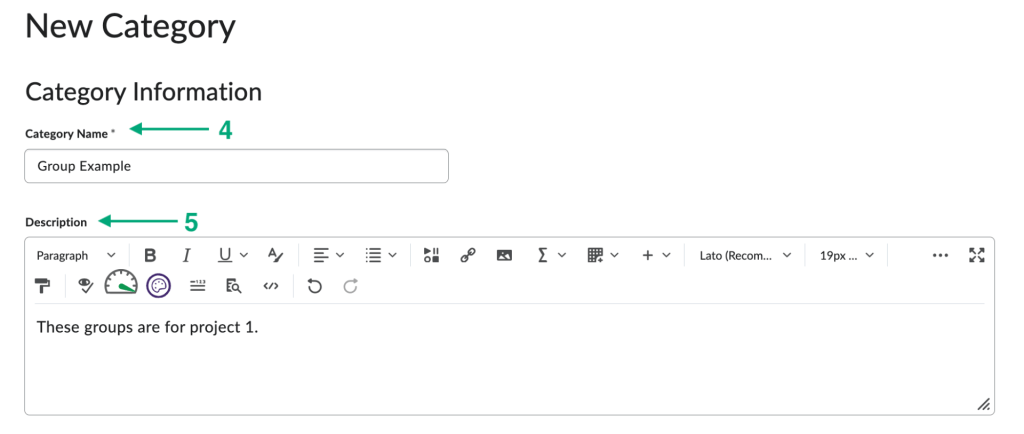
4. On the New Category page, type in a Category Name.
5. Optional: if you’d like, type in a Description of the category (this can be for your own reference only or for all to view).
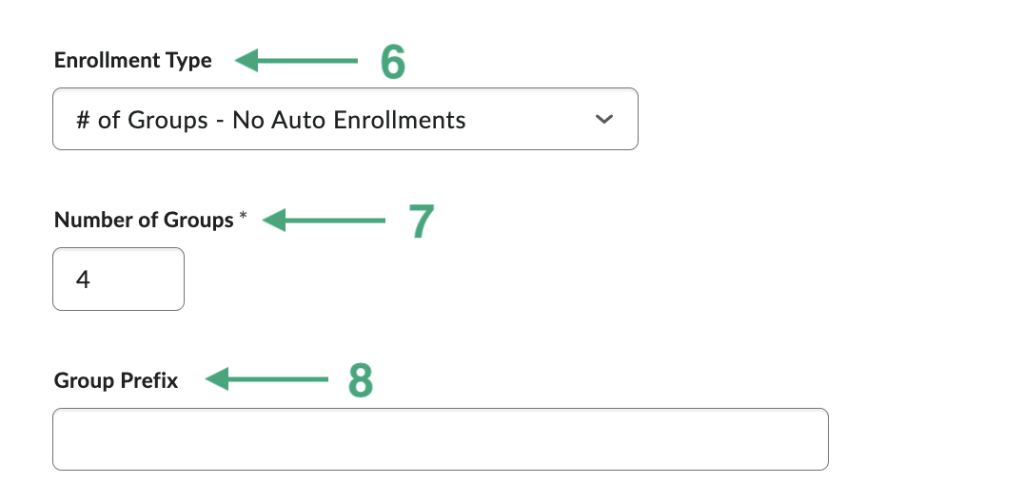
6. Under the Enrollment Type category, from the drop down list, choose the group enrollment type you want. Group Options will populate differently based on whether you chose Self Enrollment or # of Groups/Groups of #, or # of Groups – No Auto Enrollment
Note: No Auto Enrollment: This option will require you to enroll the students into designated groups. This will occur after you have saved the information on the group category page.
7. Based on which enrollment type you choose, a box to input Number of Users and/or Number of Groups will populate. Type in the numbers you want for these options.
8. Optional: Group Prefix will be used as the first word of the group name. Example: Team 1, Team 2 or you can leave this blank and it will automatically populate as Group 1, Group 2.
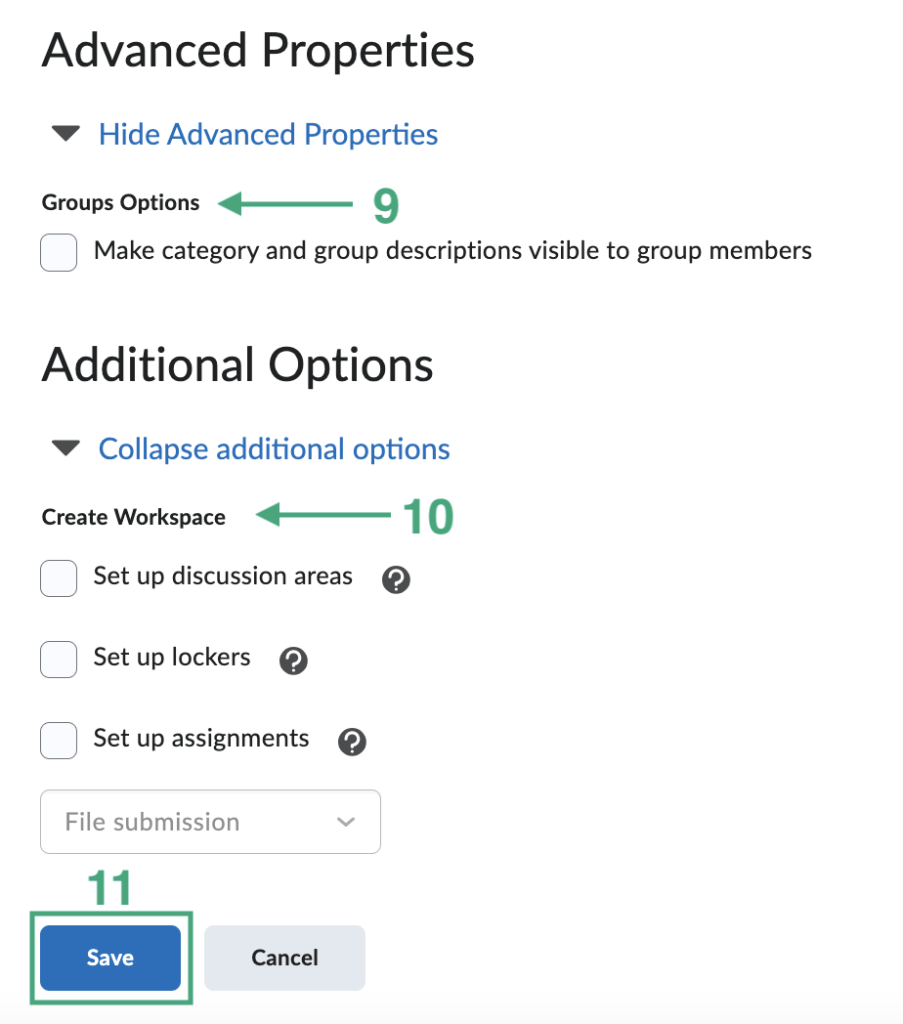
9. Optional: Choose whether to make the category name and description visible to learners.
10. Optional: Create A Workspace allows you to choose between 3 options for the groups to access to:
- Set Up Assignments: Create group specific assignments for each group.
- Set Up Discussion Areas: Create a discussion area for each group to communicate throughout the project. If this is selected, you will need to choose the forum and topic.
- Set Up Lockers: Group lockers are restricted locker areas where members of a group can share files. Any group member can modify files posted in group locker areas. Group lockers have the same options as regular lockers with the following exceptions:
- The option to make locker files public is not available.
- There is an option to Email Group Members.
- There is a Modified By column that shows the last person to work on a file.
11. Click the Save button.
Enroll User To A Group
Step By Step Instruction To Enroll Users In A Group
- On the navigation bar, click Quick Tools.
- From the drop down list choose the Groups Tool.
- On the Manage Groups page, from the View Categories drop-down list, select the category you want to enroll students into groups.
- From the group list, click the Group you want to enroll students into.
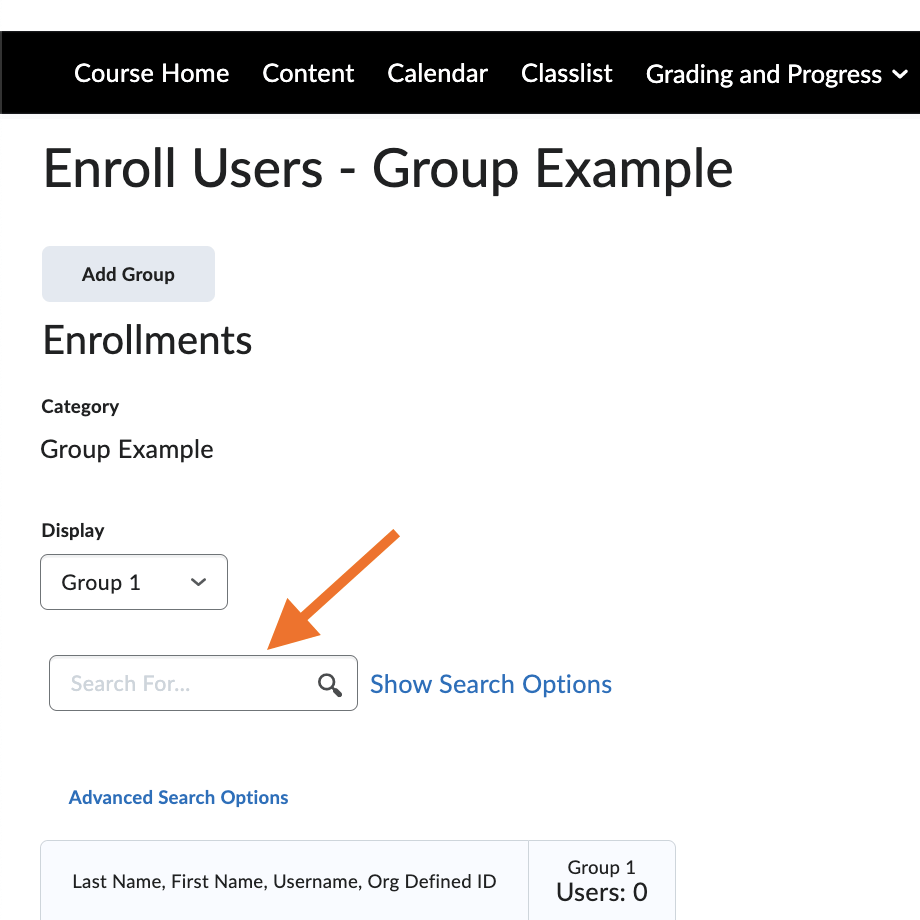
5. On the Edit Group page, click Enroll Users.
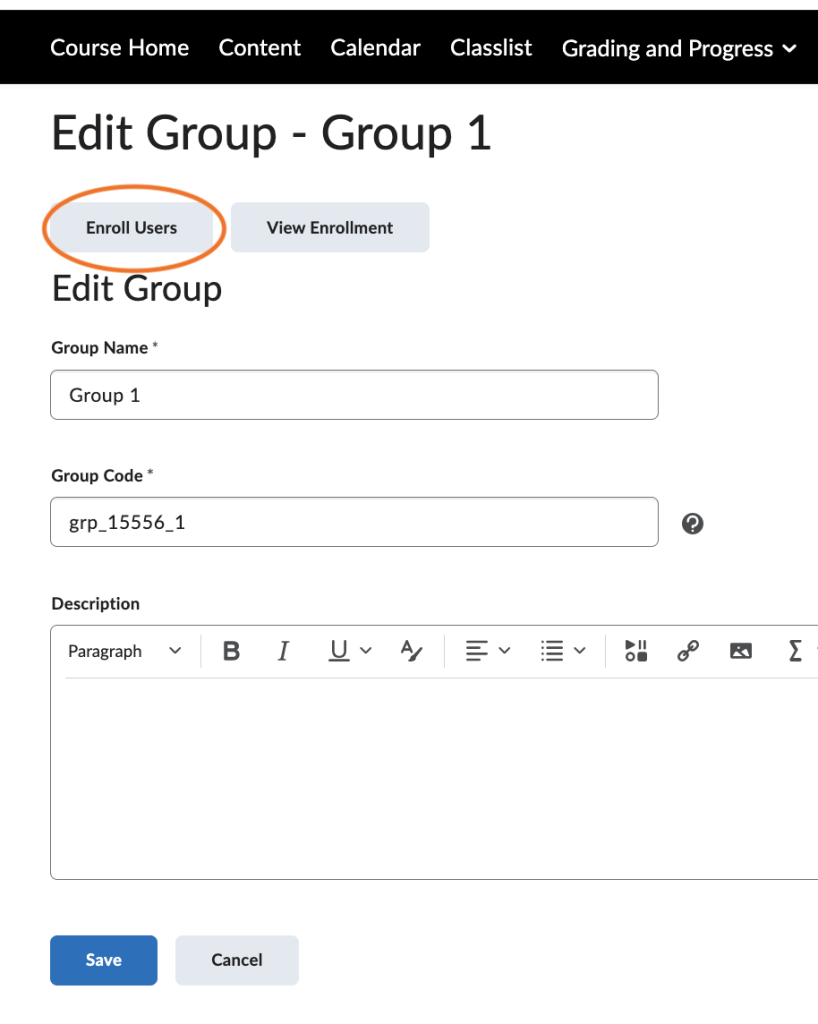
6. Search for users or select users from the available student enrollment list by clicking on the boxes next to their name.
7. Click Save.
Add A Group To An Existing Group Category
Step By Step Instruction To Add A Group To An Existing Group Category
- On the navigation bar, click Quick Tools and from the drop down list choose the Groups Tool.
2. On the Manage Groups page, from the View Categories drop-down list, select the category you want to add a group to.
3. Click the Group Title that appears below the View Categories option list.
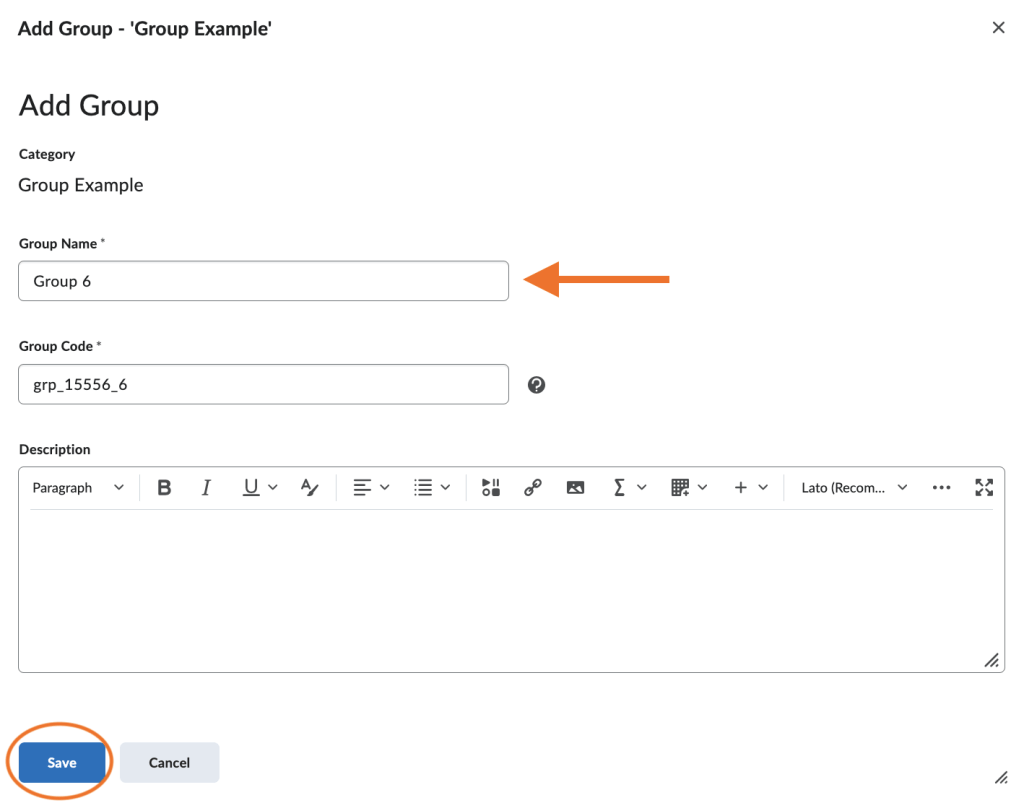
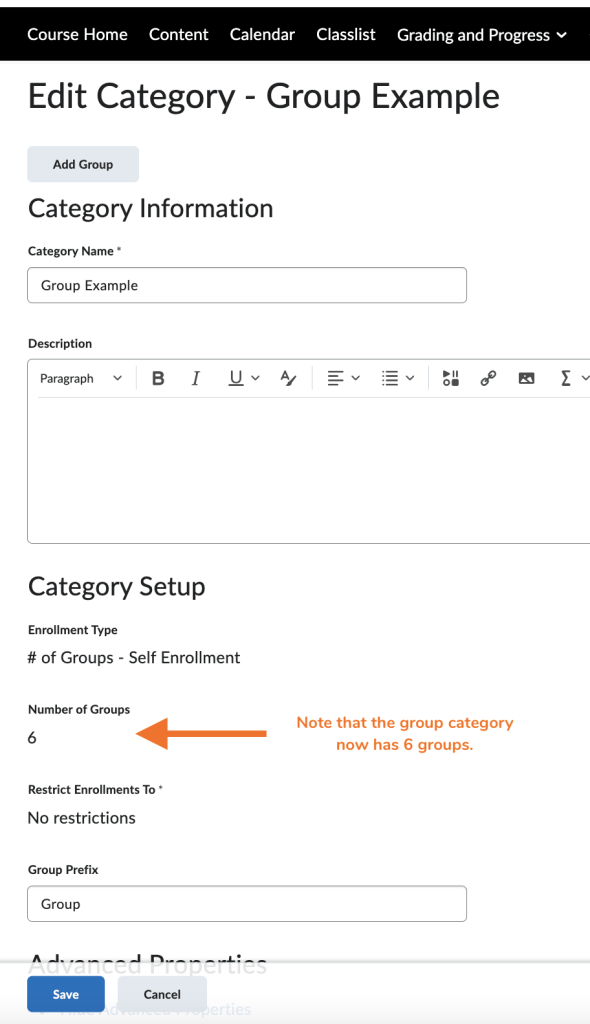
4. From the context menu of the category, click Add Group.
Note: There are currently 5 groups in the Group Example Category.
5. Name the group accordingly and type in a description if you’d like.
6. Click the blue Save button.
7. Once you click save, it will bring you back to the Group Example Category page.
Note: The Example Group Category now has 6 groups in total.
8. Click the blue Save button.
FAQ: Why Are The Group Assignments Not Showing Up In Quick Eval?
Quick Eval is only for individual assignments. You will need to use the Assignment Tool to evaluate group assignments.

Why Use Surveys?
Surveys are an excellent way to solicit feedback from participants regarding any aspect of a course. You can gather anonymous or non-anonymous opinions and information from users.
Create A Survey
What Are Surveys?
Create categories to set up, organize, and manage related groups. You must create a category and its groups before adding students to groups.
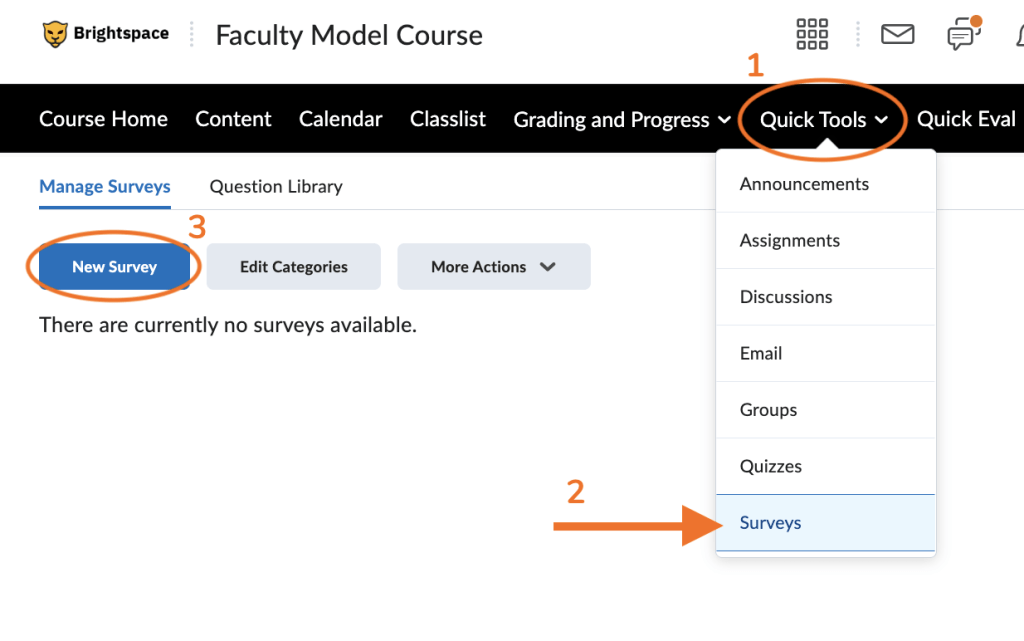
1. On the black navigation bar, click Quick Tools and then from the drop down list, choose Surveys.
2. On the Manage Survey page, click New Survey.
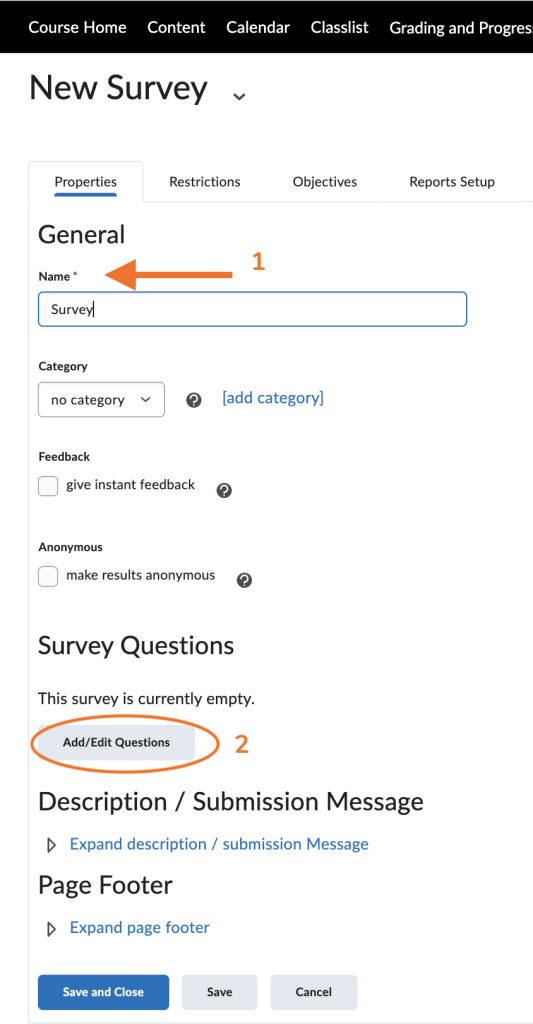
3. On the Properties tab, enter a Name and define additional settings for your survey.
4. To add questions to the survey, click Add/Edit Questions. If you have a Question Library set up for your course, you can also add/edit questions directly through the Question Library.
5. In the Add/Edit Questions area of the Surveys tool, click New and select the question type or information item you want to create. Survey question types are similar to quiz question types but Likrt Question type can only be used for surveys.
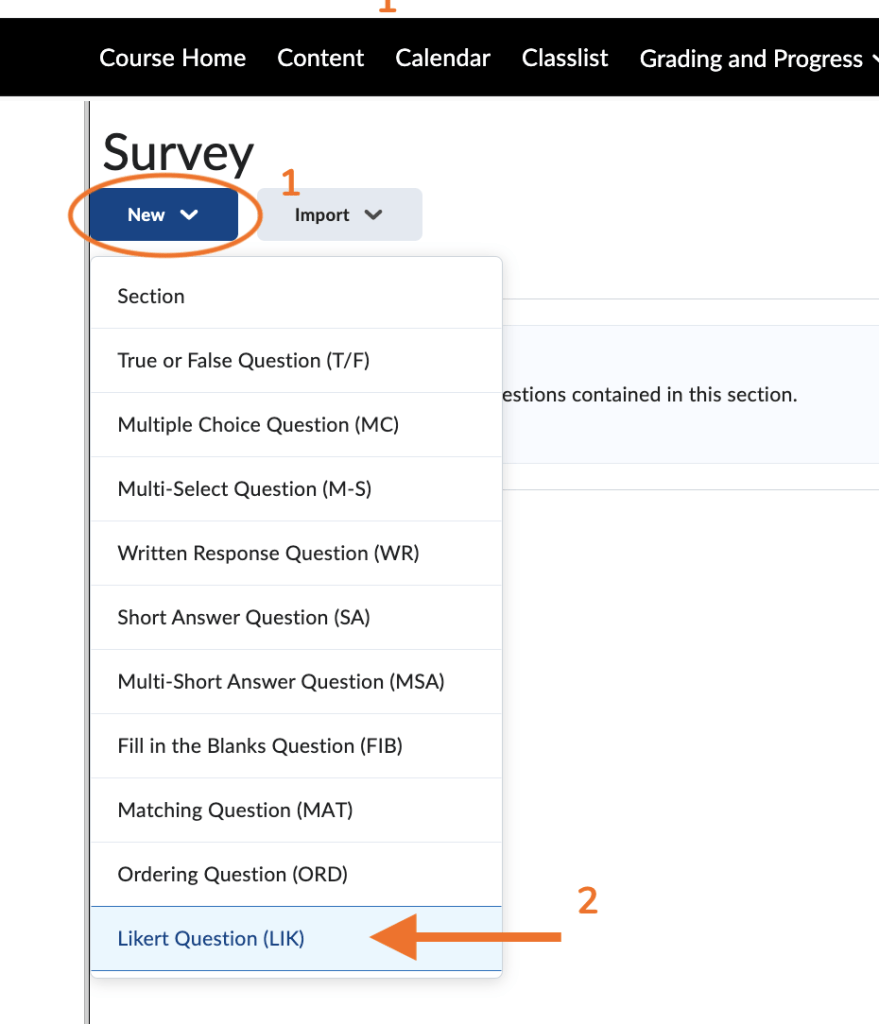
6. Choose between the Likrt Question types to start creating the survey and input the questions in the HTML edit text boxes below. Click Save when complete.
7. To return to the Manage Surveys or Edit Survey page, click Done Editing Questions. Click Save and Close if you are done editing the survey.
Ideas For Generating Student Feedback Via Surveys
Use student feedback to inform instruction and promote learning! This list showcases different types of student feedback that you can evaluate for your own courses. If you find one you like, you can copy the instructions and questions and use them in your courses. After that, explore different ways of using the feedback, as well as a list of available survey and polling tools.
Stop, Start, Continue
Answer the following questions with your opinion.
- Name one thing you think the instructor should Stop
- Name one thing you think the instructor should Start
- Name one thing you think the instructor should Continue
Point Of View Postcard
Finish the following sentence.
- “I learn the most in class when we…”
Muddiest Point
Write/ask one question about today’s content – something that has left you puzzled.
- ____________________?
One Minute Paper
Briefly respond to the following two questions.
- What was the most important thing you learned in class?
- What important question remains unanswered?
Exit Ticket
Before you leave the class or zoom meeting, please fill out the exit ticket online.
- Name one important thing you learned in class today.
- Write/ask one question about today’s content – something that has left you puzzled.
- Do you have any suggestions for how today’s class could have been improved?
Open Course Evaluation
Please take a few moments and share your thoughts about this course. Your input and ideas may help how future courses are developed. Your submission is anonymous.
- What was the most valuable thing you learned in this course?
- Which activity/activities were most effective at helping you learn the material/skills?
- Which activity/activities were least effective at helping you learn the material/skills?
- What suggestions do you have to improve this course?
Tech Specific
- How easy was it to use _______?
- How likely are you to recommend _______ to a fellow student?
- How easy is it to find support resources on _______?
- Did _____ contribute to your learning?
- In your own words, what are things you like most about ______?
- In your own words, what are the things that you would most like to improve about ______?
What to do with the feedback?
Take action!
- Summarize and share results of assignments, assessments, and feedback using percentages
- Tell students what you will do. This encourages students to reflect on and adjust their own learning strategies.
- Model lifelong learning and resiliency. Admit when something did not work. “I’m going to try this…”
- Make an FAQ More ideas…
- Seek out feedback from colleagues. Consult with peers, administrative, or faculty development specialists to get outside perspective.
- Document your teaching practices. Take notes in a teaching journal after each class.
- Look for patterns. Find common errors, and what needs to be reviewed or re-taught. Act on student achievement data throughout the semester.
- Do nothing.
Tools to collect student feedback
Brightspace Survey – You can use graded or ungraded surveys to receive feedback from your students
Google Form – Survey administration app from the Google Drive Suite can be linked from Brightpsace or Zoom
Qualtrics – Prepare a survey and share the link from Brightspace or Zoom
Zoom – Use the Zoom poll tool to prepare up to 25 polls in advance. Deploy them during the meeting. Get the results from the “Reports” setting in wentworth.zoom.us.
Kahoot! – a game-based learning platform using user-generated multiple-choice quizzes that can be accessed via a web browser or the Kahoot app. Free version available, paid version starting at $6 a month
Poll Everywhere – Online Audience Engagement Platform – free for classrooms under 40
Mentimeter – Interact with your audience using real-time voting. No installations or downloads required – and it’s free!
PearDeck – Delightful add-on for Google Slides. Basic is free or $149 per year
Socratic – Free for one class up to 50 students. $99 a year for paid subscription
References
Prosory, S. (2020, February 20). Teach Talk Webinar: Enhance Learning Through Feedback. SOLS Teaching Innovation Center. http://asutechwebs.blogspot.com/2020/02/teach-talk-webinar-enhance-learning.html
Wolski, L. (2020). Lightning Lunch – Getting Student Feedback [YouTube Video]. In YouTube. https://www.youtube.com/watch?v=vGEX3liVs7E
Wolski, L. (2021). IT&D – Incorporating Student Feedback. Google.com. https://sites.google.com/anselm.edu/itd/workshops/workshop-recordings/incorporating-student-feedback
This article was written by Lucy
Mid-Semester Survey To Inform Instruction And Promote Learning
A mid-semester survey is an opportunity to implement student feedback to improve course design and delivery. It is a series of survey questions given halfway through the semester. The timing of a mid-semester survey makes it possible to implement the feedback to improve the students learning experience in real-time. Moreover, it allows the instructor to ask questions that are important and relevant to each unique class.
Instead of waiting until the end of the course to hear how to improve, surveying the students in the middle of the semester allows time to make small, real-time changes to improve the current experience.
Student benefits
- A chance to influence some of the decisions made in the course
- A place for their voice to be heard
Instructor benefits
- Insights into student’s perceptions
- Actionable items for remediation
Survey Tools
Consider adding a mid-semester survey to your course today.
- Brightspace survey
- Pro: Built-in tool; carries over to the next time the course is taught
- Con: Clunky question types
- Qualtrics
- Pro: Anonymity guaranteed; rich analytics
- Con: Account needed, a small learning curve
- Google Forms
- Pros: Anonymity possible; easy to use
- Con: Not as much analytics
Questions to ask
If you are wondering what kinds of questions to ask, a check-in with an Instructional Designer is a good idea! They can help you craft questions that will have the most meaning to you. Here are a few examples to get you started.
- Please rate your agreement with the following technical aspects of the course
(Strongly agree, agree, neutral, disagree, strongly disagree)
a. Course navigation is logical and easy to follow.b. Instructions for completing assignments are clear.
c. Assessments are a fair representation of what we are learning.
d. Course content is presented in a manner that helps me learn. - Overall, how satisfied or dissatisfied are you with the course at this time?
(Extremely satisfied, somewhat satisfied, neutral, somewhat dissatisfied, extremely dissatisfied) - How challenging has the course material been thus far?
(Not at all challenging, slightly challenging, moderately challenging, very challenging, extremely challenging) - How reasonable or unreasonable has the course workload been thus far?
(Extremely reasonable, somewhat reasonable, neutral, somewhat unreasonable, extremely unreasonable) - What has been most helpful for your learning in this class so far (e.g., Describe the instructional tools or class topics with which you were most engaged)?
- What has caused you the most difficulty in terms of learning in this class so far (e.g. Describe the instructional tools or class topics with which you struggled or were least engaged)?
- Do you have any specific, actionable suggestions that you believe your professor could reasonably implement in this course in the next few weeks?
Deploy The Mid-Semester Survey
An announcement is a good way to introduce the mid-semester survey. Many instructors use strategies that do not affect performance grades.
- Make explicit the benefit of the survey
- Introduce the survey in-class
- Set aside 5-10 minutes of class time for the students to complete
- Offer a few points of extra credit if X% of the class completes the survey
- Restrict access to course content until the student has submitted the survey
- Set a due date for the survey
- Use intelligent agents to prompt students who haven’t completed the survey to submit
What to do with the results
Once your students have completed the survey, you can pull the reports. From there, read through the data and look for trends. Is there anything that stood out that you can take action on? Not all of it will be helpful, or even possible in a 7-week time frame. The best-case scenario is that you are able to identify two key takeaways and use them to improve your teaching.
Sometimes it is hard to get feedback. It is normal to feel defensive when we get criticism, especially if we don’t feel recognized for our good contributions. Take time to process the feedback, find the nuggets that are useful, and realize that personal growth is often uncomfortable. You have taken a step at becoming a better instructor, and you should feel really proud of that!
The next step could be to acknowledge student feedback and tell students what you plan to do. Seeing you take action could encourage students to reflect on and adjust their own learning strategies. Admit when something did not work as a way to model lifelong learning and resiliency. A growth mindset is the best lens to view challenges and setbacks along the way!
This article was written by Lucy
How To Ensure Anonymous Survey Participation
If a survey is anonymous, your user data is hidden in survey results. The responses to survey questions are available for all users, but the system does not report who made which response.
While learners are taking an anonymous survey, an alert appears at the top of the survey indicating that the survey is anonymous and their user information will not be tied to their responses.
Step By Step Instructions to Turn On Anonymous Surveys
- On the navigation bar, click Quick Tools, and from the drop down list choose Surveys.
- On the Manage Surveys page, click the survey name.
- In the General area, select the make results anonymous check box.
How To Set Up Survey Reports
Survey reports gather information on survey data. Survey reports are different from survey results; they collect and present more types of information than is available through results. Choose a report type to display question statistics, question details, user statistics, attempt details, or user attempts. You can also select a release date and choose which roles have permission to view each report.
- On the navigation bar, click Quick Tools and from the drop down list, click Surveys.
- On the Manage Surveys page, click the name of the survey.
- On the Reports Setup tab, click Add Report.
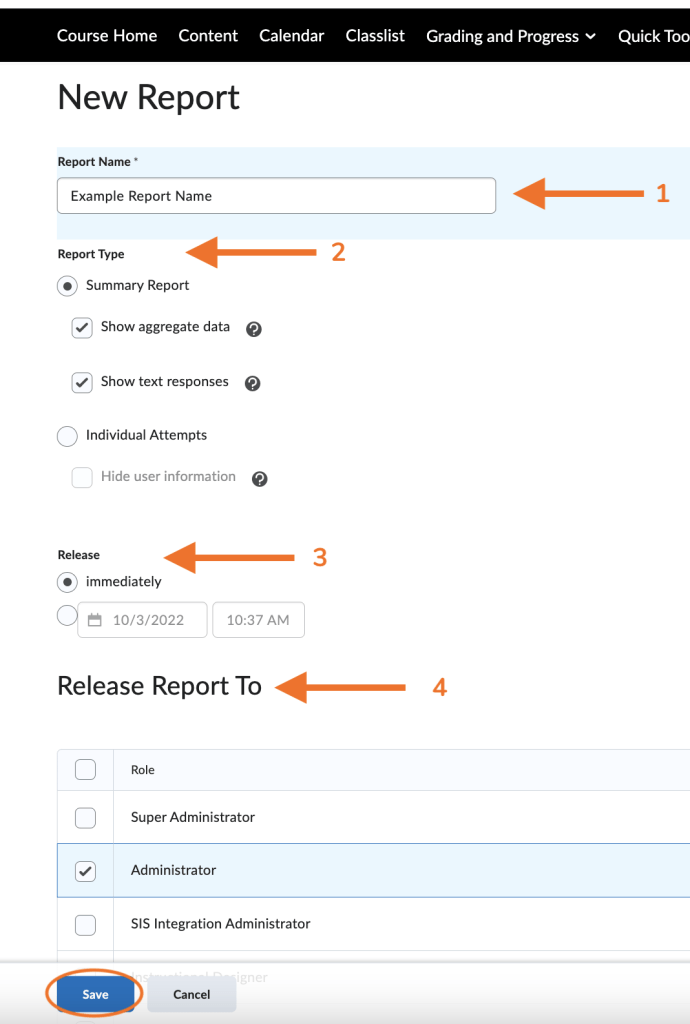
- Enter a Report Name.

5. Choose a Report Type:
Summary Report – You can display aggregate data for multiple choice, true and false, Likert, multi-select, and matching question types. You can also display text responses for written response, short answer, and fill in the blanks question types.
Individual Attempts – This report displays each attempt individually. You can choose to hide the user’s first and last name when the Individual Attempts report is viewed.
You can choose to immediately release a report after a survey submission, or enter an alternate date and time.
6. In the Release Report To section, select the check box beside each role you want to release the report to.
7. Click Save.
Why Use Awards and Certificates?
The Awards tool enables instructors to provide merit-based awards to students. There are two types of awards: Badges, and Certificates.
What Is The Difference Between Badges And Certificates In The Awards Tool?
Badges
Badges are awarded based on any criteria determined by the instructor. They are meant to provide digital markers that represent accomplishment throughout a course or program. Badges do not contribute to achieving a passing grade; however, badges are awarded for achievements that also can contribute to the type of work ethic that results in a passing grade.
Certificates
Certificates are also awarded based on criteria determined by the instructor. Certificates are similar to Badges, however, they include a PDF that users can print. Certificates typically indicate an official statement of certification or award at the end of a program, but can be awarded during the course for other criteria as well. Certificates can be awarded based on achieving a milestone that a learner can use for further academic or career success, such as passing a practical exam. Certificates also do not contribute to achieving a passing grade.
Create An Award
You can create awards that can be shared with other users in other courses, or restricted to the course and its child org units. If you restrict the award, it can only be added to the course offering in which you create the award, and any child offerings of that course.
- Within the course, do one of the following:
- On the navbar, click Awards.
- Click Course Admin. From the Assessments area, select Awards.
- Click Add Award to Course.
- Click Create Award.
- Enter a name and description for the new award.
- Select an award type from the drop-down list.
- Select the appropriate check boxes to indicate if you want the award to be available to other award managers, and where it is available within the org structure.
- Select the expiry options:
- If the award will not expire, select Never. Examples of awards that never expire are certificates of merit for passing a course, or badges for perfect attendance.
- If the award will expire on a specific date, select Fixed date. Examples of awards that will expire on a specific date are certifications for a skill that must be renewed, such as first aid training.
- If the award will expire on a day relative to the day the award was granted, select Relative Day of the Month. Examples of awards that expire on a relative date are badges for Learner of the Week or for having achieved 100% on a test or assignment.
- If you want to notify the award recipient before an award expires, select the check box and indicate the number of days of lead time.
- In the Choose Award Image area, do one of the following:
- If the image already exists in the image library, click From Existing Library.
- If you want to add a new icon to the image library, click Upload New Icon.
- To launch the OpenBadges website, click Create your own award image. OpenBadges is a free website that allows you to create custom icons.
- If you are creating a new certificate, in the Choose Certificate Template area, do one of the following:
- If the PDF template already exists in the image library, click From Existing Library.
- If you want to add a new template to the image library, click Upload New Template.
- Verify that the Issuer Information is correct.
- Ensure that the Associate this award to the <current course> on creation check box is correctly set.
- Click Save.
Add New Award Icons
The Award Icon Library contains icons that you can use to create Badges. A default library of badge icons is available with the Awards tool. You can delete these default icons or add new icons to the library.
- Within the course, on the navbar, click Awards.
- Click Award Icon Library.
- Click Upload New Icon.
- Browse to the location of the image file that you want to upload.
- Click Open.
How To Create A New Certificate Template
If the default templates provided with Awards do not meet your needs, you can create your own certificate templates from which administrators or instructors can create certificates for their courses.
- Using an application, such as Microsoft Word, PowerPoint, or Adobe Acrobat Professional, create a form.
- Add images, branding, and static text to complete your default design.
- Save the form as a PDF document.
- Open the PDF file (in Adobe Acrobat for example) and create a new PDF form based on the PDF you opened.
- Add text boxes to the PDF to include the content that you want on your completed Certificate.
- Map the text boxes and their corresponding tooltip boxes to the txtBox Name using supported text strings. Text strings are automatically replaced with user, course, and award values when you generate the certificate. Supported text strings include:
- {CourseStartDate}
- {CourseEndDate}
- {CourseName}
- {UserFirstName}
- {UserLastName}
- {UserEmail}
- {UserName}
- {FullName}
- {OrgDefinedID}
- {OrgUnitCode}
- {AwardDate}
- {AwardExpiryDate}
- {AwardName}
- {AwardDescription}
- {AwardEvidence}
- {IssuerName}
- {IssuerContact}
- {AwardCreditValue}
- Ensure that each text box is large enough for any replacement text (such as the hyphenated last name of a learner, or a multi-sentence description of an award).
- Enable Word Wrap so that the text is not cut off, and the text that you want for each text box appears as expected.
- In Brightspace Learning Environment, access the course, in which you want to create certificate templates.
- Navigate to the Awards tool and click Certificate Templates.
- Click Upload New Template.
- Browse to the location of the PDF form that you created.
- Create a certificate and then associate the new template you created with the certificate.
- Publish a few test certificates to confirm that the layout appears as expected.
Add Release Conditions To An Award
You can add release conditions to an award and release other content or another award to learners when they achieve the award requirement that you define.
- Within the course, on the navbar, click Awards.
- On the award, click Edit Properties.
- Click Create.
- From the Condition Type drop-down list, select the release condition.
- Complete the associated Condition Details.
- Click Create.
- Click Save.
Why Use Intelligent Agents?
The Intelligent Agent tool enables instructors to gain more insight into their courses. Faculty can set up Intelligent Agents based on a number of criteria from missed deadlines to lack of interaction in the course. The Intelligent Agents can send you and/or a student an email about specific course activity. This tool can help boost student engagement and help faculty monitor course activity.
Considerations For Using An Intelligent Agent
When you create a new agent, you need to determine:
- The criteria the agent looks for. The agent can check user login activity, course activity, and/or triggered release conditions. Be aware that intelligent agents evaluate the status of release conditions at the time that they run. A user that may have satisfied a release condition on a prior run, may no longer satisfy a release condition on a subsequent run, especially in the case of our ‘NOT’ conditions.
- How often the agent is scheduled to run and find users that meet its criteria. If you don’t set a schedule then the agent must be manually triggered on the Agent List page.
- How often the agent takes action when a user satisfies the criteria. I.e. Will the agent send one email the first time the user triggers the agent, or send reminder emails to the user every time the agent runs?
- The action you want the agent to take when it finds a user that fits the criteria it is looking for. An agent could: change enrollment in the current course, or enroll into another course; send an email to the user, their auditor, or other user; or do nothing (choosing no action enables the agent to run and generate reports of who has satisfied the criteria during different runs of the agent).Notes:
- You must have the appropriate enrollment permissions in the current or destination courses to create intelligent agents that change user enrollments.
- File attachments and inserted images in emails cannot exceed the limit set for your institution for email attachments.
Create An Intelligent Agent
Create an agent
- On a course navigation bar, click Course Admin.
- Click Intelligent Agents.
- On the Agent List page, click New.
- On the New Agent page, enter a name.
- If you want to assign a category to the agent, select an option from the Category drop-down menu.
- You can create a new category by clicking the Add Category link to the right of the Category drop-down menu. Enter a name into the Name field, and then click Save.
- Enter a description into the Description field, if required.
- If you want the agent to be active, select the Agent is enabled check box.

Figure: The New Agent page, showing the agent details box. This contains Agent Name, Description, Category, and Status. - To schedule how frequently agent criteria is evaluated, choose a frequency option from the dropdown menu and complete the schedule dates and repetition options as needed.
Note: Intelligent Agents can only be scheduled to start after the course start date. Scheduled intelligent agents stop running and are automatically disabled if the course is inactive, past its end date, or deleted. You can still set up a practice run or a manual run of an intelligent agent at any time in a course with a passed end date.
Figure: The Scheduling box with the Frequency drop-down menu expanded. - Expand Criteria, and under Role in Classlist do one of the following:
- If you want the intelligent agent to be applicable to all roles in the Classlist, select the All users visible in the Classlist check box.
- If you want the intelligent agent to be applicable to select roles, select the Users with specific roles check box and select the respective roles.
- If you want your agent to target users’ login habits, under Criteria > Login Activity, enter your criteria.
- Note: Login activity refers to logins at the platform level.
- If you want your agent to target users’ course habits, under Criteria > Course Activity, enter your criteria.
- To set an intelligent agent based on specific release conditions, do one of the following:
- If you want your agent to run when a specific existing condition has been met, under Criteria > Release Conditions, click Attach Existing. Select the condition you want and click Attach.
- If you want your agent to run when a specific new condition has been met, under Criteria > Release Conditions, click Create and Attach. Select a Condition Type from the drop-down list. Complete any additional Condition Details that appear and click Create.
For example, you can create an agent that acts against users who have been enrolled in a course for a certain number of days, either based on the first or last time they were enrolled into the course.
- Note: All criteria selections under Take Action on Activity, which include the criteria Login Activity, Course Activity, and Release Conditions, are optional selections.

Figure: Criteria requirements for Role in Classlist and Take Action on Activity.
- Under Actions > Repetition, select how often you want the agent to take action.
- If your role has the Use Agent Enrollment Actions and Perform Unenroll permissions, you can set your agent to perform an enrollment or unenrollment action:
- Under Change User Enrollments, select the Change user enrollments when the criteria are satisfied check box.
- From the Enrollment Action drop-down list, select the action you want your agent to perform and select the course.
- If you want to Enroll user in a course, select an available course from the dialogue. Only courses you have permission to enroll in will be shown.
- From the New Role drop-down list, select what role the user will be enrolled with when the agent criteria is satisfied.
- If you want the agent to send an email when the set criteria are satisfied, expand Actions, and under Send an Email, select the Send an email when the criteria are satisfied check box and enter your email details and relevant attachments.
- Click Save and Close.
Perform A Practice Run
You can have an agent perform a practice run to see who will be identified by the agent without sending those users an email. Agents do not need to be enabled in order to perform a practice run.
- On the navbar, click Course Admin.
- Click Intelligent Agents.
- From the context menu of the agent you want to perform a practice run for, click Practice Run.
- To view the users identified, on the Agent List, in the Results of Last Run column, click the link.
Run An Intelligent Agent Manually
Typically, agents are set up to run automatically. If you do not have a regular schedule set up for an agent, you must run it manually.
When you run an agent manually, it sends a confirmation email to the user that requested or set up the agent. This email contains the following information: org unit code and name, which agent ran, time and date the request was submitted, time and date the request was finished, and whether the agent took action.
You can set up a manual run of an intelligent agent at any time in a course with a passed end date. Agents do not need to be enabled in order to set up a manual run.
- On the navbar, click Course Admin.
- Click Intelligent Agents.
- From the context menu of the agent you want to run manually, click Run Now.
- To confirm the manual run, click Run.