Get Started
As the instructor, you can use the Quizzes tool enables you to create and manage points-measured assessments. As part of your quantifiable assessment procedures, you can use quizzes to help evaluate users’ learning progress and learning outcomes.
Question Types Available
Question Types for Quizzes and Surveys
Brightspace offers various options to create a variety of question types to use for quizzes, self-assessments, and surveys in your current and future courses.
Note: You can only access Likert questions through the Surveys tool and Question Library. Likert questions are unavailable for quizzes.
Question Types Explained
1. True/False (T/F) questions present a statement which learners must determine if it is correct or incorrect. This question type can be automatically graded.

2. Multiple Choice (MC) questions present a statement or question with a list of possible answers, in which learners must choose the best possible answer. Instructors can randomize the order for this question type. This question type can be automatically graded.

3. Multi-Select (M-S) questions require learners to identify one or more correct answers in a list of possible answers. Instructors can change how the points are assigned to the multiple answers and the order can be randomized. This question type can be automatically graded.

4. Written Response (WR) questions require learners to write detailed answers in response to open-ended questions. Instructors can enable HTML editor for learner responses and allow learners to insert images and add attachments. This question type can NOT be automatically graded.

5. Short Answer (SA) questions require learners to create one word or brief sentence answers in response to open-ended questions. Instructors can add multiple words for the answer to be correct for each blank and assign how the points will be assigned to the blanks. This question type can be automatically graded. Note: brief sentence answers would require students to accurately type in exactly what you had as the answer to be marked correctly. For example: If the answer you input for the question is “Paul McCobb” but the learners type in “McCobb” only, their answer will be marked incorrect.

6. Multi-Short Answer (MSA) questions require learners to answer a multi-solution question and input their answers into individual input boxes. Learners’ answers are checked against each possible answer stored in the answer fields. The instructor can insert images, videos, audio, etc into the question HTML text box, insert numerous potential answers, weigh each question, and change the evaluation from case sensitive, insensitive, or type in regular expressions. Note: The Options section allows the instructor to change the number of input boxes that learners will see when taking the quiz. Use the Preview option to view this question as the learners will.

7. Fill In The Blanks (FIB) questions require learners to fill in one or more missing words for an incomplete sentence, statement, phrase, list, or key terminology. The instructor can insert insert numerous potential answers per blank, weigh each question, and change the evaluation from case sensitive, insensitive, or type in regular expressions. Note: Use the Preview option to view this question as the learners will.

8. Matching (MAT) questions require learners to choose from a set of possible match choices from drop-down lists and correctly pair them with related items.
Instructors can insert images, videos, audio, etc into the question HTML text box and choose how to weight each question. Note: Use the Preview option to view this question as the learners will.

9. Ordering (ORD) questions require learners to arrange a series of items into a correct sequence or order. Instructors can insert images, videos, audio, etc into the question HTML text box and choose how to weight each question as well as feedback. Note: Use the Preview option to view this question as the learners will.

10. Arithmetic (2+2) questions enable the instructor to assess users’ knowledge and comprehension of mathematics and number theory. Instructors can limit the number of decimal places, the viable answer allowed with min and max option in the variable section, and allow for tolerances. D2L Video: Watch How To Create An Arithmetic Question

11. Significant Figures (x10) questions require learners to answer in scientific notation and provide solutions that contain a specified number of significant figures. Math and science courses commonly use this question type.
D2L Video: Watch How To Create A Significant Figure Question Type
12. Likert (LIK) questions to measure subjective information such as personal opinions, knowledge, abilities, and attitudes. Likert questions enable the instructors to create surveys that evaluate the intensity of respondents’ feelings towards statements presented to them.
There are seven measurement scales available to Likert questions: One to Five (1 to 5), One to Eight (1 to 8), Agreement Scale (Disagree–Agree), Satisfaction Scale (Dissatisfied–Satisfied), Frequency Scale (Never–Always), Importance Scale (Unimportant–Important), and Opposition Scale (Oppose–Support).
Note: You can only access Likert questions through the Surveys tool and Question Library. Similar to self assessments, all question types you import into surveys automatically omit point value and difficulty level indicators.
Additional Resources:
Create A New Quiz
Creating A Quiz To Assess Learners
Create and manage quiz questions from the Question Library or the Quizzes tool, and organize quizzes into categories to make it easier to find assessments with similar or related content. Use the quiz preview option to test the accuracy of content and grading before you release a quiz. In a preview, you can answer the questions, view allowed hints, submit the quiz, reset the evaluation of answers, read feedback, and view report results.
Note: You can only access Likert questions through the Surveys tool and Question Library. Likert questions are unavailable for quizzes.
Step By Step Instructions To Create A Quiz (Without Using The Question Library or Import)
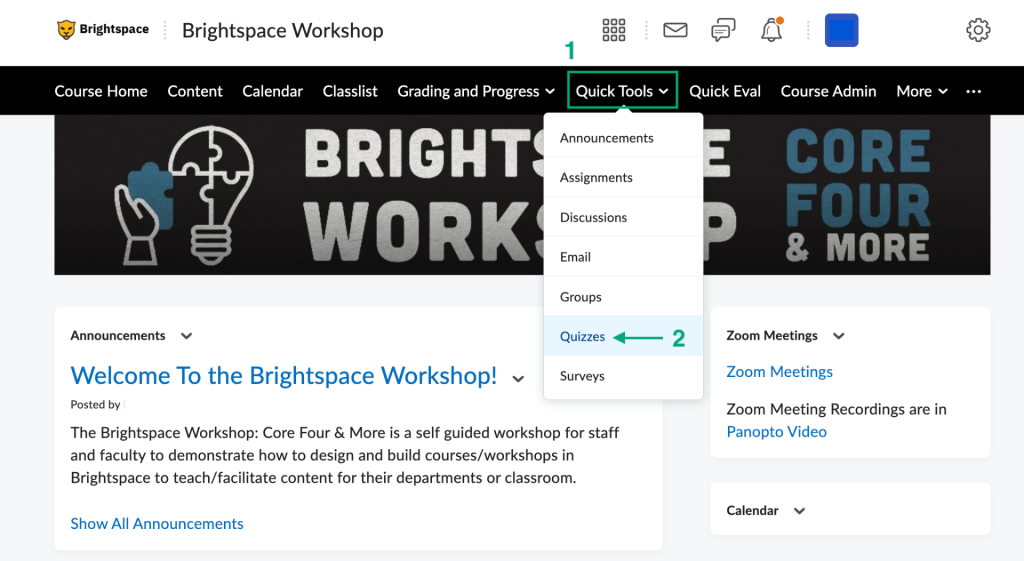
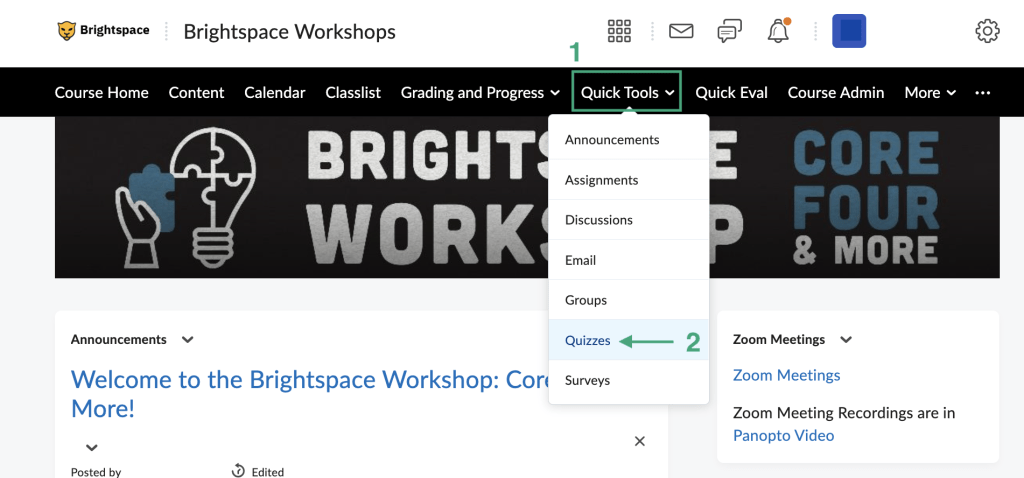
1. On the navigation bar, click Quick Tools.
2. From the drop down menu, click Quizzes.

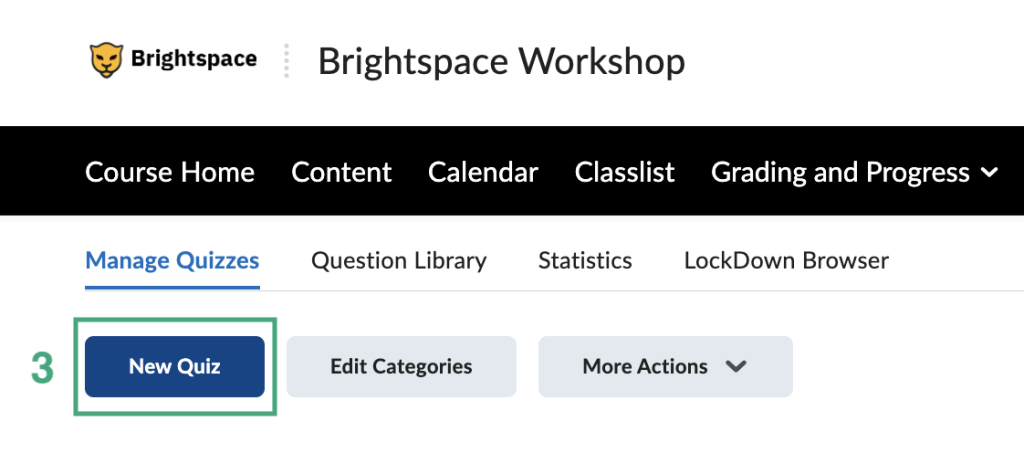
3. Click on the blue New Quiz button.
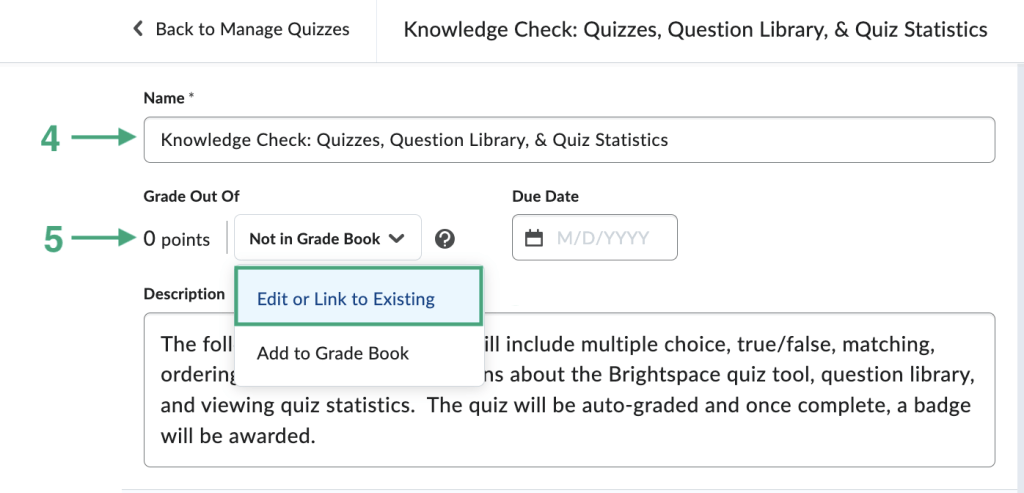
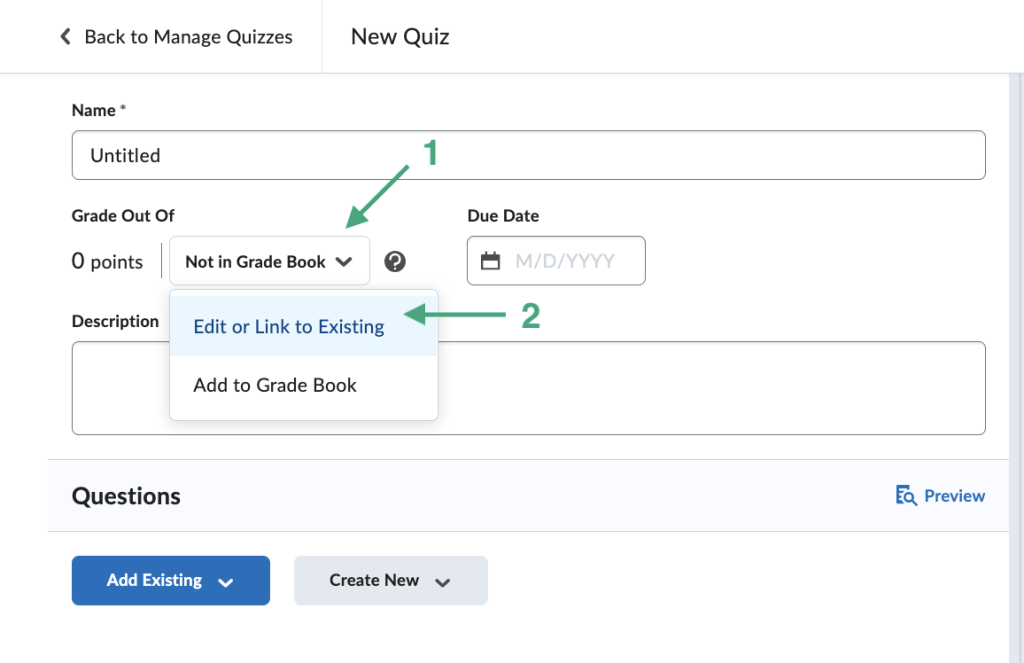
4. Type in the name or title of the quiz.
5. Click Not in Grade Book and from the drop down list, click Edit or Link to Existing.
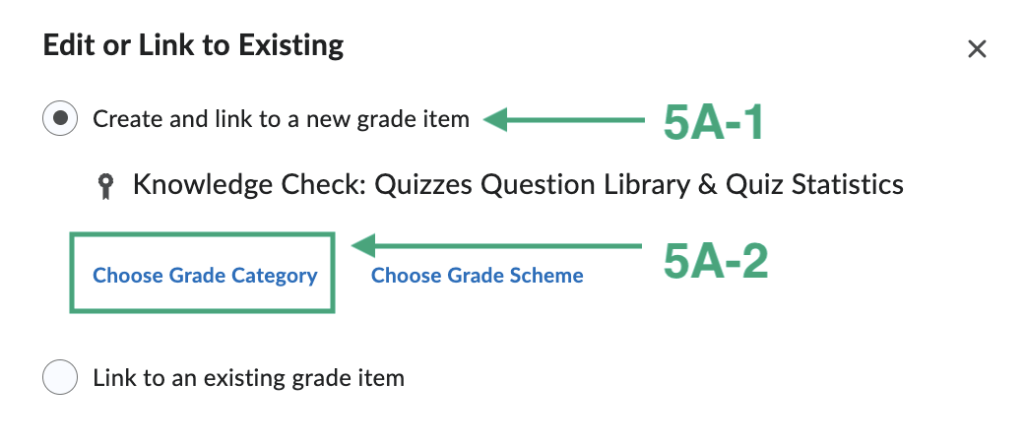
5A and 5B: There are two options: Create And Link To A New Grade Item or Link To An Existing Grade Item. Below are instructions on both options.
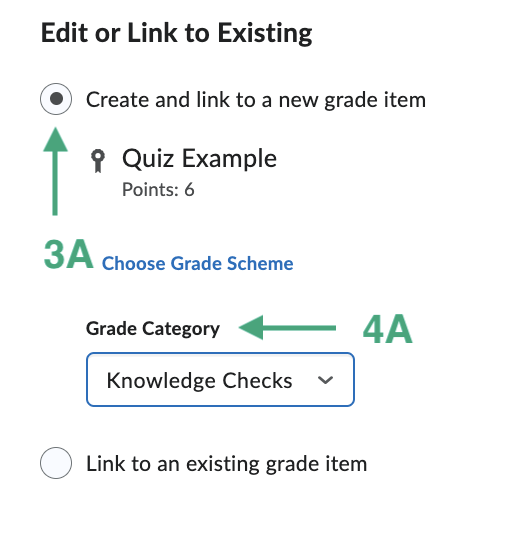
- Option 1: Create And Link To A New Grade Item. Choose this option if you have NOT created a grade item already in the grade book.
- 5A-1. Select the bubble next to Create And Link To A New Grade Item
- 5B-2. Click the blue Ok button.
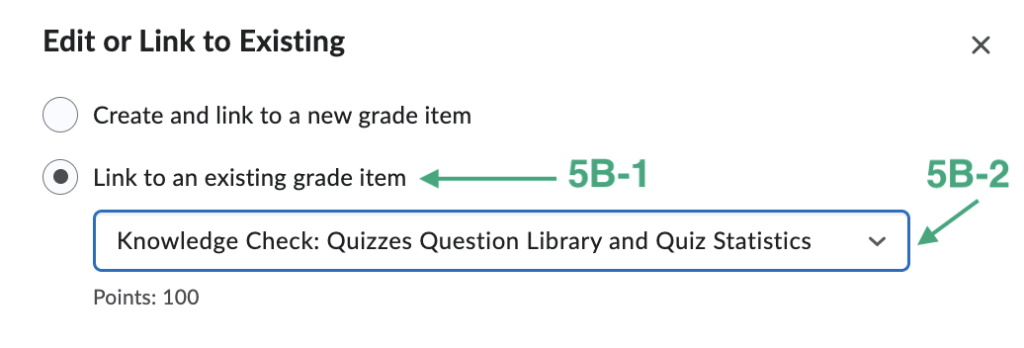
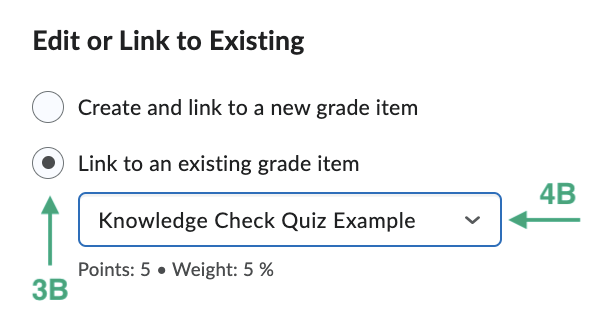
- Option 2: Link To An Existing Grade Item. Choose this option if you HAVE created a grade item already in the grade book.
- 5B-1. Select the bubble next to Link To An Existing Grade Item
- 5B-2. From the drop down menu, choose the grade item that correlates with the assignment you just created.
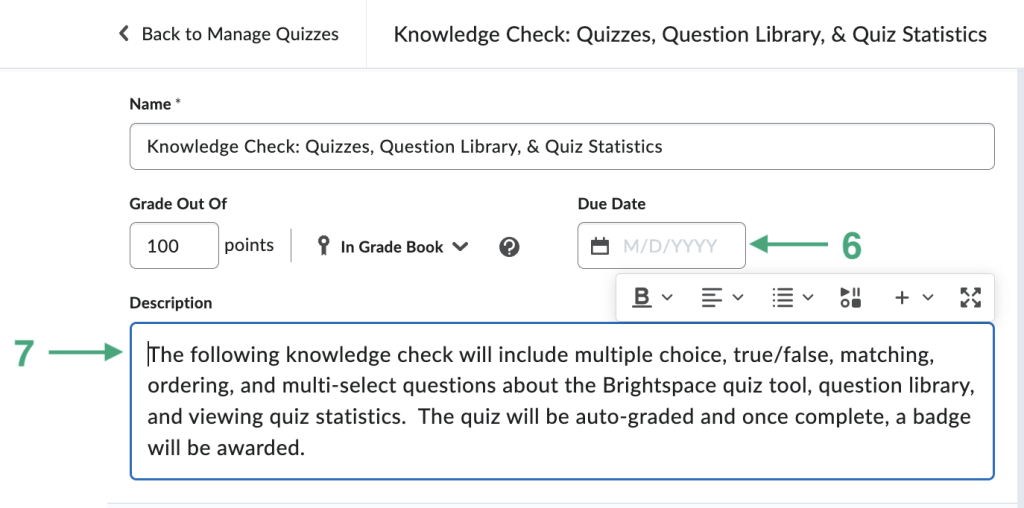
6. Add in the Due Date.
7. Add in the description or instructions.
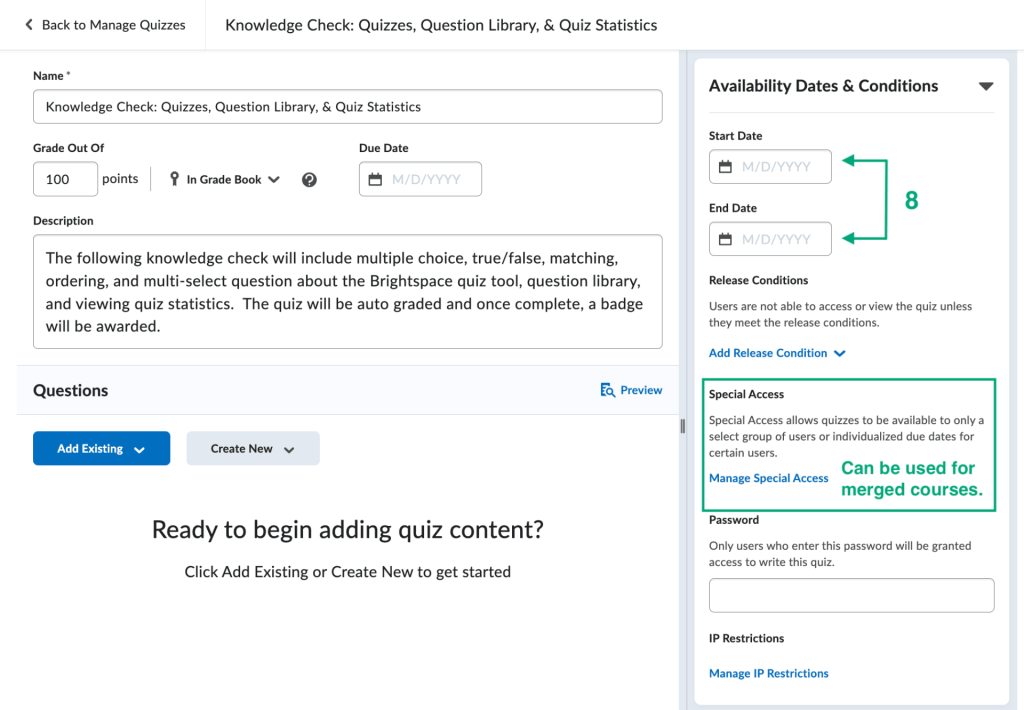
8. Add in a Start or End Date, if applicable, and Special Access.
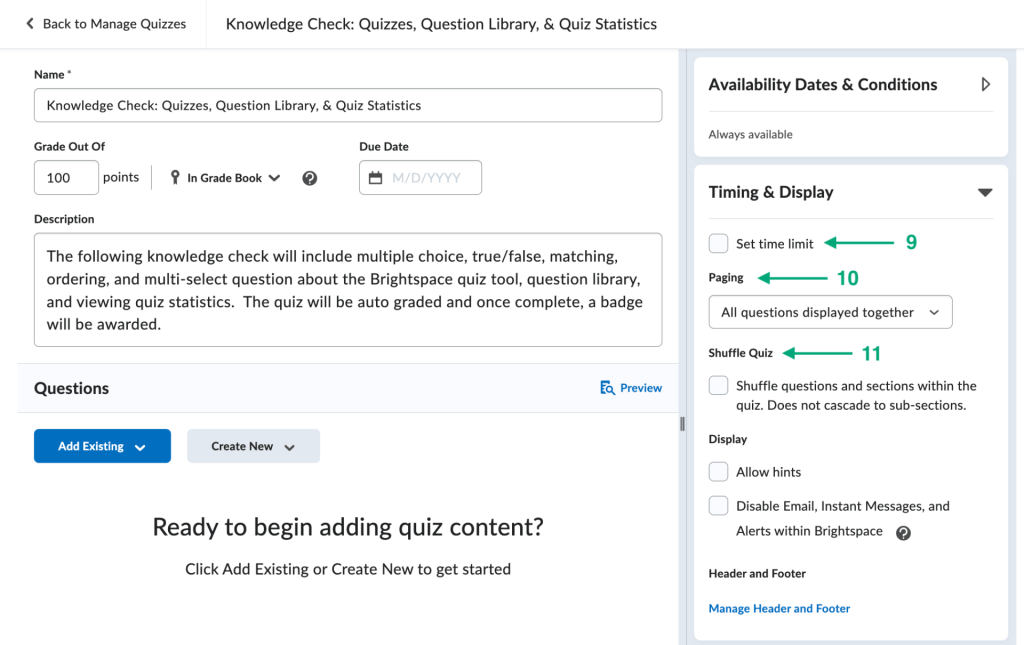
9. Choose to Set a Time Limit including the number of minutes the quiz will be available and whether the quiz will automatically submit when time limit expires or not be enforced via the Timer Settings option.
10. Choose the Paging options to either have 1 question or more displayed per page.
11. Choose to either Shuffle Quiz questions.
12. Click on Attempts and Completion and click on Manage Attempts to choose if students have unlimited attempts or from 1-10 attempts. Note: For more than 1 attempt, choose how those attempts will be calculated and if students will retake the entire quiz or just incorrect questions.

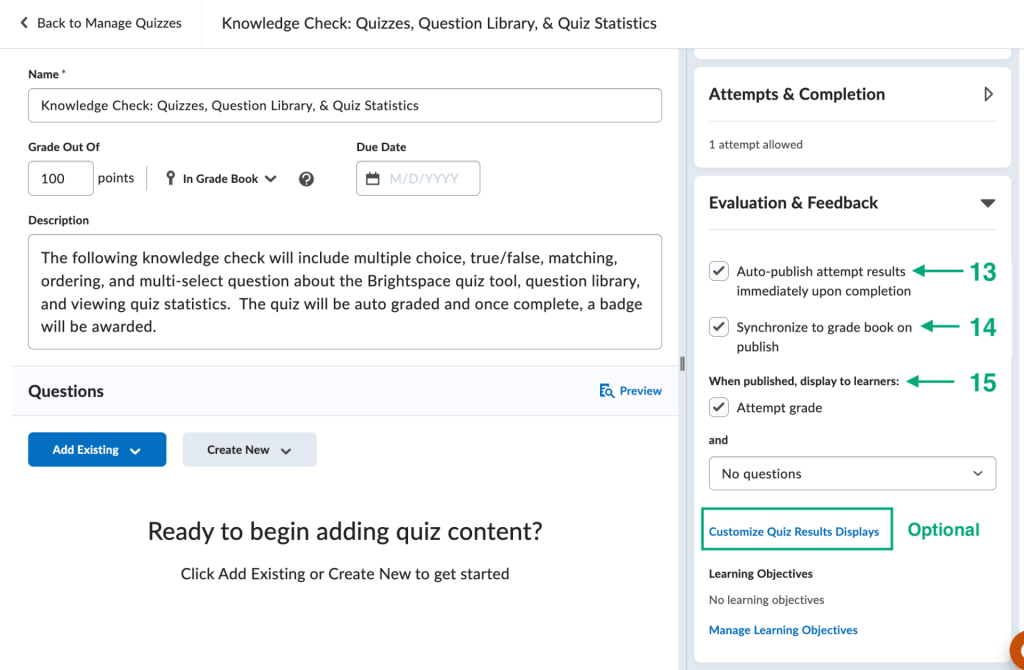
13. Click Evaluation and Feedback and then choose if you want to auto publish attempt results.
14. Choose whether to synchronize the quiz results to the grade book.
15. Choose which options you’d prefer the learners to view when quiz results are published.
16. Click the Create New button under Questions heading. From the drop down, select New Question.
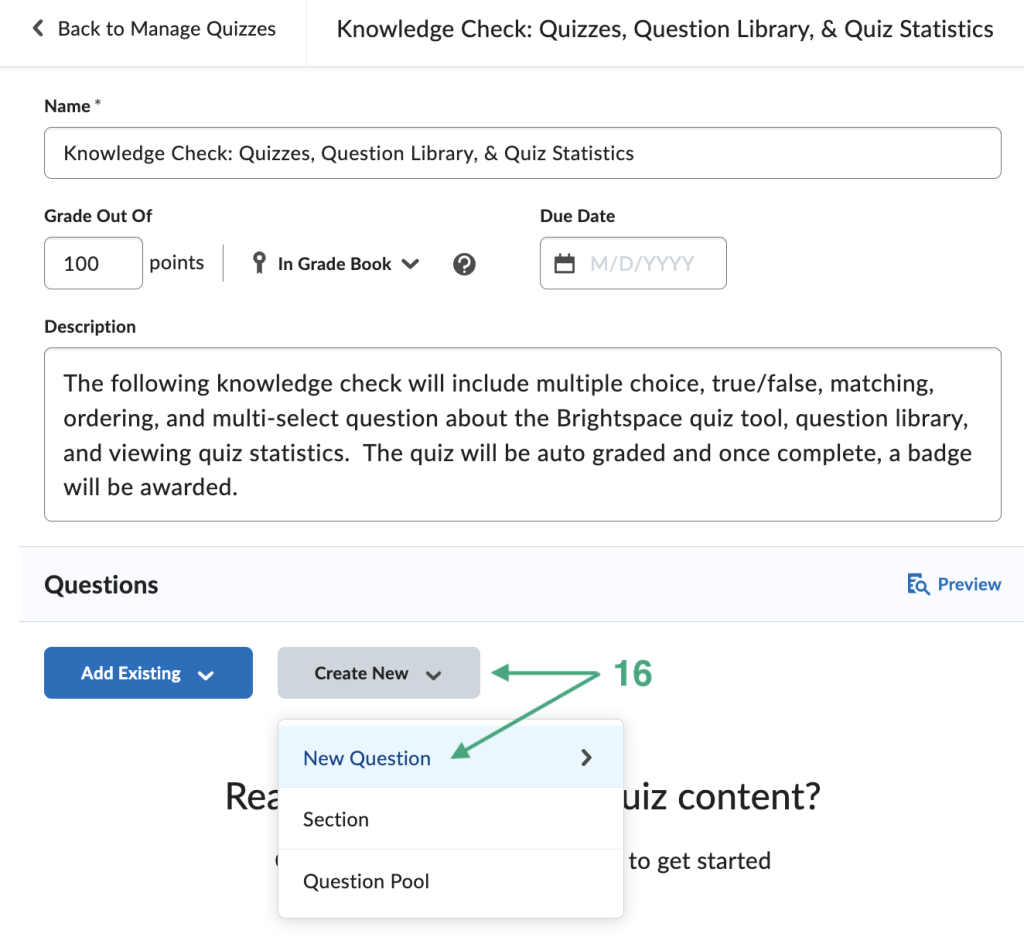
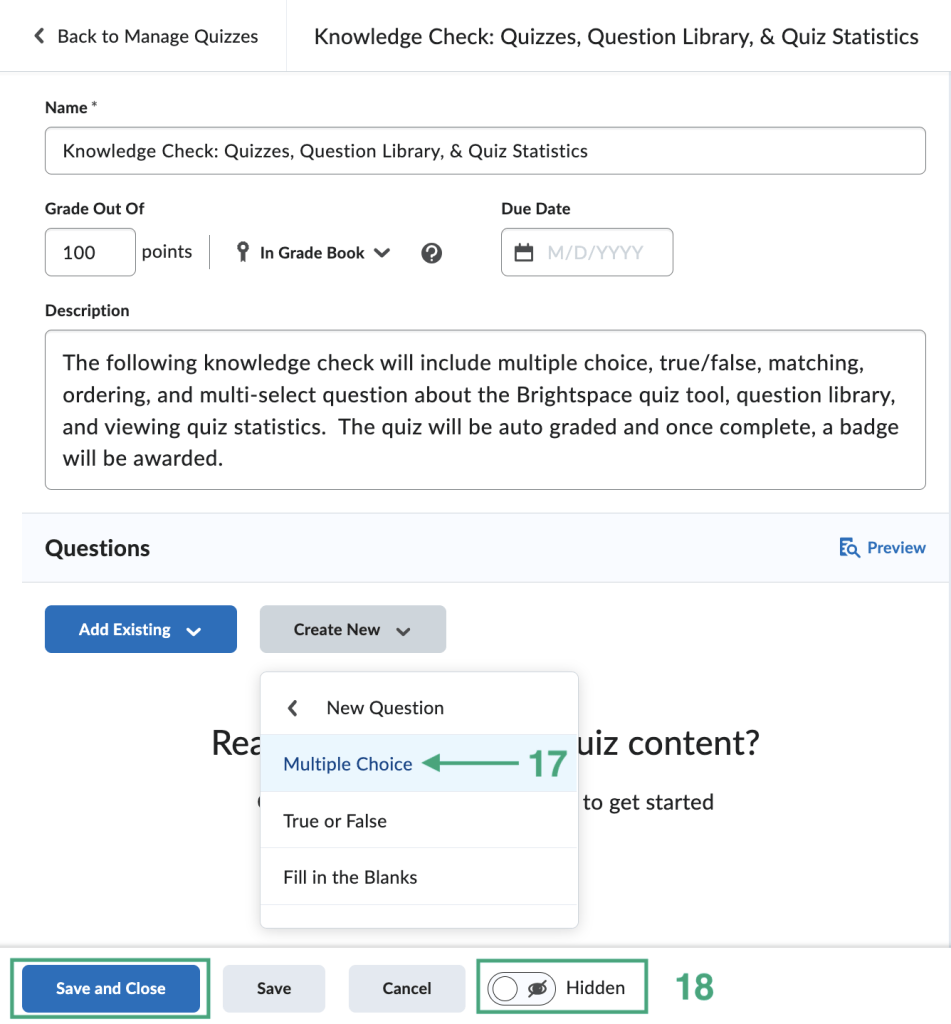
17. From the drop down menu, choose the quiz question type you want to create and then create the question.
18. When complete, toggle on the eye to make this quiz visible to learners and then click Save and Close.
Question Library
What Is The Question Library?
The Question Library is a central repository that stores and archives questions which you can reuse within a course. Creating all of your questions using the Question Library provides organized questions by type and topic, making it easier for you to find questions for your quizzes, surveys, and self assessments.
What You Can Do In The Question Library
- You can create multiple folders within the Question Library to organize your questions by type and topic, making it easier for you to find questions for your quizzes, surveys, and self assessments.
- Import questions into Question Library to consolidate questions created with the Quizzes, Surveys, and Self Assessments tools.
- Re-order or shuffle questions within a folder.
- Import a Question Library folder to a quiz for easy transferability.
- Preview how students will see the question.
- Import Questions from a CSV file.
- Import or Export Questions to and from the Learning Repository.
How To Access The Question Library
1A. On the navigation bar, go to Quick Tools.
2A. From the drop down menu, choose Quizzes.
or
1B. On the navigation bar, go to Course Admin.
2B. From the drop down menu, choose Quizzes.
3. Click the Question Library tab at the top of the screen underneath the navigation bar.
4. You can choose between creating a New Section (option 1: 5A), which will become a folder in the question library, or a New Question (option 2: 5B) with no section by choosing from the available question type drop down list. If you have a CSV file that coordinates with Brightspace, you can Import Question/s from a CSV file, existing questions, or importing from the Learning Repository.
5A. If you chose to create a New Section, type in the Section Title and then type in Section Text if you want a brief description of what type or topic the questions in this section will be about.
Link A Quiz To A Grade Book Item
Step By Step Instruction To Link A Quiz
1. On the edit Quiz page, click Not in Grade Book.
2. From the drop down list, click Edit or Link to Existing.
3 & 4. There are two options: Create And Link To A New Grade Item or Link To An Existing Grade Item. Below are instructions on both options.
- Option 1: Create And Link To A New Grade Item. Choose this option if you have NOT created a grade item already in the grade book.
- 3A. Select the bubble next to Create And Link To A New Grade Item.
- 4A. Select the Category, if applicable, from the drop down list.
- Option 2: Link To An Existing Grade Item. Choose this option if you HAVE created a grade item already in the grade book.
- 3B. Select the bubble next to Link To An Existing Grade Item.
- 4B. From the drop down menu, choose the grade item that correlates with the assignment you just created.
5. Click Save and Close.
Grading How To’s
As the instructor you can automatically grade and export quiz grades to the grade book, manually grade quiz questions, create statistical reports, and assess how learners’ did overall on key concepts within the quiz.
How To Grade Quizzes
Step By Step Instructions To Grade A Quiz
1. Go to Quick Tools on the navigation bar.
2. From the drop down list, select Quizzes.
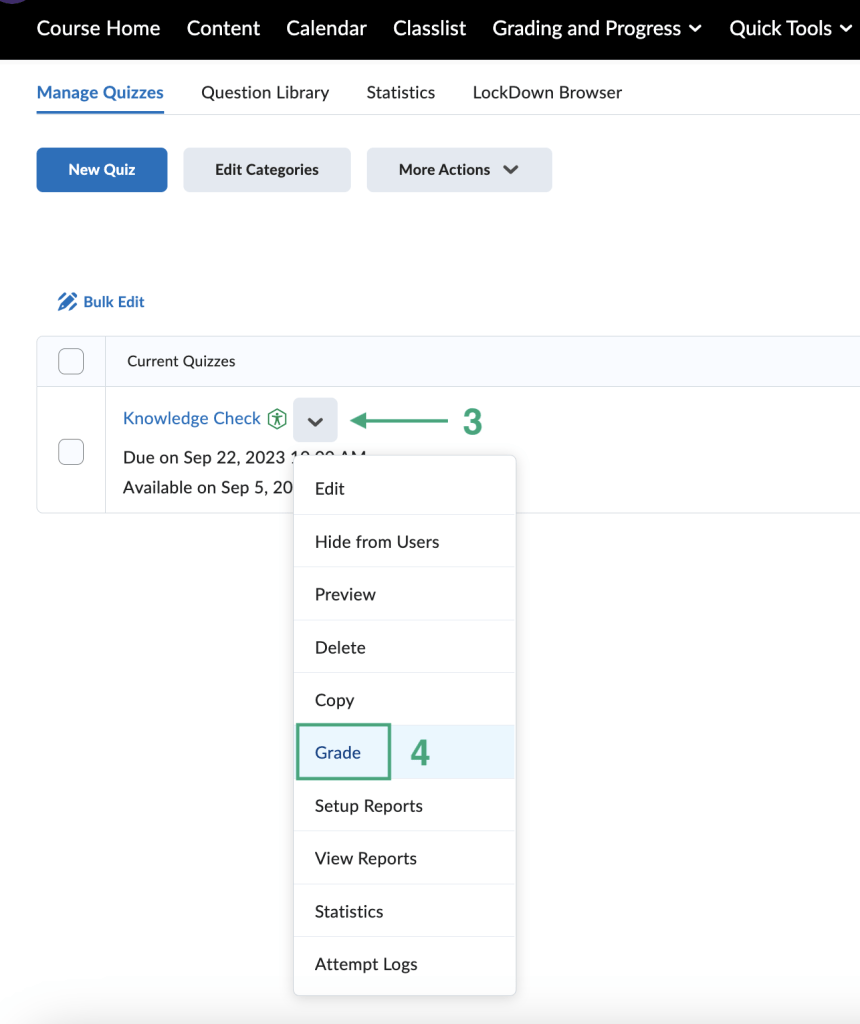
3. On the Manage Quizzes page, find the quiz title to be graded and click the arrow next to the title.
4. From the drop down list, click the Grade option.
5. Click the Users tab to view each student and their quiz attempts.
6. Select Attempt 1 beneath a student’s name to begin grading.
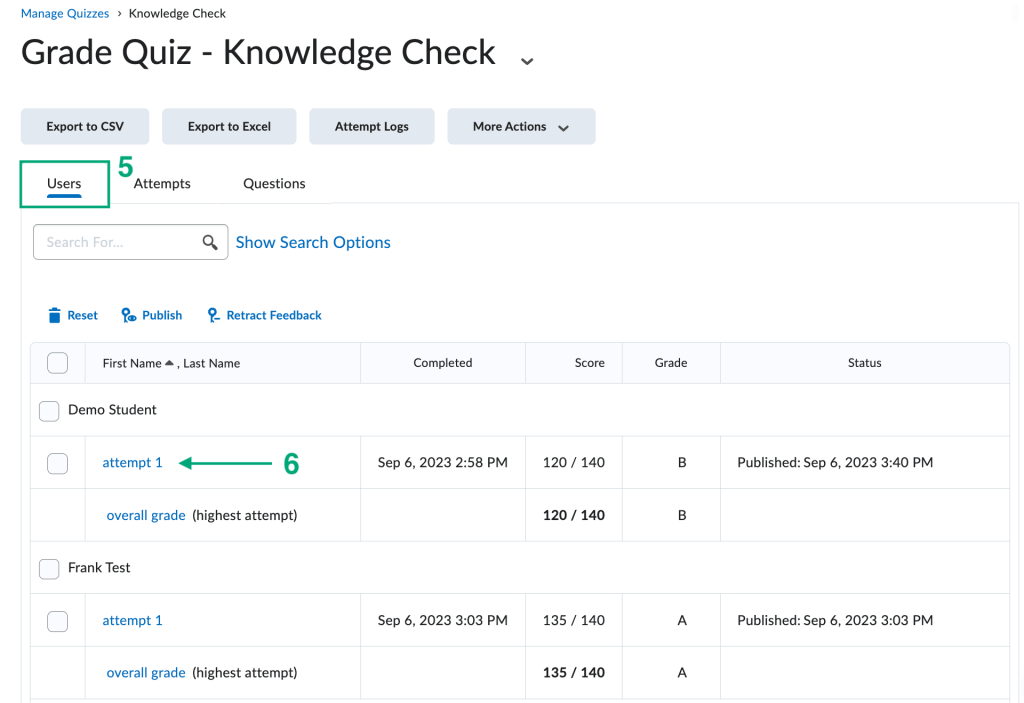
7. Optional: Choose to view attempt 1 or 2 if multiple attempts were allowed.
8. Optional: View all questions or view only questions that could not be auto-graded. For example a written response or short answer question.
9. Optional: Edit the grade for that specific attempt.
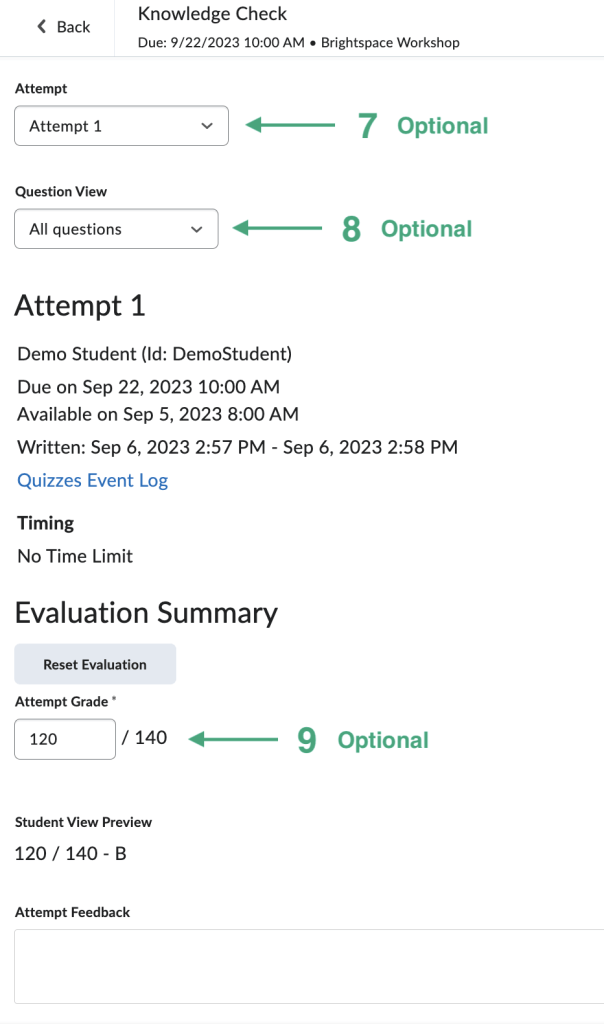
10. Scroll down to view the entire quiz or only specific questions to grade. Check or change grades as needed.
11. Click the Publish button when complete.

Create A Report
About Quiz Reports
You must set up quiz report before you can view or export reports into CSV or a Microsoft Excel file to view the data analysis. To view existing quiz reports, from the quiz context menu, click View Reports.
All statistics are calculated based on a user’s first attempt of the quiz. If a question is changed after attempts have occurred, then only the attempts on the newest version of the question are included in the statistical calculations. Average grade is calculated only for first attempts of the quiz.
Select or deselect the Include exempted users in stats check box to either include or exclude exempted users in quiz statistics.
For all reports, you can set a release date and select roles to release the report to.
Step By Step Instructions To Create A Quiz Report
- Go to Quick Tools on the navigation bar.
- Choose Quizzes form the drop down menu.
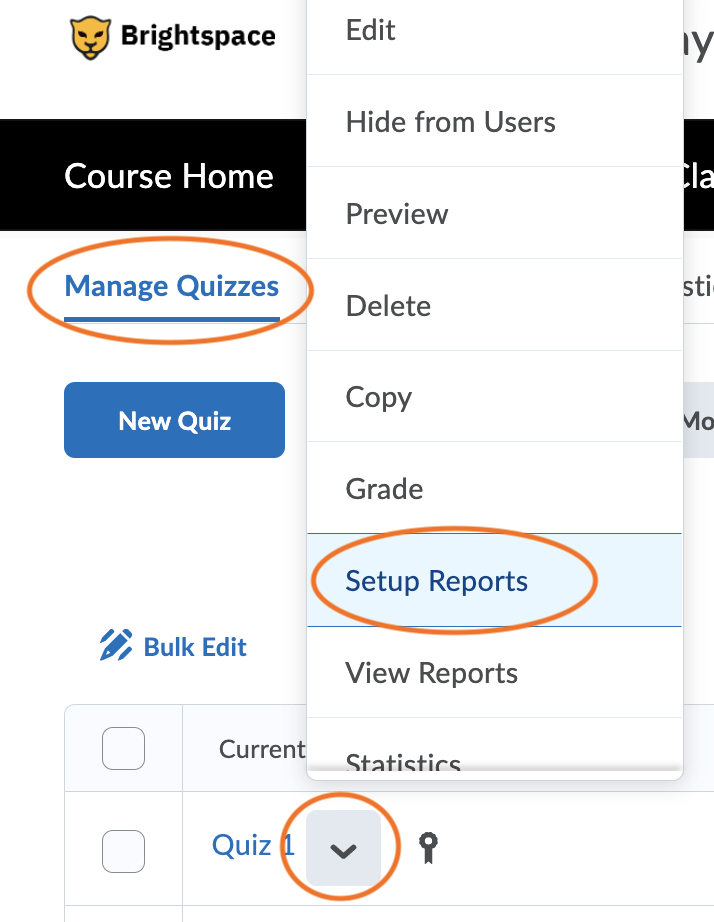
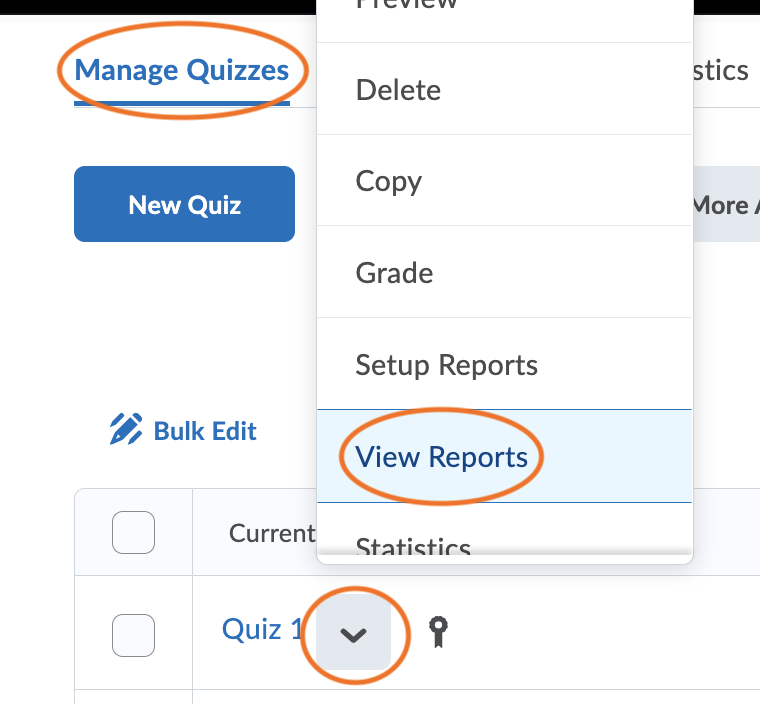
- On the Manage Quizzes tab, find the quiz you want to create a report for.
- Click the drop down arrow next to the quiz title and choose Setup Reports from the drop down menu.
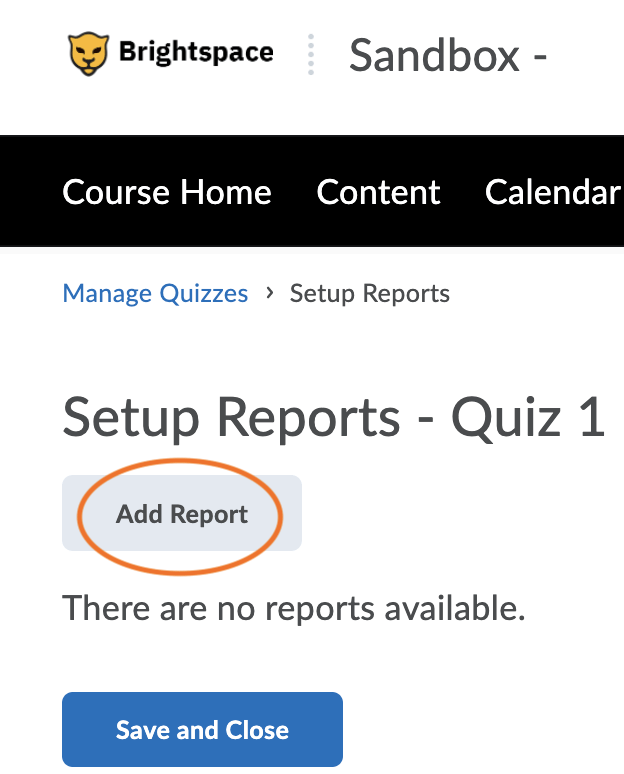
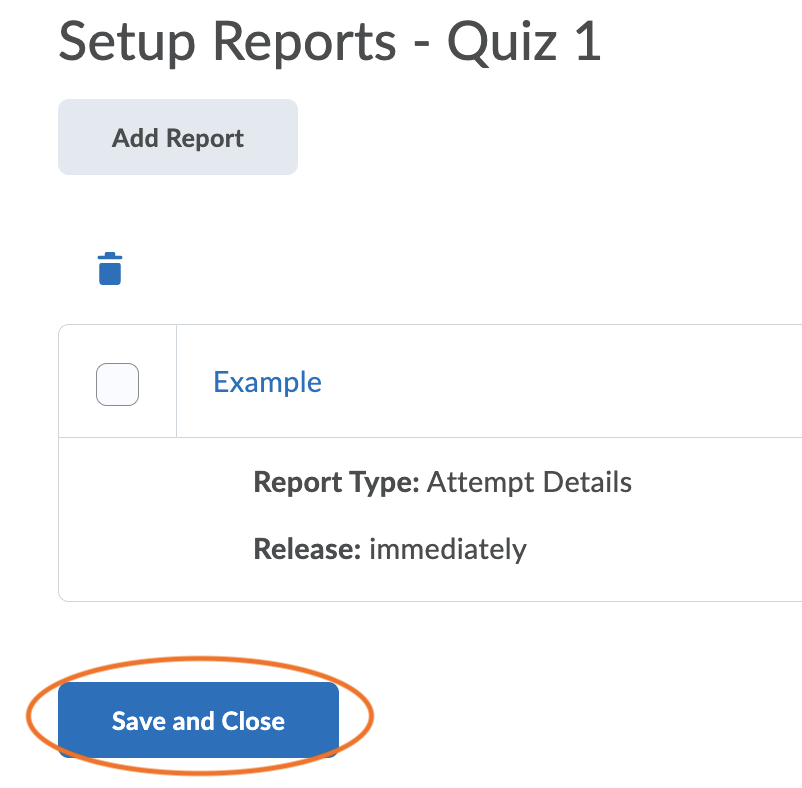
5. On the Setup Reports page, select Add Report.
6. Name the report and then choose from the following options for your report.
- Question Statistics: The average score on questions by points and percentage. You can choose:
- Class average
- Score Distribution
- Bonus Questions
- Out Of value
- Standard Deviation
- Point Biserial
- Discrimination Index.
- Question Details: All of the answers provided for each quiz attempt, how many users chose each possible answer, the total number of responses, and the average score on each question.
- Display difficulty for each question
- Text Responses
- Bonus Questions
- Private Comments From Sections
- Standard Deviation
- Point Biserial
- Discrimination Index
- User Statistics: The class average and standard deviation, grade distribution, and the grade of each user.
- Class Average
- Score Distribution
- Org Defined ID
- Attempt Details: The Org Defined ID, username, first name, and last name of each user. Detailed information about each question. The users’ responses for each question organized by attempt, including how long each attempt took.
- Org Defined ID
- Attempt Duration
- User Attempts: The Org Defined ID, username, first name, and last name of each user. The users’ score for each question in points and percentage organized by attempt, including how long each attempt took.
- Org Defined ID
7. Choose to release the report immediately or on a specific day and time.
8. Choose who you want to release the report to.
9. Click Save.
10. After saving, you’ll be brought back to the Setup Report page.
11. To view the report, on the manage quizzes page, click the arrow next to the quiz title.
12. From the drop down menu, choose View Reports from the drop down menu.
Additional Resources
View Quiz statistics
About Quiz Statistics
You can view and export quiz statistics and reports to a CSV file and/or an Excel file for data analysis.
Note: Quiz statistics are not computed for questions in a Question Pool.
Quiz Statistic Options
1. User Stats: These stats contain performance data by user, including the user’s Org Defined ID, username, first name, last name, quiz score, the value the quiz was graded out of, the user’s score as a percentage, and the class average.
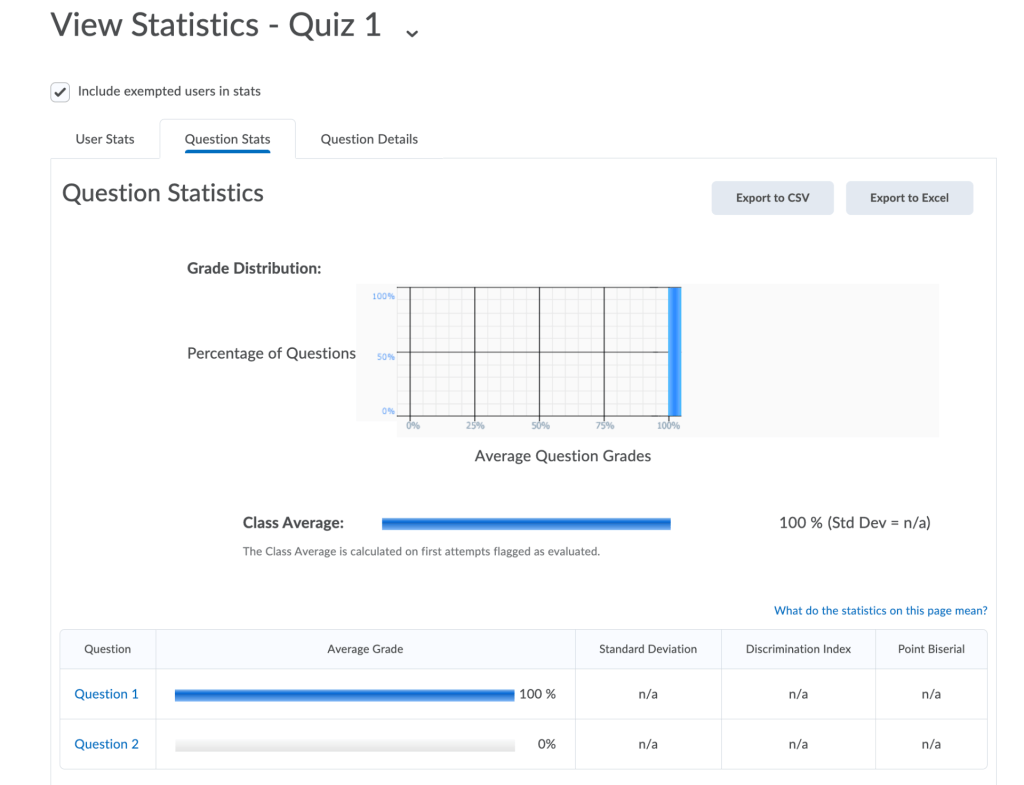
2. Question Stats: These stats contain the question title, text, bonus status, and difficulty level are included in the files so that data can be analyzed without referring back to the learning management system.
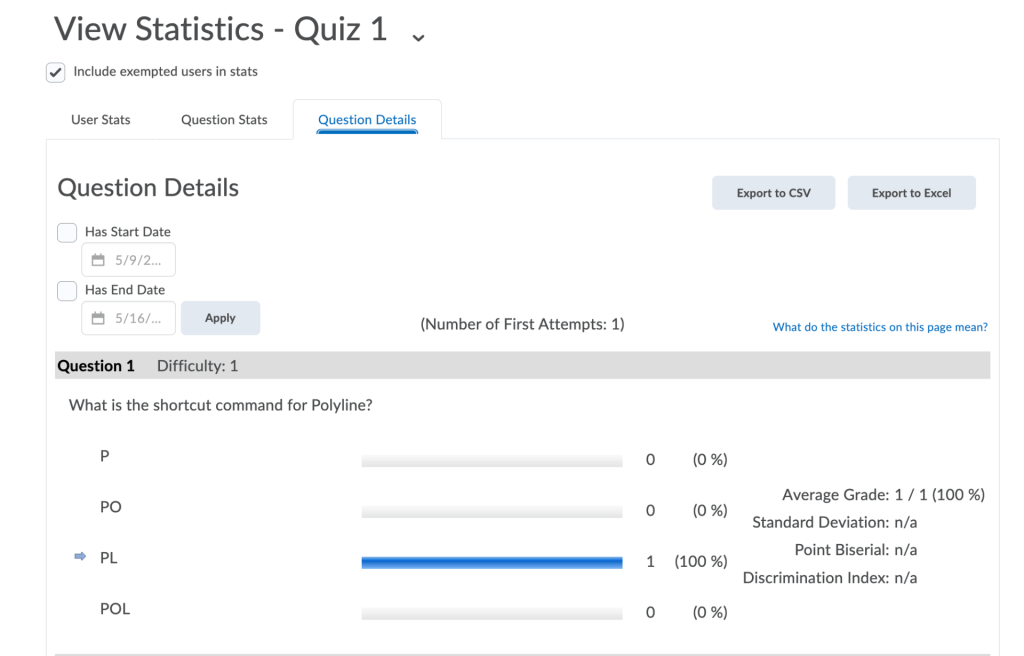
3. Question Details: These stats contain detailed information about each question in the quiz, including a list of all of the answers provided for each quiz attempt, how many users chose each possible answer, the total number of responses, and the average score on the question. Question Details reports can help you evaluate trends in answers and look for questions that were unclear or difficult for a number of users.
Step By Step Instructions To View Quiz Statistics
- Go to Quick Tools on the navigation bar.
- Choose Quizzes form the drop down menu.
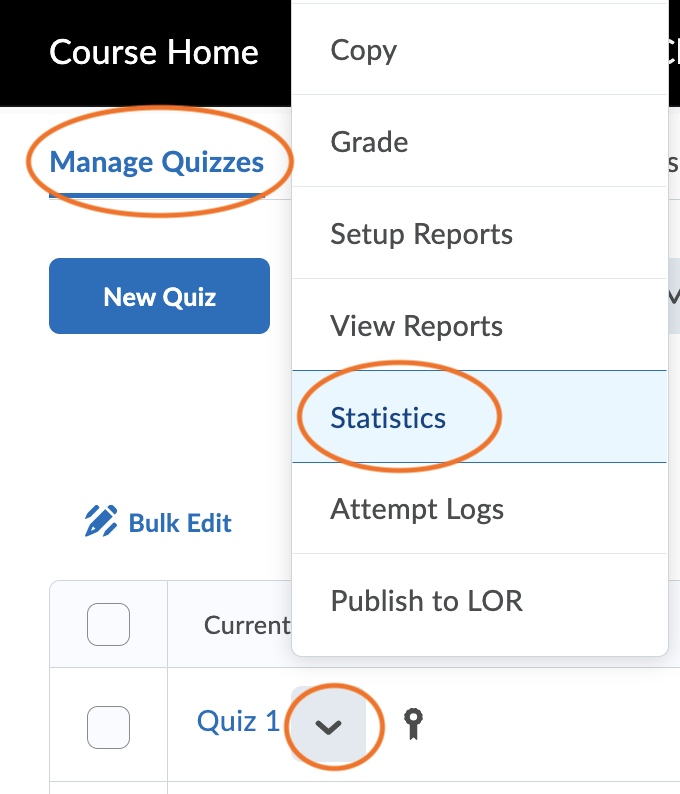
- On the Manage Quizzes tab, find the quiz you want to view quiz statistics for.
- Click the drop down arrow next to the quiz title and choose Statistics from the drop down menu.
5. Choose which statistic you’d like to view and/or export to an excel or CSV.
- User Stats – how learners did on the quiz overall and the class average in graph format.

- Question Stats – how learners did overall and how learners did on each individual question including information on standard deviation, discrimination index, and point biserial in graph format.
- Question Details – how learners did overall and how learners did on each individual question and which percentage of learners chose which question answer option.
6. Once the stat report is chosen, click the grey Export to Excel or Export to CSV button.
Additional Resources
Troubleshoot Your Quizzes
If you’re running into issues with your quizzes, check the following to see if your issue is listed. If it’s not and you need further assistance, please email our team at Teach@wit.edu.
Assign Different Due Dates Or Times
Set Different Due Dates Or Times For Groups, Merged Courses, Or Individuals
Note: If you are currently editing the quiz you want to add special access to, skip to step 4.
1. On the navigation bar, click Grading And Progress.
2. From the drop down list, click Quizzes.
3. On the manage quizzes page, click the title of the quiz you want to create special access to.
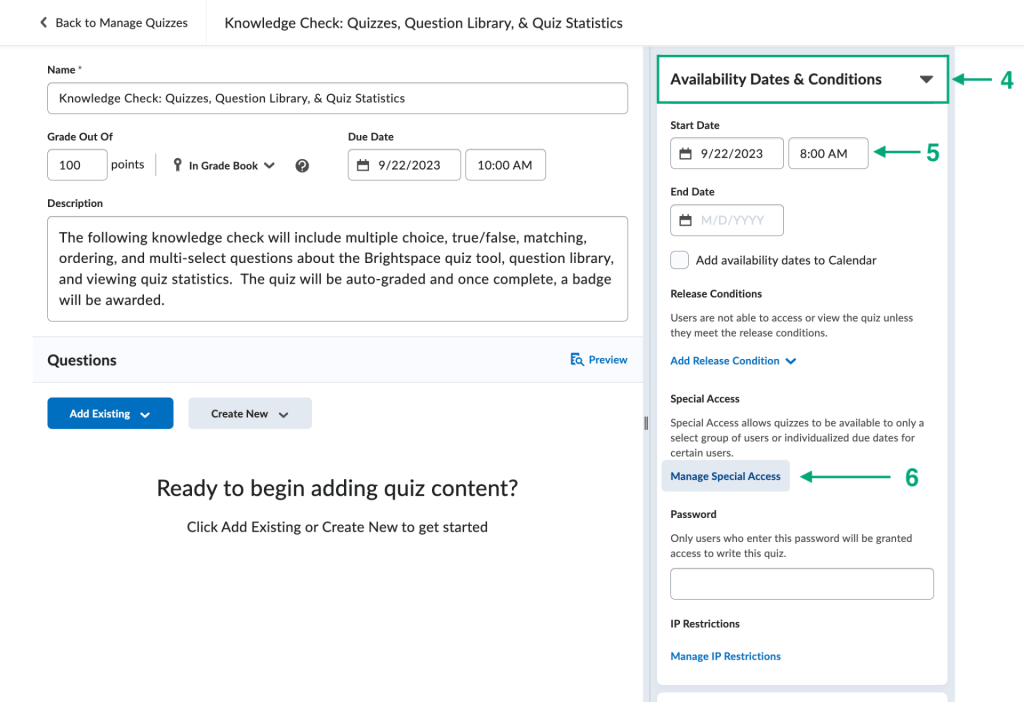
4. On the right side of the edit quiz page, click Availability Dates & Conditions.
5. Choose Start Date and Time. Note: A Due Date and Time need to be chosen.
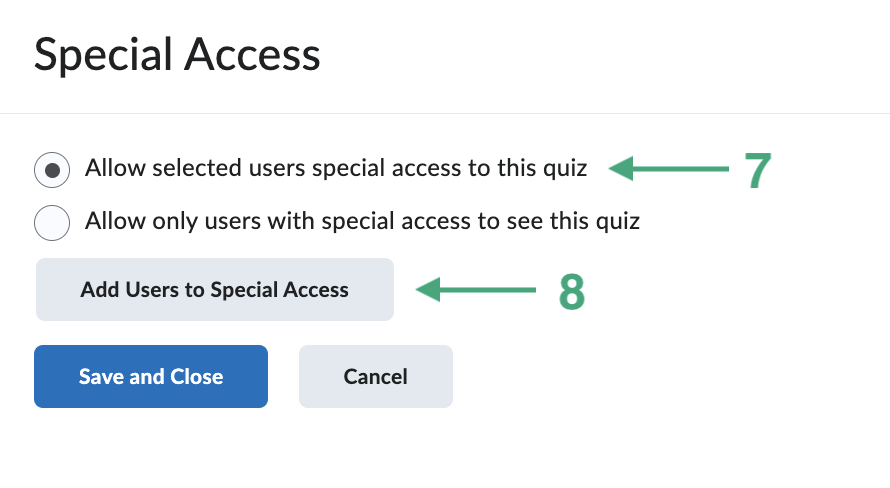
6. Under the Special Access heading, click Manage Special Access.
7. On the Special Access pop-up, click the bubble next to Allow Selected Users Special Access To This Quiz.
8. Click the grey Add Users To Special Access button.
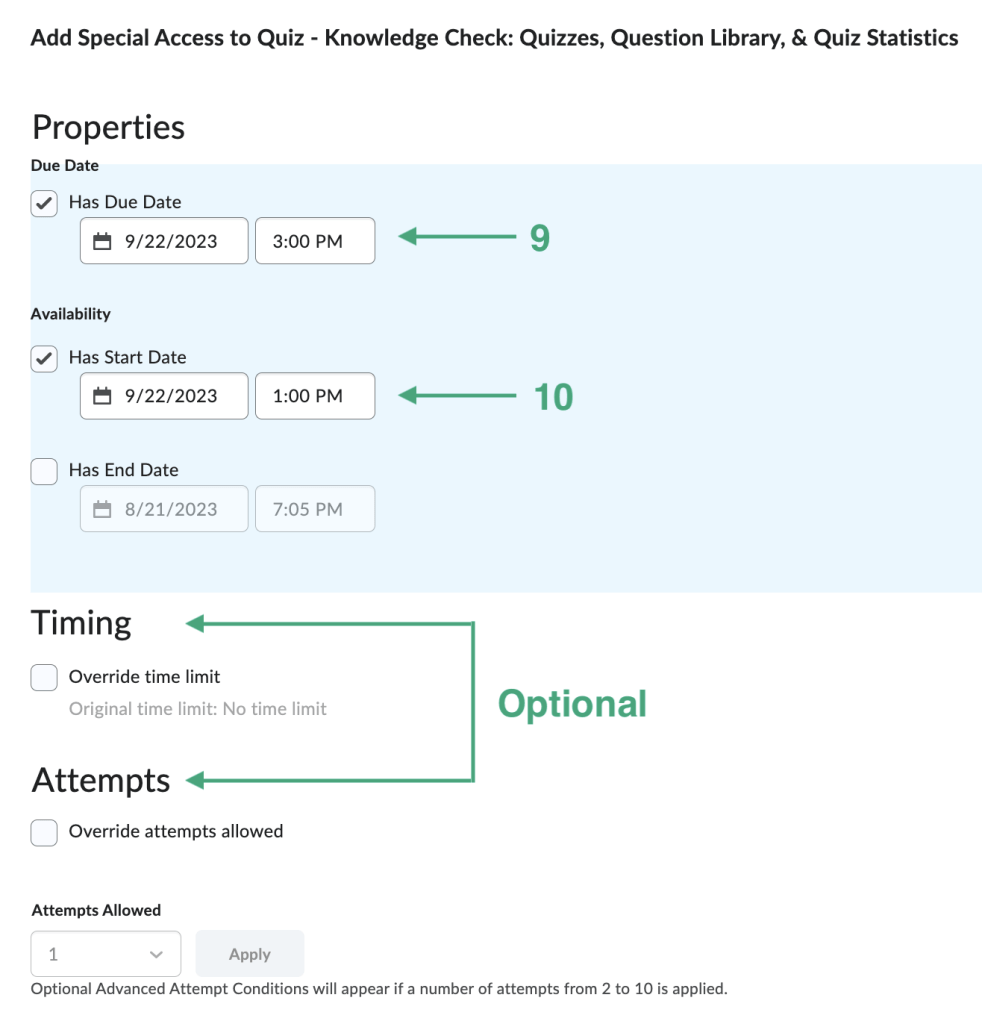
9. On the Add Special Access options page, add in a Due Date and Time.
10. Add a Start Date and Time.
Optional: Change the Timing (override the original time limit if set) or number of attempts allowed.
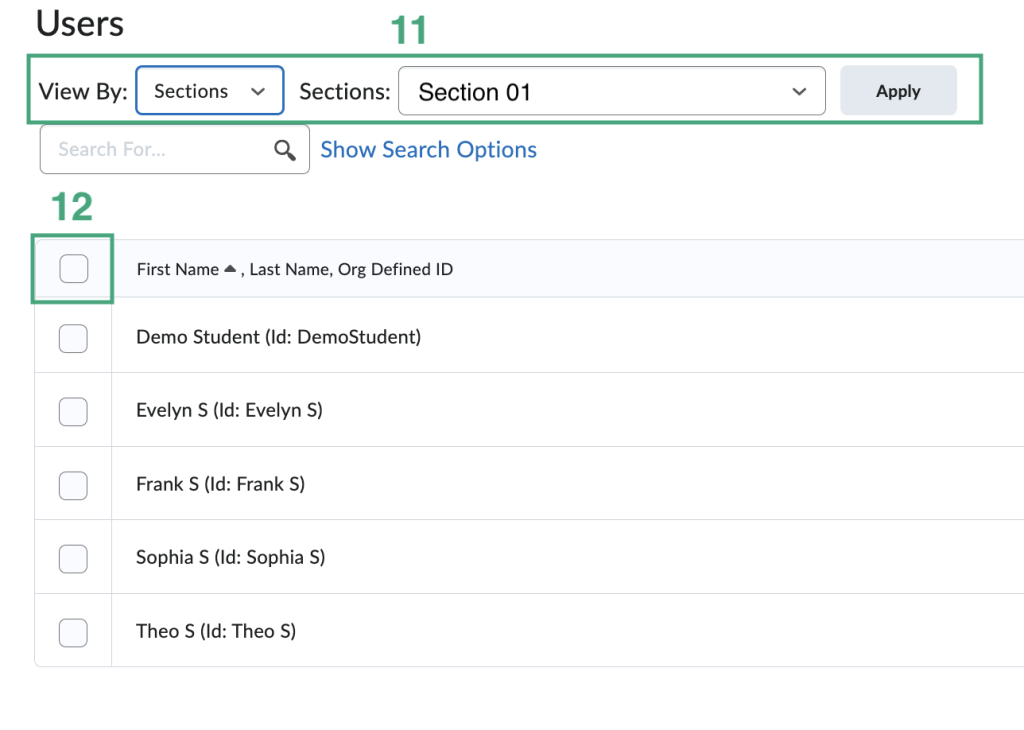
11. Under the Users heading, click the drop down list next to View By and click Sections, click Apply. The section options will populate and find the section that you are giving special access to and click Apply.
12. Check the box next to First Name, Last Name, Org Defined ID to select everyone in that section or click the box next to individual learners’ names.
13. Click the blue Save button.